How-To Geek
How to add a video to a microsoft powerpoint presentation.

Your changes have been saved
Email is sent
Email has already been sent
Please verify your email address.
You’ve reached your account maximum for followed topics.

Quick Links
Embedding videos versus linking to videos, supported video formats in powerpoint, how to insert a video into a powerpoint presentation, manage an embedded video's playback in powerpoint.
Videos can make presentations even more interesting or exciting. If you're looking to add a video to your Microsoft PowerPoint presentation, it's easy to do so. We'll show you how.
In PowerPoint, you can either embed a video or link to a video from your presentation. If you embed a video, your video becomes part of the presentation, which increases the overall size of the presentation file.
Related: How to Send PowerPoint Presentations With an Embedded Video
If you link to a video, PowerPoint only adds a reference to that video in your presentation. The downside of this method is that you need to send the video file separately if you share your presentation with someone. We have written a guide on how to send PowerPoint presentations with videos , so check that out.
In this guide, we'll focus on embedding a video in your presentation so you don't have to worry about sending separate files. And, if you're looking to add a YouTube video to your presentation , there's a way to do that, too.
Related: How to Embed a YouTube Video in PowerPoint
PowerPoint supports multiple video formats, including ASF, AVI, MP4, M4V, MOV, MPG, MPEG, and WMV. If your video is already in one of these formats, you can quickly add that to your presentation.
If your video is in another format, you can convert it to a supported format and then add it to your presentation.
Related: How to Use Handbrake to Convert Any Video File to Any Format
First, make sure the video you want to add to your presentation is saved on your Windows or Mac computer. Then, open your presentation with PowerPoint on your computer.
On the PowerPoint window, in the left sidebar, click the slide in which you want to add a video.

At the top of the PowerPoint window, click the "Insert" tab.

In the "Insert" tab, under the "Media" section (which is to the extreme right side of the interface), click "Video."

You'll now see an "Insert Video From" menu. Here, select "This Device."

Your computer's standard "open" window will open. In this window, access the folder that has your video file. Then double-click your video file to add it to your presentation.

You'll see your selected video in your presentation. To resize this video, click it and use the handles around the video to change its size. Then drag the video to place it at its desired location in your slide.

If you'd like to test the video, at the bottom-left corner of the video, click the play icon.

And you're all set.
Now that you have added a video to your presentation, you might want to change how it plays in your slides. In PowerPoint, you have multiple ways to change your video's playback.
To access these playback options, first, click your video in your presentation. Then, at the top of the PowerPoint window, click "Playback."

In the "Playback" tab, under the "Video Options" section, you will find various options to manage your video's playback.

For example, to change how your video starts to play in your presentation, click the "Start" drop-down menu and select one of these options:
- In Click Sequence : This plays your video in the click sequence. This means if you press the button for the next slide, your video will play.
- Automatically : This option automatically plays your video when the slide with your video opens.
- When Clicked On : Select this option to play your video only when you click it.

The other options are "Play Full Screen," which opens your video in full screen, and "Loop Until Stopped" that plays your video over and over again until you manually stop it.
Before you close PowerPoint, make sure you save your presentation so that your embedded video is saved with it. Do this by clicking File > Save in PowerPoint's menu bar.

And that's how you make your PowerPoint presentations even more engaging by including videos in them. Exciting!
If you don't want to add a video but you do want audio, you can add music to your presentations . This also helps enhance your presentation quality.
Related: How to Add Music to Your PowerPoint Presentation
- Microsoft Office
- Microsoft PowerPoint
- PRO Courses Guides New Tech Help Pro Expert Videos About wikiHow Pro Upgrade Sign In
- EDIT Edit this Article
- EXPLORE Tech Help Pro About Us Random Article Quizzes Request a New Article Community Dashboard This Or That Game Happiness Hub Popular Categories Arts and Entertainment Artwork Books Movies Computers and Electronics Computers Phone Skills Technology Hacks Health Men's Health Mental Health Women's Health Relationships Dating Love Relationship Issues Hobbies and Crafts Crafts Drawing Games Education & Communication Communication Skills Personal Development Studying Personal Care and Style Fashion Hair Care Personal Hygiene Youth Personal Care School Stuff Dating All Categories Arts and Entertainment Finance and Business Home and Garden Relationship Quizzes Cars & Other Vehicles Food and Entertaining Personal Care and Style Sports and Fitness Computers and Electronics Health Pets and Animals Travel Education & Communication Hobbies and Crafts Philosophy and Religion Work World Family Life Holidays and Traditions Relationships Youth
- Browse Articles
- Learn Something New
- Quizzes Hot
- Happiness Hub
- This Or That Game
- Train Your Brain
- Explore More
- Support wikiHow
- About wikiHow
- Log in / Sign up
- Computers and Electronics
- Presentation Software
- PowerPoint Insertions
5 Ways to Embed a Video File in Microsoft PowerPoint
Last Updated: June 14, 2024 Fact Checked
Embedding a Web Video
Embedding a video file, embedding a stock video, using android, linking movie files (powerpoint 2007).
This article was co-authored by Mitch Harris and by wikiHow staff writer, Rain Kengly . Mitch Harris is a Consumer Technology Expert based in the San Francisco Bay Area. Mitch runs his own IT Consulting company called Mitch the Geek, helping individuals and businesses with home office technology, data security, remote support, and cybersecurity compliance. Mitch earned a BS in Psychology, English, and Physics and graduated Cum Laude from Northern Arizona University. This article has been fact-checked, ensuring the accuracy of any cited facts and confirming the authority of its sources. This article has been viewed 1,145,476 times.
If you want to spruce up your PowerPoint presentations, you can add a video to your slides. If you have a video file on your computer, you can easily embed it into your presentation. You can also embed YouTube videos, use looping stock videos, or, on older versions of PowerPoint, link to the videos. This wikiHow will show you how to add a video to Microsoft PowerPoint using your Windows, Mac, or Android device.
The Best Ways to Embed a Video in PowerPoint
- Copy a YouTube URL. In PowerPoint, click "Insert' → "Video" → "Online Videos/Movie". Paste the URL and click "Insert".
- To embed a video file, click "Insert" → "Video" → "This Device" → select a file → "Insert".
- To use a stock video, click "Insert" → "Video" → "Stock Videos" → select a video → "Insert".

- You must have a subscription to use Office 365 . [1] X Trustworthy Source Microsoft Support Technical support and product information from Microsoft. Go to source
- Adding a video to your PowerPoint can help you make a great presentation .

- You can insert a video from supported websites such as: YouTube, SlideShare, Vimeo, Microsoft Stream, and Flip.

- On Mac, this will look like Online Movie .

- You'll see a preview of the video.

- To adjust when the video plays, click the drop-down menu next to Start: . Select In Click Sequence , Automatically , or When Clicked On .
- Check the boxes to apply any of the following: Play Full Screen , Hide While Not Playing , Loop until Stopped , and/or Rewind after Playing .
- Click Volume to adjust the video's volume. Select Low , Medium , High , or Mute .

- Select the web video and click the Video Format tab.
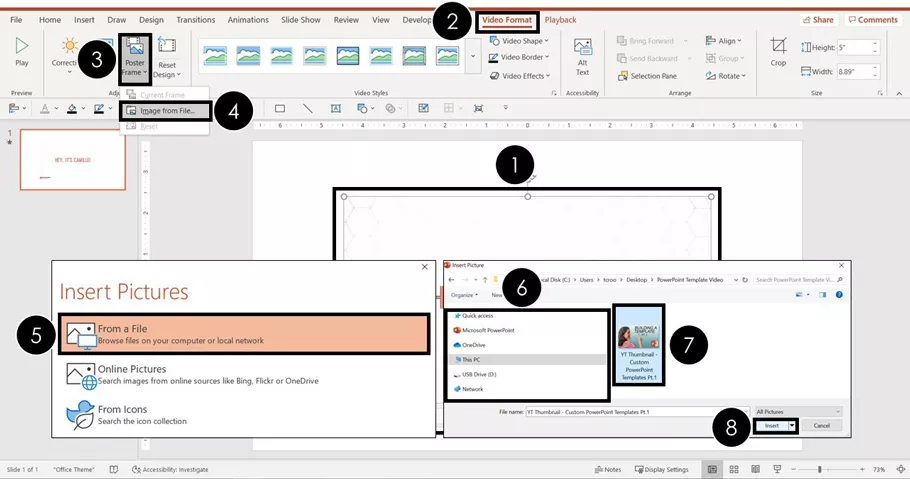
- Click Poster Frame on the left of the toolbar.
- Click Image from File… .
- Select From a File , Stock Images , Online Pictures , or From Icons .
- Select the image source from the chosen method, and then click Insert .

- Stock videos work best as a background graphic to your PowerPoint text, since these videos loop seamlessly

- The stock video will be added to your slide. By default, it will cover the entire slide.

- PowerPoint is available for Android in the Google Play Store .

- The menu will open.

- If you want to take a video using your camera, tap Open Camera instead.
- The video file will be added to your PowerPoint.

- Videos can only be "embedded" (included in the presentation file itself) in PowerPoint 2010 or newer.

- Click the Office button and select "Publish."
- Select "Package for CD" and then select your presentation.
- Ensure that "Linked files" is selected in the "Options" menu.
Community Q&A
Tips from our Readers
- In the newest version of PowerPoint, to embed a YouTube video, all you have to do is go to insert, video, online video and then paste the link for the video.
You Might Also Like

- ↑ https://support.microsoft.com/en-us/office/insert-a-video-from-youtube-or-another-site-8340ec69-4cee-4fe1-ab96-4849154bc6db#OfficeVersion=Windows
- ↑ https://support.microsoft.com/en-us/office/insert-audio-or-video-in-powerpoint-for-android-95e0a2af-35fb-405a-8536-cdcd934f659a
- ↑ https://support.office.com/en-us/article/My-movie-doesn-t-play-190cf574-183d-4b7f-b627-3783a14b7b07?ui=en-US&rs=en-US&ad=US
- ↑ https://support.office.com/en-us/article/Add-and-play-a-movie-in-a-presentation-f3fcbd3e-5f86-4320-8aea-31bff480ed02
About This Article

1. Open the slide. 2. Click Insert . 3. Click Movie . 4. Click Movie from File or Video on my PC . 5. Select the video and click OK . 6. Click Playback . 7. Choose how to play the video. 8. Save your presentation. Did this summary help you? Yes No
- Send fan mail to authors
Reader Success Stories
Rjan Berglund
May 26, 2017
Is this article up to date?

Jun 20, 2017
Nov 7, 2016
Jul 27, 2016

Featured Articles

Trending Articles

Watch Articles

- Terms of Use
- Privacy Policy
- Do Not Sell or Share My Info
- Not Selling Info
wikiHow Tech Help Pro:
Level up your tech skills and stay ahead of the curve
How to embed a video in PowerPoint for a more engaging presentation

What type of content do you primarily create?

Making an engaging PowerPoint presentation is no easy feat.
You have to figure out what to say, and what you want your audience to grasp. Then, decide how to bring the two together to deliver a compelling presentation.
One popular way to add flair is by embedding video into the content, like what Dr. Frans de Waal did in his TED Talk on inequity aversion . To emphasize his points, he included videos of animal experiments, turning a mind-numbingly boring topic into an engaging and viral presentation—which now has over 5 million views.
In this step-by-step guide, you’ll learn how to embed a video in PowerPoint so you can create exceptional presentations that grab your audience’s attention and help them remember what you said.
How to embed a video in PowerPoint from your PC or Mac
First, of course, you’ll need a video, either one online or from your media library. The next step is to find a way to make it play during your PowerPoint presentation. You could do it manually by bringing up the video from another website or program while you’re speaking, but that process is clunky and you might end up facing technical challenges.
Luckily, there are simpler and easier methods of embedding videos in PowerPoint. You can link to your video file externally or embed it directly in your presentation.
Use the tutorial below to insert videos in PowerPoint from a computer.
How to embed a video in PowerPoint in Windows
Step 1: select the powerpoint slide.
Launch Microsoft PowerPoint on a Windows computer and open a blank or existing PowerPoint file.
Then, go to the slide you want to embed a video and select the Insert tab in the toolbar.
Step 2: Click Video > This Device
Select the Video option. Here, you can either embed a video from your computer or from an online source, like a website or YouTube and other supported platforms.
Click This Device from the drop-down menu to embed a video from a folder on your computer.
PowerPoint supports MP4 files encoded with H.264 video and AAC audio. So, you can upload videos in file formats, such as M4V, MOV, ASF, AVI, MPG, MPEG, or WMV.
If you don't want to play a video full screen, resize it to your preferred dimensions.
For precise height-to-width proportions:
- Select Format (PowerPoint 2013 or newer) or Options (PowerPoint 2010) in the Size group
- Click the Dialog Box Launcher Icon image
- Click Size, then select the Lock aspect ratio checkbox under Scale
- Enter your preferred height and width under Size and rotate or enter the percentage of size that you want in the Scale height and width boxes
Then, select Video Format to access formatting options like borders and effects or right-click the video for more options. You can also use the Designer tool to choose from professional slide templates.
Then, click the Playback tab to trim your video, add captions, choose playback options, like In Click Sequence, Automatically, or When Clicked On.
Note: In PowerPoint for Microsoft Office 365 or PowerPoint 2016 version 1709 or later, you can use the In Click Sequence option. This way, your video can play in sequence with other actions you’ve programmed on the slide, like animations or transitions.
To insert a web video, select Video > Online Videos .
Note: PowerPoint supports YouTube, SlideShare, Vimeo, Stream, and Flip video providers.
Step 3: Click Insert
If you choose to embed an online video, copy the link to the video you want to embed and paste it in the blank field. A preview of your video will appear in the Insert video pop-up.
Click the Insert button to embed the video in your presentation.
PowerPoint will download and insert the video on the selected slide. You can drag the edges of the video thumbnail to resize it, then use Video Format options, like shape, border, and effects to enhance the video.
Select the Playback tab to insert captions or choose how your video plays (automatically or when clicked).
Note: You can’t change when an online video starts. But if you’re embedding a YouTube video, you can copy the video URL at the current time to link from a specific start time.
Click the Slide Show tab to preview the video with all the formatting changes you made. Then, save your presentation to your computer or click the Share button to move or copy it to the cloud.
How to embed a video in PowerPoint on a Mac
To embed a video in PowerPoint for Mac, you’ll need to save the video file in the same folder as your presentation.
Launch PowerPoint and open a blank or existing presentation, then select the slide you’d like to add a video to.
Select Insert .
Step 2: Click Video > From File
Click Video to access video embed options from the drop-down menu:
- Video browser
- Video from file
- Stock videos
- Online film
Select Video from file to insert a video file from your Mac.
In the Choose a Video dialog box, select the video file you want to insert, then click the Insert button to embed the video on the slide.
If you want to put a link to the video on the slide, click Show Options in the lower left corner of the dialog box.
Then, select the Link to file box, and click Insert .
Select the Video Format tab to add effects and choose whether your video will play automatically or when clicked.
Tip: If you’re using the 2016 version of PowerPoint (or newer), you can play back videos with multiple audio tracks. These versions also support closed captions and subtitles embedded in video files.
Select the Playback tab to do the following:
- Trim your video
- Add fade in and fade out effects
- Play the video on full screen or hide during the show
- Insert captions
- Select start time options (in click sequence, automatically, or when clicked)
- Loop the video to play repeatedly and continuously during the presentation
- Rewind your video
How to embed a video in PowerPoint from YouTube
Embedding a YouTube video to a PowerPoint presentation is simple. You can use the video URL or integrated search function to embed a video you uploaded to YouTube or someone else’s video (with permission).
To add a video to your PowerPoint presentation, you’ll copy the video embed code and paste it into the slide you want. The code will load the video at the source and play it on the platform you’re using.
You won’t need to download and upload the video from YouTube and the video will load and play faster regardless of the file size. Plus, you can share video content that’s covered under copyright, so you’re not in danger of crossing any legal lines.
Follow these steps to embed a video in PowerPoint from YouTube on a Windows PC or Mac.
How to embed a video in PowerPoint from YouTube in Windows
Step 1: click “insert video”.
Open a PowerPoint presentation and select the slide you want to embed your video.
Click Insert > Video .
Step 2: Choose “Online video”
Select the Online Videos option.
Step 3: Insert the URL from YouTube
Right-click the video to copy the video link or embed code, or click Share to get the embed code. Then, paste the URL or embed code in the link field.
A preview of your video will appear in the Insert video dialog box.
Click Insert to embed the video in your presentation.
Resize the video thumbnail, then use the video formatting options to enhance it.
Click Playback play the video automatically or when clicked or add captions. Then, preview the video with all the edits you made and save or share your presentation.
Note: YouTube’s video file formats are similar to those PowerPoint supports, so your video will likely play without issues. However, YouTube supports some formats that PowerPoint doesn’t, including FLV, 3GPP, WebM, DNxHR, ProRes, HEVC (h265), and CineForm. If your video isn’t playing, check to make sure it’s a supported file format.
How to embed a video in PowerPoint from YouTube on a Mac
Step 2: choose “online film”.
Select Online Film .
A URL pop-up will appear prompting you to enter the link to the YouTube video.
Go to YouTube and copy the link or embed code of the video you want to embed in your presentation. You can right-click the video and select copy video URL or copy embed code, or click Share and copy the video link or embed code.
Paste the video link or embed code in the URL pop-up in your PowerPoint presentation, then click Insert .
Resize your video and polish your slides before saving the presentation to your computer.
How to insert a video file link in PowerPoint
Embedding a video in PowerPoint may be convenient, but it increases the size of your presentation.
To reduce your presentation file size, insert a video file link to create a linked video. The downside with linked videos is that links can break, but you can prevent this by copying and storing your presentation and linked videos in the same folder, then linking to the video there.
Ensure you have a stable internet connection, then use the steps below to insert a video file link in PowerPoint on a PC or Mac.
Insert a video file link in PowerPoint on a PC or Mac
Step 1: take a screenshot of the video.
Find the video you want to link to in PowerPoint and take a screenshot of the clip.
To take a screenshot in Windows, you can either use the Snipping tool, press the PrtScn (print screen) key and Windows Logo key on your keyboard.
If you’re using a Mac computer, you can take a screenshot by pressing and holding SHIFT + COMMAND + 3 keys together (for full screenshot) or SHIFT + COMMAND + 4 keys to screenshot a specific area.
Step 2: Insert the screenshot in your presentation
Alternatively, navigate to the slide you want to add your screenshot to, select Insert > Pictures > Picture from File . Then, find the screenshot you took, select Insert to add it to the slide, then crop, resize, and position it to your liking.
Step 3: Hyperlink the image to your video
Right-click the image and select Link .
If your video is in Descript, copy the video link from your dashboard.
Insert the video link in the address field then click OK .
The hyperlink will be connected to the image itself, not other elements on the slide or the entire slide.
Click Slide Show to test your video and ensure it links to the right video. When you click on the image, it will open in a web browser, ready for you to play.
Why can’t I embed a video in PowerPoint?
Embedding videos to a PowerPoint presentation is a straightforward process, but sometimes the video may fail to play. Let’s review some reasons for playback failure and how to resolve them.
Video playback issues
Video playback may fail in PowerPoint if:
- The storage folder is corrupt
- The video’s audio is out of sync
- The video file is corrupt, damaged, in an unsupported file format, or missing certain files
How to fix: Convert your video into a supported file format, check PowerPoint playback settings, or make the video visible by unchecking the Hide while not playing option in the playback tab. You can also save your presentation using the PPT or PPTX extension, so it’s easier to open the file in older or modern Office versions.
File size and compatibility
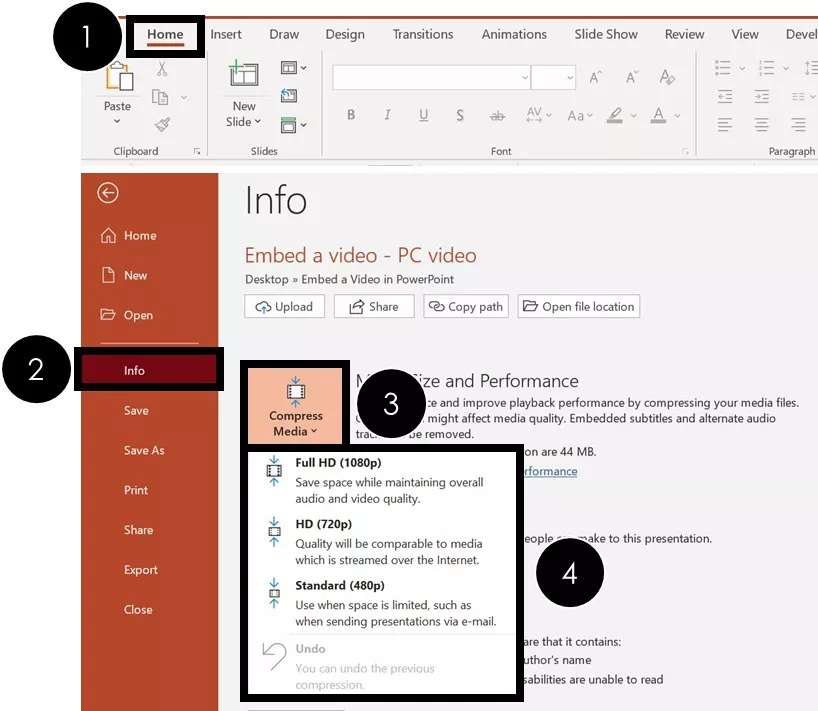
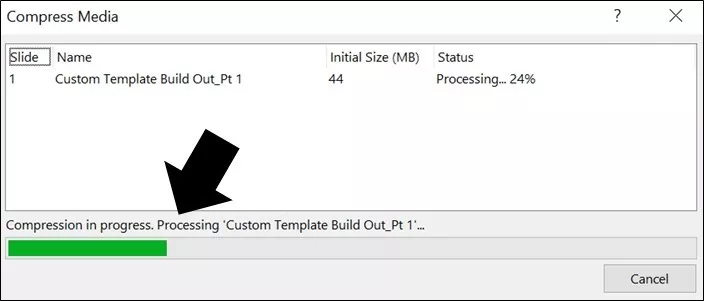
Your video might not play if the file is too big. To resolve this issue, compress the media file by going to File > Info > Compress Media. Then, select one of these options:
- Presentation quality/full HD: Adjusts the video size while maintaining its quality.
- Internet quality/HD: Saves on space and video quality.
- Low quality/Standard: Saves more space but doesn’t keep overall video and audio quality. This option is ideal if you want to share the presentation with others and ensure your videos will still play.
If your video file is incompatible with PowerPoint, it may be in an unsupported file format or missing a codec.
How to fix: Convert the video to a supported format or add a missing codec to your computer for smooth playback.
Broken links
When adding an online video, you might accidentally enter an incorrect link or the video link may be broken at the source. This means it won’t embed correctly and won’t play when you’re presenting.
How to fix: Before inserting or embedding an online video, install the required updates for your version of PowerPoint and check that you’ve copied the right link. Then, test your video to ensure it plays on any device.
Make the best videos to embed in PowerPoint with Descript
Embedding a video in PowerPoint is a pretty simple process with several benefits for you and your audience. To prevent yawns and glazed-over eyes, you’ll need professional-quality videos that will draw your audience in, keep them engaged, and improve message recall.
Descript’s audio and video editing software lets you record, edit, and publish studio-grade videos to YouTube, then embed them in your PowerPoint presentations in a few clicks.
Plus, Descript’s AI-powered automatic transcription generates high-quality transcripts from your video’s audio, which you can use as notes while making your presentation. You can also use Descript’s AI features to get text summaries, auto-generate copy for social media posts, and enhance your audio with Studio Sound .
Take Descript for a spin today to make quality videos that will help you deliver exceptional PowerPoint presentations.
Related articles
.webp)
Featured articles:

6 podcast editing tips for a better interview podcast
Make your interview stand out from the pack with these tips about hooks, narrative, and other smart editing lessons.

How to make a video essay: A guide for beginners
Learn how to craft compelling video essays. This beginner's guide covers everything from thesis creation to editing and publishing.

Product Updates
Descript Season 7: Rooms, Zoom & Automatic Multicam
Descript's newest release makes recording and editing video with multiple people easier than ever.

How to create a YouTube channel trailer (and do you need one?)
A good YouTube channel trailer tells viewers what you do and why they should subscribe. But some top YouTubers don't have one. Should you?

Podcast grants 101: How to get funding for your show
Podcasts cost money, and podcast grants can help. Discover the various grants available and essential tips for a successful application.

5 ways to boost audience retention on YouTube from real creators
Learn how MrBeast and other high-performing creators boost audience retention on YouTube with 5 tricks to keep viewers watching.
Articles you might find interesting
Descript storyboard: what's new for podcasters.
Descript Storyboard release is focused on video, but it also contains some exciting new features for podcasters and audio creators

Video post-production: Tips to master video editing
Video post-production is where raw footage turns into magic. Learn the stages of post-production, from color correction to audio editing to motion graphics.

From audio to text: uncovering the best transcription software in 2024
Transcription tools can save you time, money, and manual labor. Check out our top picks for the best transcription software to add to your tech stack.

Learn How to Add Music in a Video and Up the Production Value
Want to know how to add music to a video? Learn how to do that here with Descript’s Script Editor.

How to Turn Audio Into Text With 9 Great Transcription Services
The best transcription services help you easily transcribe audio and video into text that’s legible. Here's a breakdown of some of the leading options out there to accomplish your transcription.

What's New in Descript Podcast Studio
Last week we made a few big announcements, including the latest Descript release: a full multitrack podcast production studio. (Relaunch the app to update, or download here.)
Join millions of creators who already have a head start.
Get free recording and editing tips, and resources delivered to your inbox.
Related articles:
Share this article

How to Embed a Video in Powerpoint (From Drive & YouTube)
Last updated on 21st February 2022
Imagine this: you’re giving a presentation to your boss, a potential new client, or an important customer. You’re in a groove, and things are going well. Best of all, you’ve got a killer video coming up in your presentation that’s sure to get them excited. But suddenly, you get to your video in your PowerPoint and it wont play.
You lose focus, stumble around to find the video elsewhere (or forego playing it at all), and lose the attention of your once captive audience.
We’ve all been there, and unfortunately, technical difficulties with video can be a huge buzz kill for presenters and audiences alike.
But, when it’s done right, video has the ability to amp up a presentation, get a crowd excited, and share a powerful message with your viewers.
So how do you prevent this all-too-common mishap from ruining your next presentation? Here’s a step-by-step guide to how to embed a video in PowerPoint three different ways.
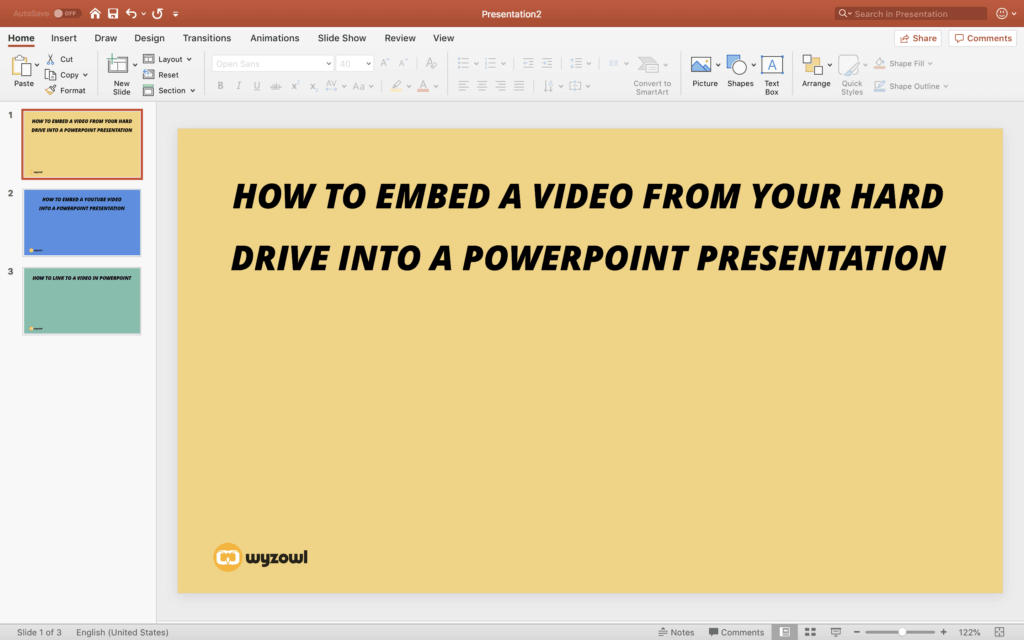
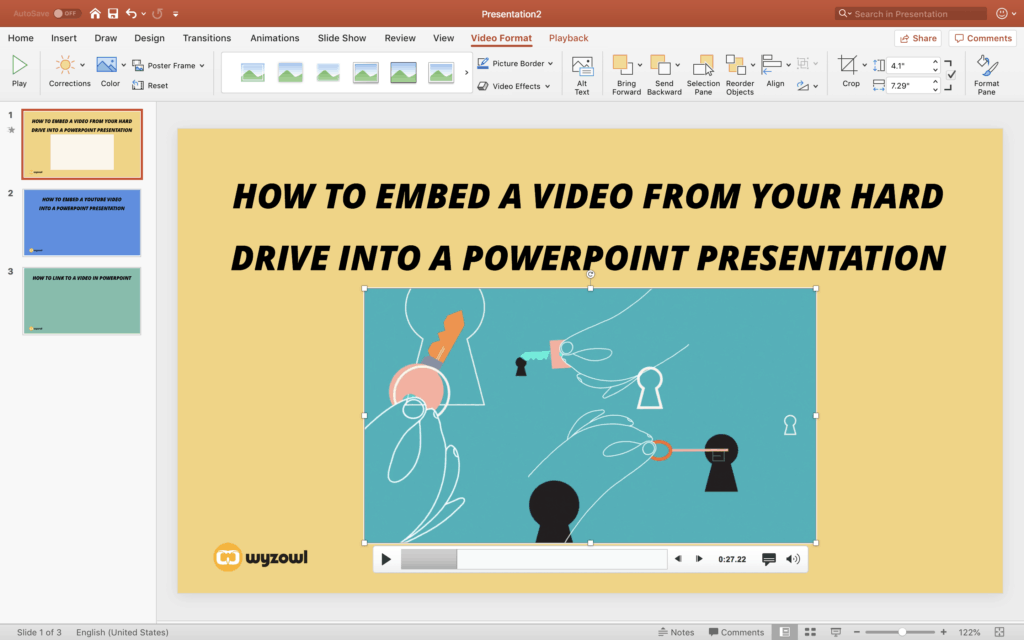
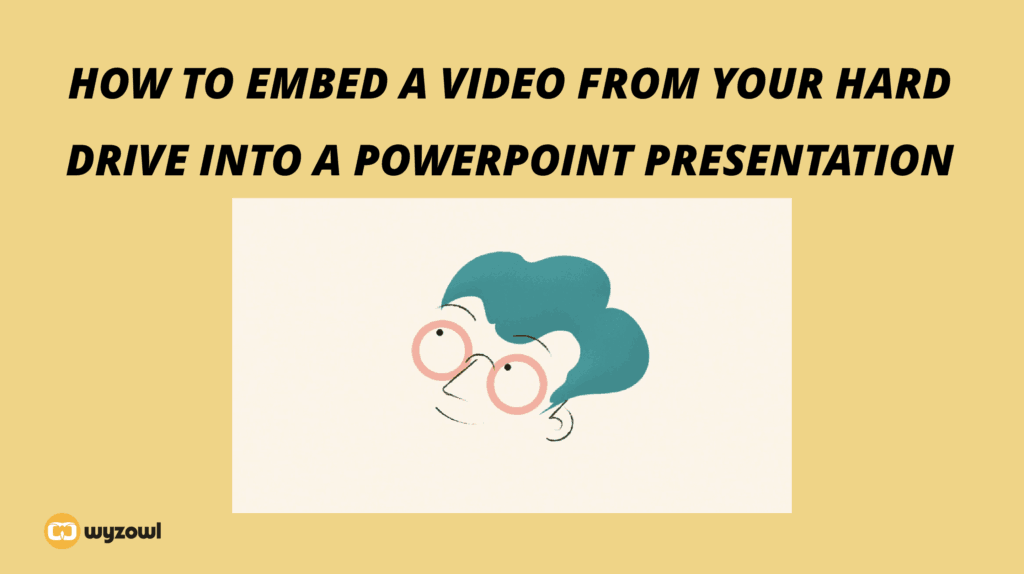
How to embed a video from your hard drive
Embedding a video into your PowerPoint directly from your hard drive is a great way to ensure your video plays seamlessly, even without an internet connection. When you store a video on your hard drive, it’s accessible to PowerPoint even if you can’t connect to wi-fi, which is an important consideration for people presenting to groups in new environments.
But watch out for a few common stumbling blocks. If you move the video from one folder to another on your hard drive, your PowerPoint presentation may have trouble locating it, leaving you with a blank screen. Also, if you share your PowerPoint with someone via email or USB, and you don’t also share the video with them and re-embed it into the presentation, you’ll be stuck stumbling in front of a confused audience with no playable video content in your PowerPoint.
If you decide to embed a video file from your hard drive into a PowerPoint presentation, here are six simple steps you can take to ensure success.
1. Navigate to the right slide
First, open your PowerPoint file and navigate to the slide that you want to put the video on.
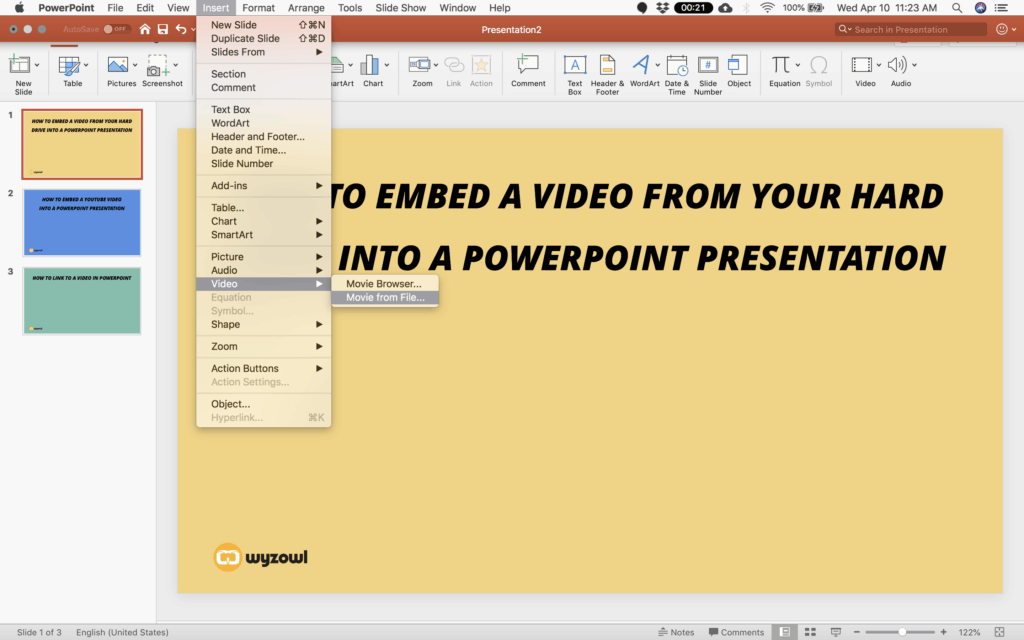
2. Select Insert > Video > From File
Next, navigate to the top PowerPoint menu and select Insert. Then toggle down to Video, and select Movie from File. Be sure you know where your video is saved to make this step quick and easy.
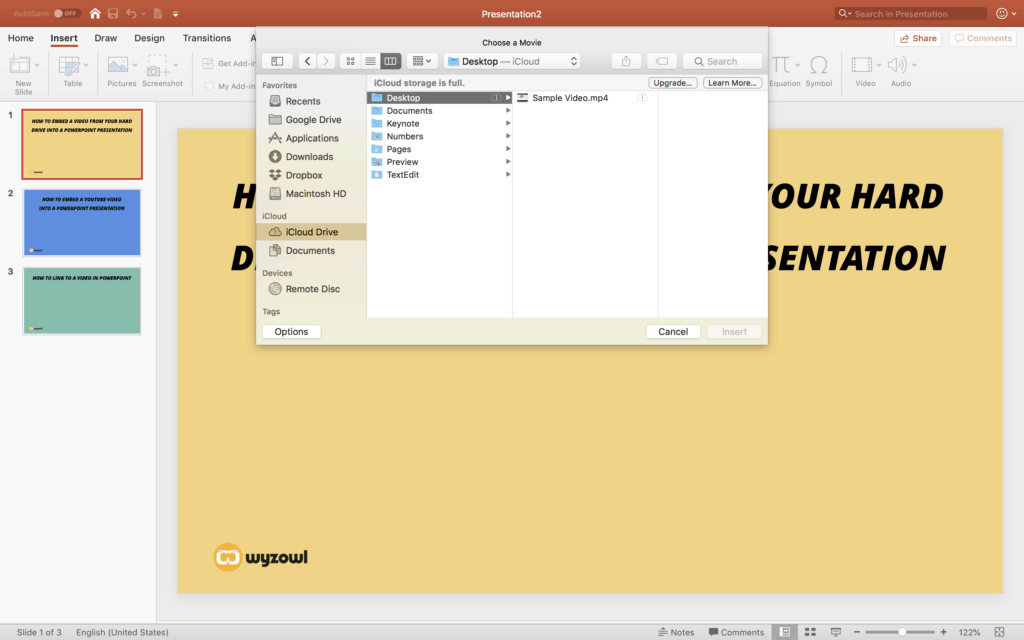
3. Find the video file on your hard drive
From here, find the video on your hard drive. If you have your hard drive synced to a cloud storage system like Dropbox or Google Drive, you could also use a video stored in one of those locations.
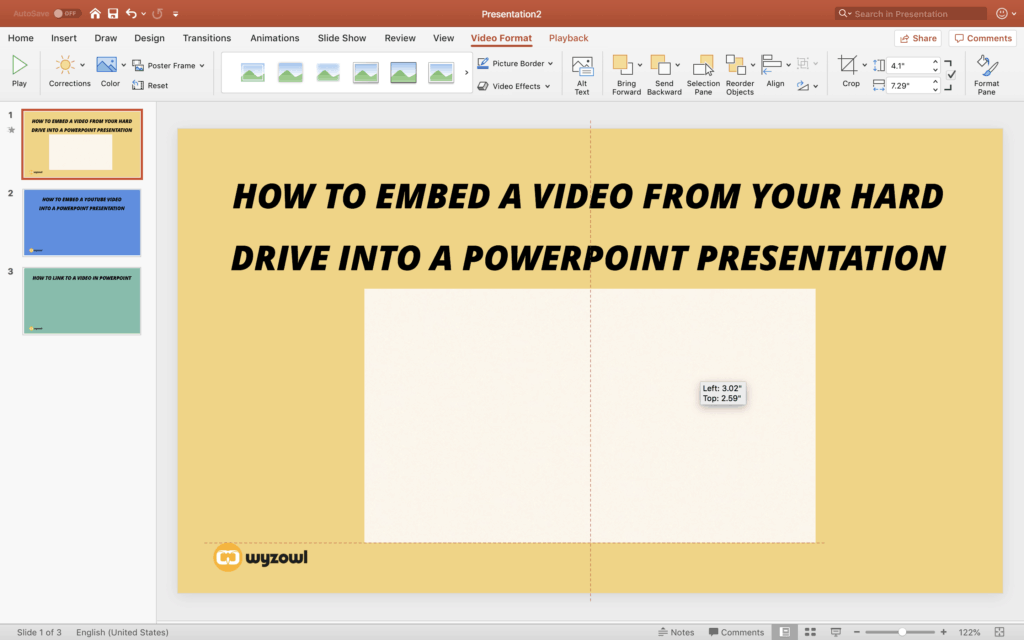
4. Resize the video
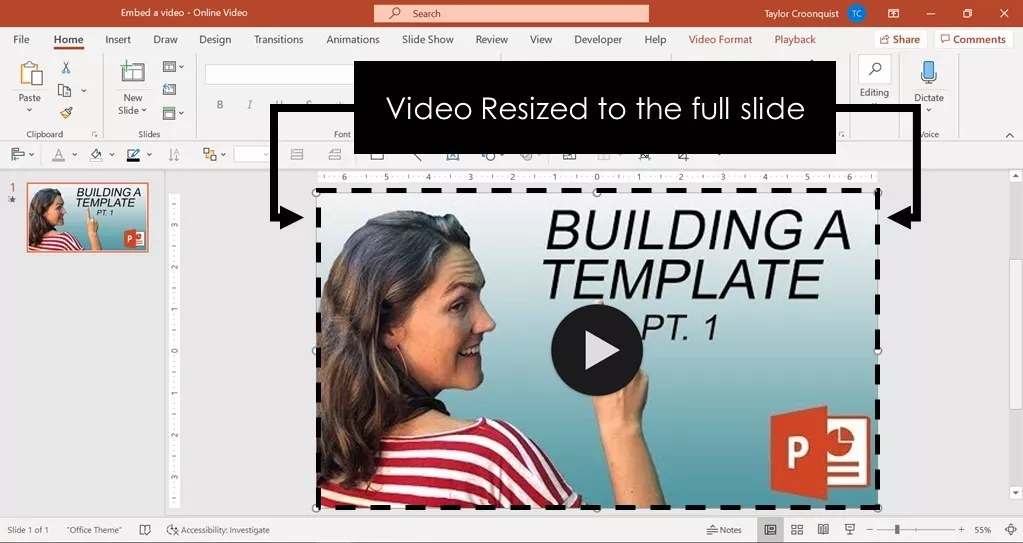
Once the video is inserted onto your slide, you’ll want to resize it to fit the slide. PowerPoint may insert the video as a full-screen video – which could be exactly how you want to display it. But if you’re looking to feature a headline or other graphics on your slide, simply resize the video and position it on the slide the same way you would an image or other element.
5. Play the video
Testing is critical to ensuring your video embed was successful. The first test you’ll perform is at this step, right after you’ve resized the video. Play the video in the PowerPoint to be sure it fully embedded and that you selected the right file. Be sure you watch from start to finish to ensure the full video embedded successfully.
6. Test in Play mode
As the final step in the process and your second test, play the PowerPoint like you will be during your presentation. You should see the video move at normal speed and hear any audio you have in your video as well. Again, be sure to watch the entire video to identify any potential embedding issues.
While you will have tested your video twice at this point, it’s also a good idea to give it a final test on the day of your presentation. This will not only ensure you’re set up for success, but give you confidence knowing your video will play seamlessly.
How to embed a YouTube video in PowerPoint
PowerPoint has come a long way with regards to displaying video into presentations, and this method is proof of that. PowerPoint offers the option to embed a YouTube (or other video platform) video directly from the website in just a few clicks.
This option is the fastest solution and doesn’t involve downloading or storing any video files on your computer, but it does come with a few limitations. First, with this option, YouTube automatically selects the image that appears on the slide, giving you a less customisable look. If image customisation is important to you, check out the next section on how to link to a video from PowerPoint. Second, if you’re not connected to the internet, your video won’t play – an important consideration for people presenting in environments where they don’t have reliable internet access.
While this method comes with a few technical limitations, it’s super easy to implement. If you decide to use this method, here’s how to embed a YouTube video in PowerPoint in just five steps.
First, open your PowerPoint file and find the slide you want to embed your YouTube video onto.
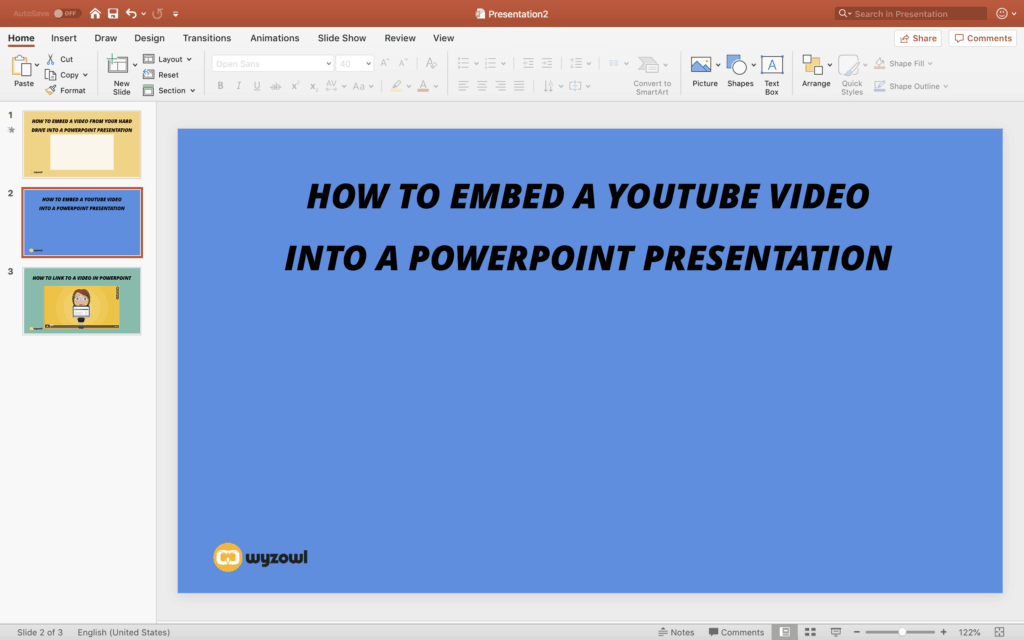
2. Insert an Online Movie
Next, navigate to the Insert tab within PowerPoint’s main menu, and select Video. Then from the dropdown, opt to insert an Online Video.
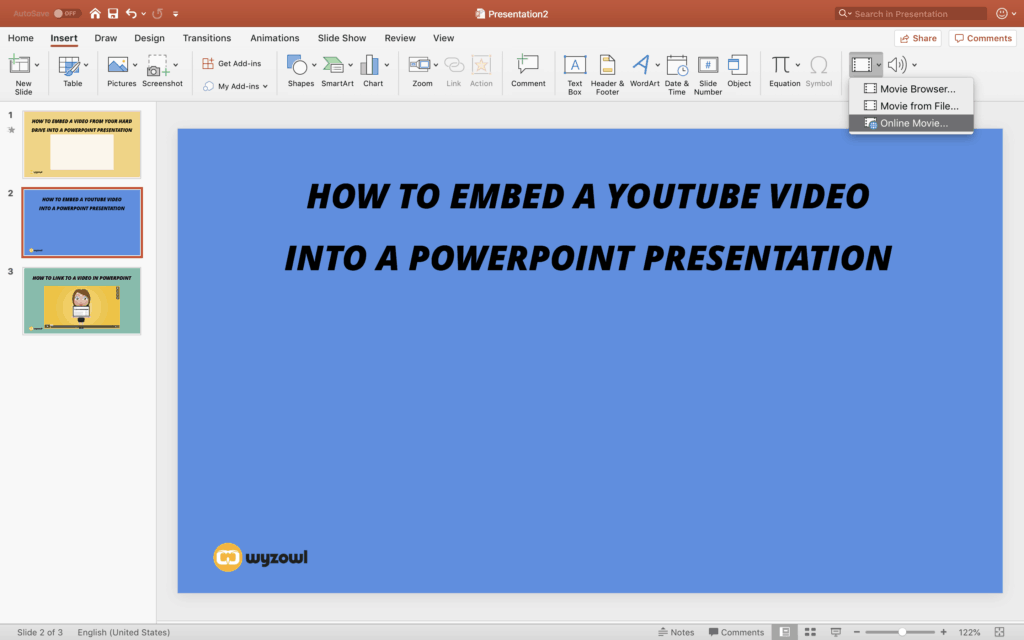
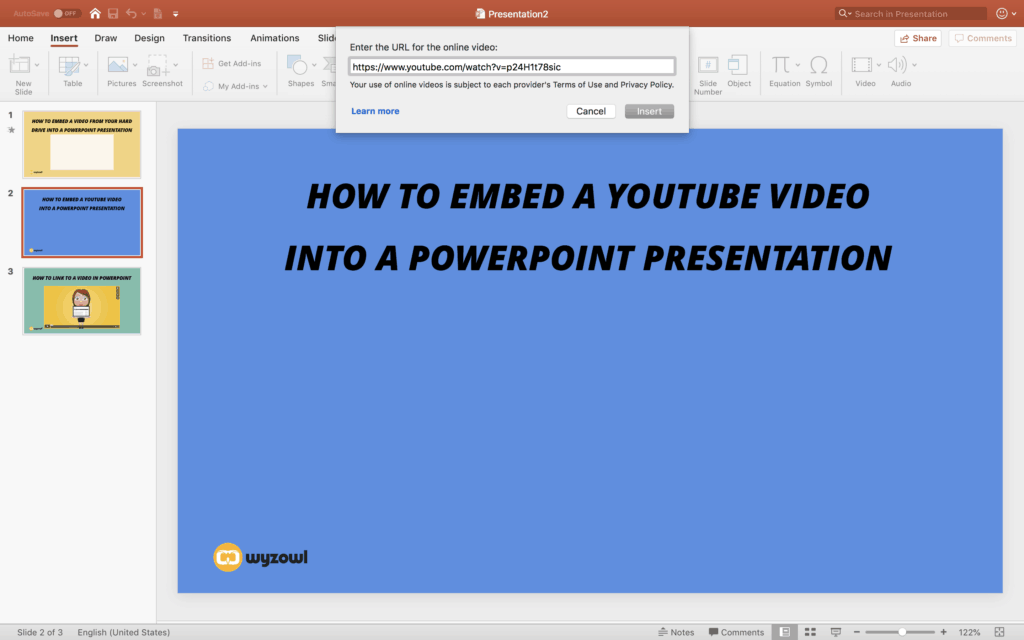
3. Paste your video URL
Selecting insert an Online Video will activate a pop-up to insert a URL. Paste your YouTube link directly into this form field, and select Insert.
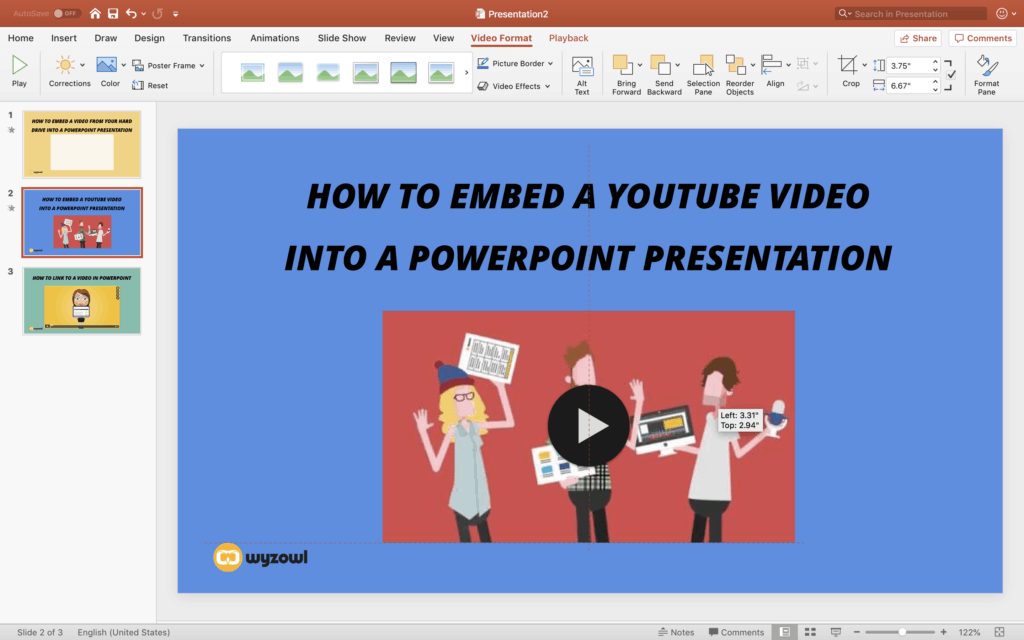
4. Resize and position your video
With this method, PowerPoint does all the work. The playable video will appear right on the slide, complete with an image from your video (note that this is the non-customisable part we mentioned). Now all you need to do is resize the video and position it on the slide where you’d like it.
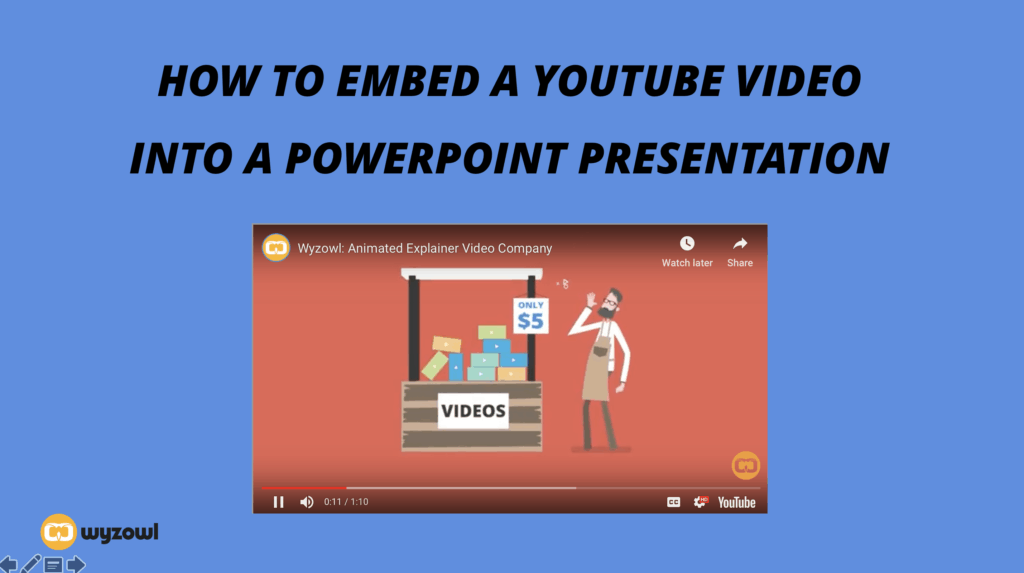
5. Test your video in Play mode
As a final step, hop into Play mode and test the video playback. You’ll even see the YouTube window, along with play and pause buttons, giving your slide an official, buttoned-up feel reminiscent of a website more than a PowerPoint.
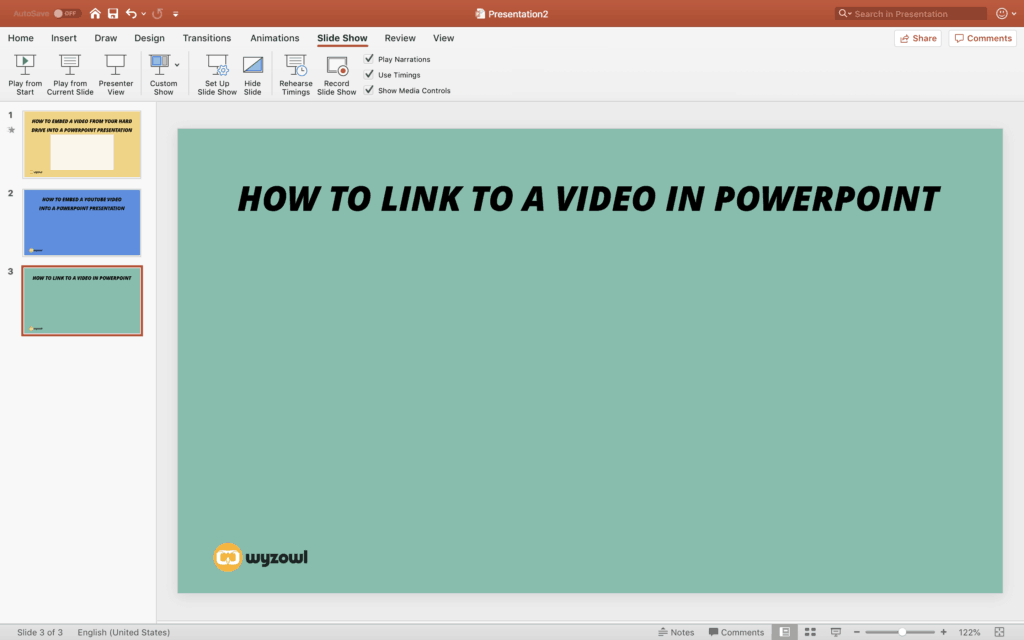
How to link to a video from PowerPoint
Linking to a video within your PowerPoint is a great option that’s very customisable. You can link any image or text to a YouTube, Wistia , Vimeo or website link in just a few minutes. But, readers beware: while you don’t have to worry about hosting large files on your computer with this option, web connectivity is critical. You need to have a reliable internet connection for this option to work.
If you’re unsure about your connectivity, we recommend opting to embed a video into your presentation from your hard drive. But if you’re cruising through the digital age at warp internet speed, check out how to link to a video from a PowerPoint in just six steps.
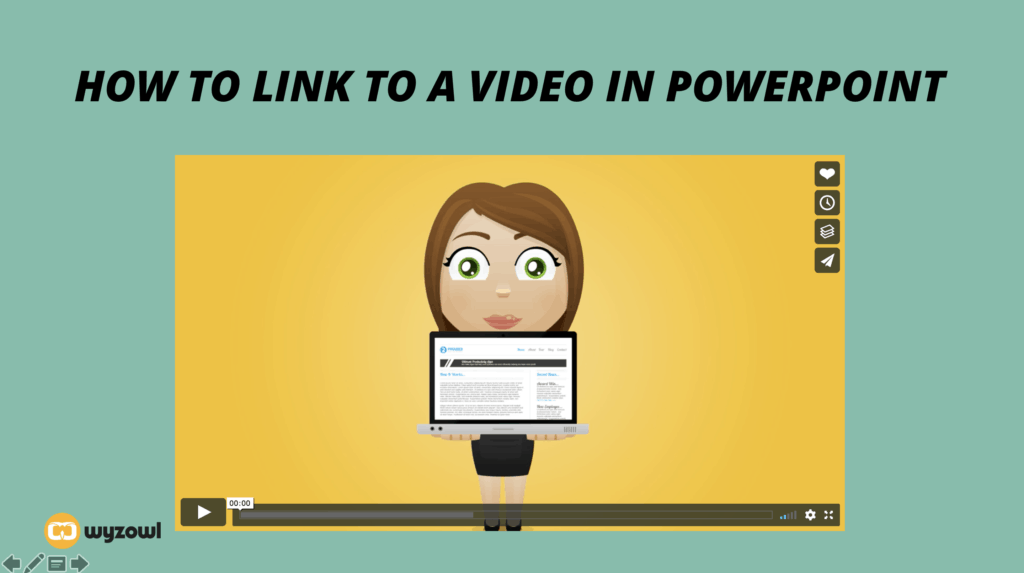
1. Screengrab an image of the video
To link to a video, you’re going to turn an image in your presentation into a hyperlink. The first step in the process is to find the right image – which in this case is a screenshot of your video. Note that you could use any image as your link, but we’re going to focus on the screenshot approach.
To capture a screenshot on a Mac, simply select command + shift + 3. You can also control the parameters of your screen grab by using command + shift + 4 (as seen in the image below). We suggest you play around with both options to determine which works best for you. This action will automatically save the image to your desktop.
To capture a screenshot on a PC, you’ll want to locate the key labeled PrtScn, also known as the print screen key. When you press this key along with the Windows icon key, your computer will take a screenshot of the screen and save it to your Pictures folder. Since this function captures an image of the entire screen, you’ll want to use a photo editor, like Windows Photo Gallery, to crop the image to include only the video thumbnail.
2. Find your PowerPoint slide
After you’ve captured a screenshot of your video, navigate to the slide in the PowerPoint that you want to use to link to your video.
3. Insert your image onto the slide
Next, put the image onto your slide. Select Insert, and toggle down to Picture and select Picture from File.
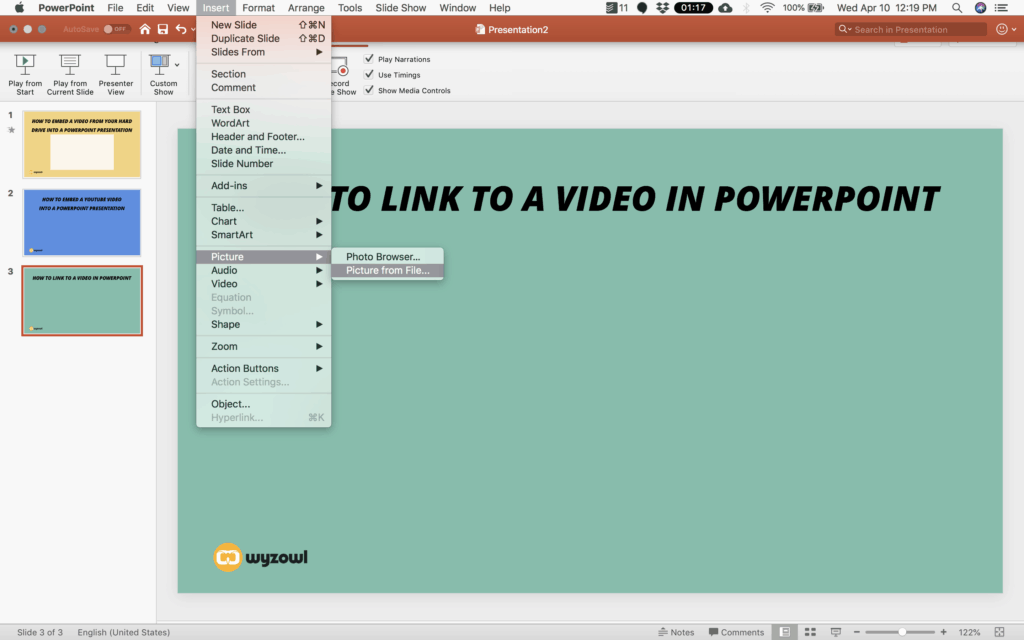
Then find the image you’d like to use to preview your video, and select Insert.

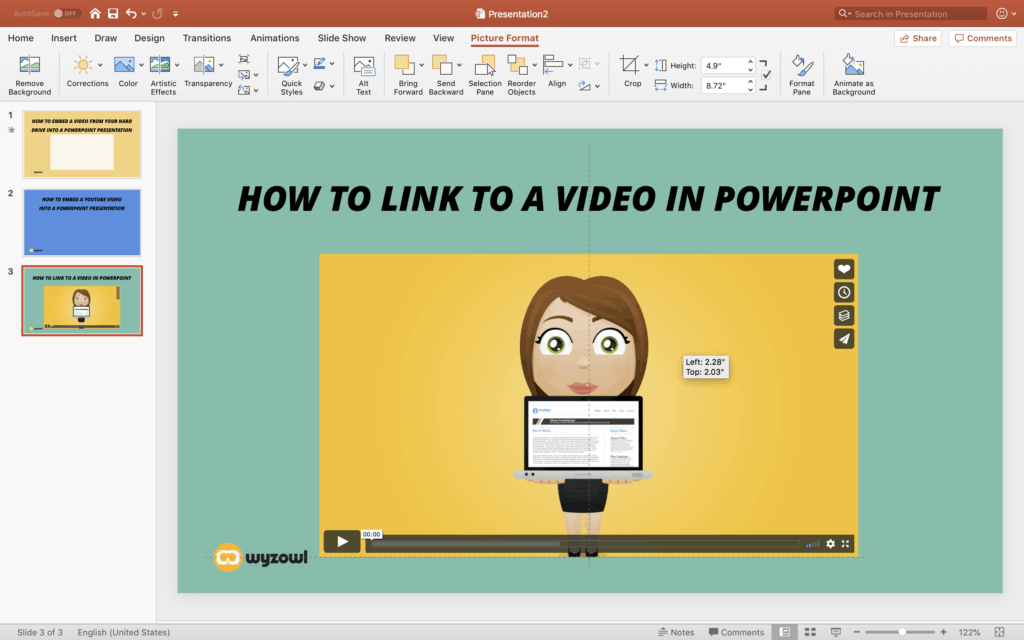
4. Resize your image
Once your image appears on your slide, resize it and position it just like you would any other image.
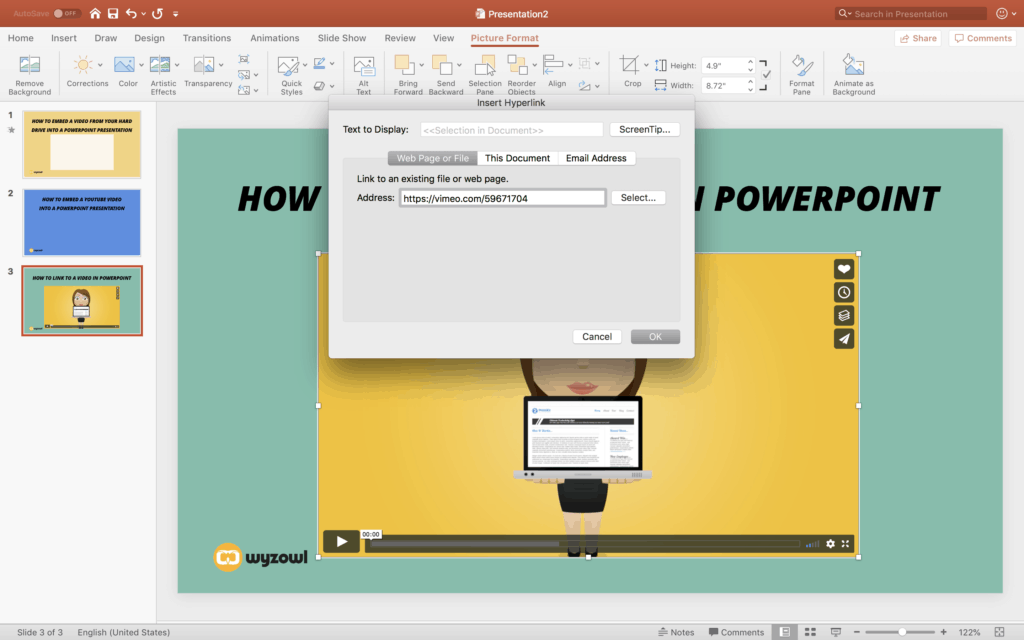
5. Add a hyperlink to the image
The same way you inserted your video file, you’re going to insert a hyperlink. Navigate to Insert, and toggle down to Hyperlink. Be sure you have the image selected while you’re doing this so the hyperlink connects to the image itself, not the entire slide or another element on the slide.
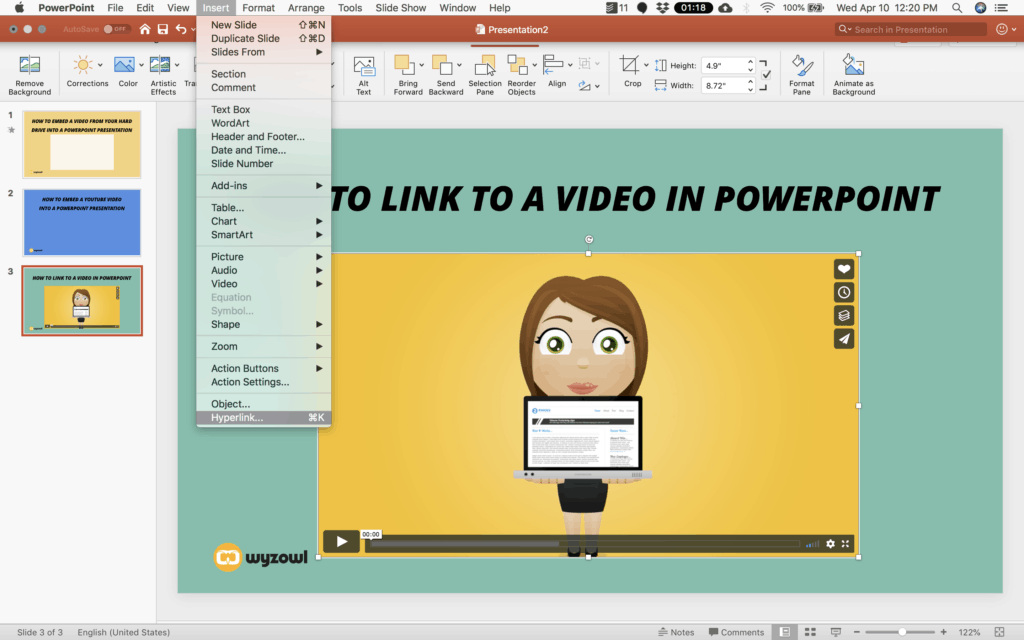
Then copy-and-paste the link to your web video into the hyperlink form field, and select OK.
6. Test the video in Play mode
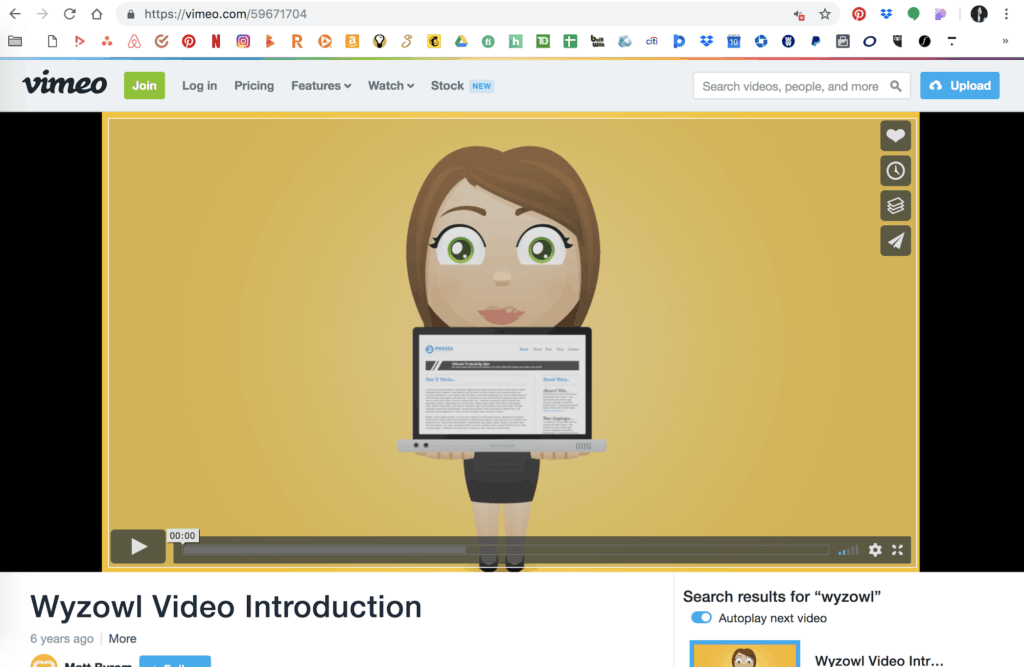
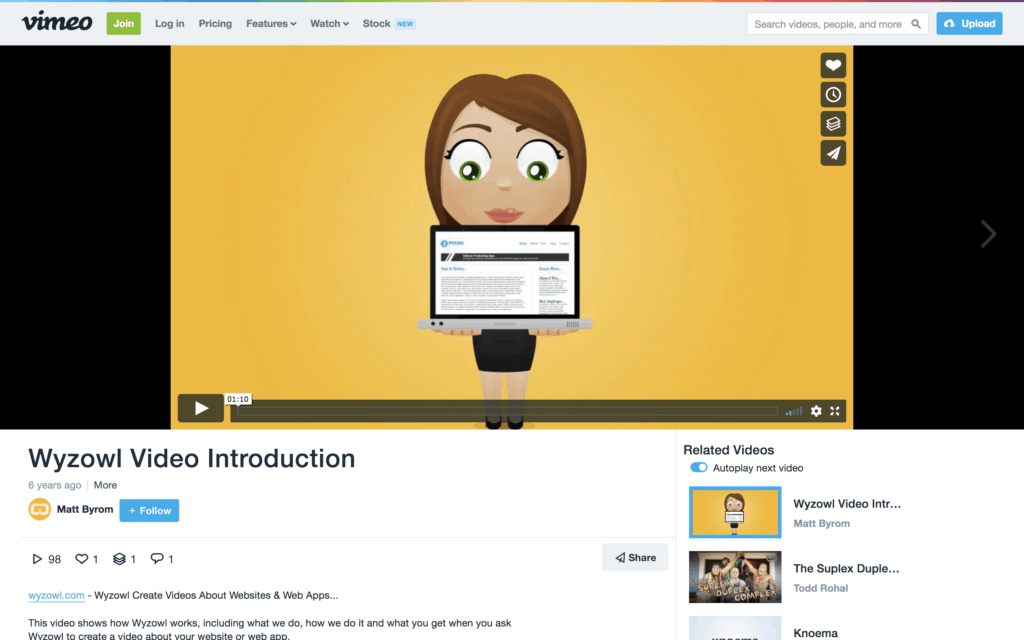
You guessed it. The final step in the process is to test your video in Play mode to be sure you linked to the right video. You should be able to click on the image in your PowerPoint when you’re in Play mode. And when you click it…
…you should be taken to a web browser where your video appears, ready for you to play!
Now that you know how to embed a video in PowerPoint, it’s time to take the final steps to preparing for a phenomenal presentation.
- Test your audio and visuals before you present. If you’re giving a presentation in a new location, you should anticipate issues with their A/V set-up and assume you’ll have wi-fi connectivity issues. Be sure to run through the presentation once before you formally present to ensure the video appears and your audio is both working and loud enough. Also consider taking a wi-fi hot spot in case you encounter internet issues.
- Keep it short. When presenting in front of an audience, sometimes less is more. No one wants to watch a 10-minute long video in the middle of a presentation. The best PowerPoint videos get an audience excited but don’t drag on to the point of boredom.
- Get creative. PowerPoints can be boring – but when you add video, you add a whole new dynamic element and energy to your presentation. Let your mind run wild with ideas as you think of ways to spice up your PowerPoint.
For more awesome tips on how to create the most awe-inspiring, jaw-dropping videos your audience has ever seen, head over to the Wyzowl blog . Peruse posts on the best motion graphics videos around, how to convert a video to a GIF , and everything in between.

Written by Sam Parker
Related posts.

Need to know how to embed a video in Wordpress? Use this super quick and easy guide to do it for yourself!

Want to know how to embed video in email? In this article we show you several ways to embed videos in emails with little fuss.

In this simple guide we show you how to compress a video, and we also identify the best free video compressor out there.
🎥 One great video example
🗓 Once per week
🤩 Analysed & reviewed
✉️ Direct to your inbox

How to explain anything with video
- Name * First Last
- Hidden cloudamp__data__c *
- Hidden gclid
- Phone This field is for validation purposes and should be left unchanged.

We make videos! In fact, we’ve made over 4,000 videos for 2,000 companies around the world. We create everything from simple social media videos to explainer videos, customer testimonials and everything in-between.
Complete your details below and we’ll send you a FREE info pack with everything you need to know about our service, straight to your inbox.
Get info & pricing
Fill out the form below and we’ll send a FREE info pack with everything you need to know about our service. Then we’ll be in touch to discuss how we can help you with your next video 🚀

How to Insert a Video in PowerPoint (from a File on Your PC or Shared Drive)

Insert or Embed a Video in a PowerPoint Presentation from a File and Set Playback Options
by Avantix Learning Team | Updated October 9, 2021
Applies to: Microsoft ® PowerPoint ® 2010, 2013, 2016, 2019 and 365 (Windows)
You can insert a video into a PowerPoint presentation from a file on your PC or from a shared drive. Video can help to engage your audience and focus attention. In 2010 and later versions, video files are embedded or copied into PowerPoint by default so video files can increase file size significantly.
Recommended article : How to Compress Video and Audio Media in PowerPoint to Reduce File Size
Do you want to learn more about PowerPoint? Check out our virtual classroom or live classroom PowerPoint courses >
When inserting video in PowerPoint, consider the following:
- PowerPoint 2010 and later versions support common video formats such as WMV (Windows Media Video file), ASF (Windows Media file), MP3 and MP4 (Movie files) and AVI (Windows Video File).
- The default format for PowerPoint 2013 and later versions is MP4.
- In 2010 and later versions, video is embedded by default not linked as in previous versions.
- If you choose to link to a video, it's good practice to copy the video file to the same folder as your presentation before you link. You will not be able to apply certain types of formatting to linked videos.
Note: Buttons and Ribbon tabs may display in a different way (with or without text) depending on your version of PowerPoint, the size of your screen and your Control Panel settings. For PowerPoint 365 users, Ribbon tabs may appear with different names. For example, the Video Tools Playback tab may appear as Video Playback.
Although you can insert a video in Slide Master View, we'll assume here that most of your videos will be inserted on slides in Normal View.
Inserting a video from a file
To insert a video from a file and embed it on a slide:
- In Normal View, navigate to the slide where you want to insert a video.
- Click the Insert tab in the Ribbon.
- Click Video. A drop-down menu appears.
- Depending on your PowerPoint version, choose Video on My Computer, Video on My PC or This Device. A dialog box appears.
- Navigate to the folder where your video is saved and click the video to select it.
- On the bottom right of the dialog box, click Insert to embed the video. You can also double-click it. If you click the drop-down menu beside Insert, you can choose Link to File. If you decide to link rather than embed, you may want to copy your video or movie clip to the same folder as your presentation before you insert it on your slide. PowerPoint will place the video in the center of the slide.
- In Normal View, click the video and then Play on the media controls to play the video.
After you insert a video, two tabs will appear in the Ribbon when you click the video (Video Tools Playback and Format or Video Playback and Format) in Normal View.
Below is the Video Tools Playback tab in the Ribbon with a video selected (this may appear as Video Playback):

Below is the Video Tools Format tab in the Ribbon with a video selected (this may appear as Video Format):

Playing a video automatically or when clicked
You can change the way a video plays when you run a slide show.
To control the way a video plays during a slide show:
- In Normal View, click the video on the slide.
- Click the Video Tools Playback or Video Playback tab in the Ribbon.
- In the Video Options group, beside Start, choose In Click Sequence, When Clicked On or Automatically from the drop-down menu.
If you select When Clicked On, you must click directly on the video when running a slide show.
Playing a video full screen
You can play a video so that it fills the entire screen when you run a slide show. However, depending on the resolution of the original video file, it might appear distorted if the video is lower quality.
Be sure to preview your video so that if the video appears distorted or blurry, you can turn off the full screen option. If you set a video to be displayed full screen and it is also set to start automatically, you can drag the video frame off the slide into the gray work area so that it will not be visible on the slide or flash briefly before the video goes to full screen.
To set a video to play full screen during a slide show:
- In the Video Options group, select the Play Full Screen check box.
Controlling video volume
To control video volume:
- In the Video Options group, click Volume and then choose Low, Medium, High or Mute.
- You can also set the volume of a video by using the volume slider on media controls that appear below the video.
Be sure that volume is turned on through your Control Panel settings on your computer.
Hiding a video when not playing
During a presentation, you can hide a video until you are ready to play it. However, you should create an automatic or triggered animation to start the video or you won't see it play during the slide show.
To hide a video when not playing:
- In the Video Options group, select the Hide While Not Playing check box.
Looping a video
To play a video continuously during a presentation, you can loop the video:
- In the Video Options group, select the Loop until Stopped check box.
Rewinding a video after playing
To rewind a video after playing during your presentation:
- In the Video Options group, select the Rewind after Playing check box.
Showing media controls during a slide show
To show the media controls during your presentation when running a slide show:
- In Normal View, click the Slide Show tab in the Ribbon.
- In the Set up group, select the Show Media Controls check box.
Fading a video in or out
You can start or end your video with a fade effect for a certain number of seconds.
To start or end a video with a fade effect:
- In the Editing group, under Fade Duration, choose or enter a duration for Fade In or Fade Out. To add a timed fade to the beginning of your video, in the Fade In box, click the up and down arrows to increase or decrease the fade in time. To add a timed fade to the end of your video, in the Fade Out box, click the up or down arrows to increase or decrease the fade out time.
Cropping a video
You can also crop a video in PowerPoint to remove specific areas in the video.
To crop a video:
- Click the Video Tools Format or Video Format tab in the Ribbon.
- Click Crop in the Size group.
- Position the pointer over a black cropping handle and drag the handle.
- Click Crop again to finish cropping.
Trimming a video
You can trim video at the beginning and end of each clip so you can start at any point and end the clip earlier. Trimming is different from cropping.
To trim a video clip:
- In the Editing group, click Trim Video. A dialog box appears.
- To trim the beginning of the clip, click the start point (a green marker on the far left). When the pointer becomes a two-headed arrow, drag the arrow to the desired starting position.
- To trim the end of the clip, click the end point (a red marker on the right). When the pointer becomes a two-headed arrow, drag the arrow to the desired ending position.
In this article, we've reviewed inserting video files in PowerPoint presentations from a PC or shared drive, controlling playback during a slide show as well as cropping and trimming. In future articles, we'll look at video formatting techniques and how to export a PowerPoint presentation as a video.
Subscribe to get more articles like this one
Did you find this article helpful? If you would like to receive new articles, join our email list.
More resources
How to Embed a YouTube Video in PowerPoint
How to Highlight Text in PowerPoint (5 Ways)
How to Add Audio in PowerPoint Presentations
A Beginner's Guide to Video Formats in PowerPoint
PowerPoint Keyboard Shortcuts to Play and Control Video During a Slide Show
Related courses
Microsoft PowerPoint: Intermediate / Advanced
Microsoft PowerPoint: Design for Non-Designers
Microsoft PowerPoint: Accessible PowerPoint Presentations
Microsoft PowerPoint: Animations Bootcamp
Microsoft Excel: Intermediate / Advanced
VIEW MORE COURSES >
Our instructor-led courses are delivered in virtual classroom format or at our downtown Toronto location at 18 King Street East, Suite 1400, Toronto, Ontario, Canada (some in-person classroom courses may also be delivered at an alternate downtown Toronto location). Contact us at [email protected] if you'd like to arrange custom instructor-led virtual classroom or onsite training on a date that's convenient for you.
Copyright 2024 Avantix ® Learning
You may also like

How to Insert or Type E with an Accent Mark in PowerPoint (È, É, Ê, Ë, è, é, ê, or ë)
You can insert or type e with an accent mark in PowerPoint using built-in tools or keyboard shortcuts (including Alt code shortcuts). The letter e can be inserted with an accent in both upper or lower case in text boxes or placeholders on slides, the slide master or layouts. The following are common accents in upper or lower case – È, É, Ê, Ë, è, é, ê, or ë.

How to Fade a Picture or Part of a Picture in PowerPoint (Using a Gradient)
You can fade a picture in PowerPoint by drawing a rectangle shape on top of the picture and then filling the rectangle with a gradient from opaque to transparent. This technique is often used to fade an image into the background of a slide. Since the rectangle is placed on top of the image and then text may be placed on top of the rectangle, you may need to reorder the objects.

How to Lock an Image, Shape or Other Object in PowerPoint
You can now lock an image, shape or other object in PowerPoint. Objects can be locked in Normal View or Slide Master View. Only PowerPoint 365 users can lock objects to prevent moving and resizing. This is helpful if you want to select and move other objects on the slide or prevent others from moving or resizing an object. You can lock items using the context menu or the Selection Pane.
Microsoft, the Microsoft logo, Microsoft Office and related Microsoft applications and logos are registered trademarks of Microsoft Corporation in Canada, US and other countries. All other trademarks are the property of the registered owners.
Avantix Learning |18 King Street East, Suite 1400, Toronto, Ontario, Canada M5C 1C4 | Contact us at [email protected]
Our Courses
Avantix Learning courses are offered online in virtual classroom format or as in-person classroom training. Our hands-on, instructor-led courses are available both as public scheduled courses or on demand as a custom training solution.
All Avantix Learning courses include a comprehensive course manual including tips, tricks and shortcuts as well as sample and exercise files.
VIEW COURSES >
Contact us at [email protected] for more information about any of our courses or to arrange custom training.
Privacy Overview
Pin it on pinterest.
- Print Friendly
Home Blog PowerPoint Tutorials How to Insert a Video into PowerPoint
How to Insert a Video into PowerPoint

Adding videos to slides can save a lot of time explaining different concepts. A short video can help make even complex ideas easy to grasp with visual aids and assist the presenter in avoiding making several slides explaining the topic. You can add videos to your custom slides or PowerPoint templates from your device or online sources by following a few easy steps.
How to Add Video to PowerPoint
Just as we explained in a previous tutorial about how to add a video to Google Slides , adding a video to PowerPoint is quite similar. To get started, click the Insert tab and select Media -> Video . Now, select the source for your video.

Add Video from Device
You can add a video from your device by browsing to the location where the video is located to select it.

Add a Stock Video
To add a stock video, select the Stock Videos option from the Video dropdown menu, search for a video, and select to insert it.

Add Videos from Online Sources
Videos can also be added from online sources by adding the URL for a video from different sources such as YouTube, SlideShare, Vimeo, Stream, and Flip. For more details regarding this process, see our tutorial about how to embed a YouTube video in PowerPoint .

Format Video Added to PowerPoint
Once you have added a video in PowerPoint, you can format the video to adjust it according to need. The video size can be adjusted either from the Video Format tab or via drag and drop. The same tab also provides options to crop, rotate, and adjust the colors of the added video. Cropping and resizing options are available in the Video Format tab from the Size menu.

To add a video frame or change the look of the video outline, go to the Video Styles menu from the Video Format tab.

The video rotation and other adjustment options can be found in the Arrange menu in the Video Format tab.

The Adjust menu in the Video Format tab provides options for color correction, adding a poster frame, and resetting the video design.

Adjust Playback Settings for Video in PowerPoint
There are a number of playback settings that you can adjust from the Playback tab in PowerPoint. You can add closed captions, select the video to play in the loop, and rewind automatically once it’s played, as well as edit the video.

From the Video options menu in the Playback tab, select the Start dropdown menu to decide if the video will be played automatically when clicked or in a click sequence. From this menu, you can also select whether the video is to be played in full screen and hidden when not played.

Insert Captions is another option in the Playback tab that enables importing closed captions to be added to the video. The closed captions format supported by PowerPoint is WebVTT.

To edit a video in PowerPoint, the Playback tab provides the Editing menu. From this menu, you can trim the video in PowerPoint and add a Fade (in and out) effect. Let’s see how to trim a video in PowerPoint:

As shown in the screenshot, to trim the video in PowerPoint you need to draft the handles that sets the start time and end time. This way, you can cut the video and trim it so only a portion of the video is being shown.
To add a video from your device, go to the Insert tab, select Media -> Video -> This Device. Browse for the video file on your computer and select it to insert it into your slide.
Yes, you can add stock videos. Go to the Insert tab, select Media -> Video -> Stock Videos. Search for the desired video and select it to insert into your slide.
To add an online video, go to the Insert tab, select Media -> Video -> Online Video. Enter the URL of the video from sources like YouTube, SlideShare, Vimeo, Stream, or Flip, and click Insert.
After adding a video, you can format it using the Video Format tab. Here, you can adjust the size, crop, rotate, and change the colors of the video. You can also use the Video Styles menu to add a frame or change the video outline.
Go to the Playback tab to adjust playback settings. You can choose to start the video automatically, on click, or in a click sequence. Other options include playing the video in full screen, looping it, and hiding it when not playing.
Yes, you can add closed captions. In the Playback tab, select Insert Captions and import the WebVTT file for your video.
To insert an offline video in PowerPoint: – Go to the Insert Tab: Open your PowerPoint presentation and navigate to the Insert tab on the Ribbon. – Select Media: In the Insert tab, find the Media group and click on Video. – Choose Video from This Device: Select Video on my PC from the dropdown menu. – Browse for the Video File: A file explorer window will open. Browse to the location where your video file is stored on your device. – Insert the Video: Select the video file you want to insert and click Insert. The video will be added to your slide. You can then resize and position it as needed.
Final Words
Videos added to PowerPoint can be of immense help in explaining something important to an audience. Many YouTube videos make it easy to quickly provide the necessary information instead of using multiple slides or creating a custom video to get your point across.
By effectively using videos in your PowerPoint slides, you can make your slides easier to grasp and work smart to present ideas and concepts quickly. However, it is worth testing out the slides once the videos are added by running them as a slideshow. If it’s an online video, ensure you have a stable Internet connection when presenting your slides; if it’s an offline video added to your slides, make sure the slides don’t lag on the system you are using. Do you know you can also convert slides to videos? See our tutorials on how to convert a PowerPoint presentation to an HD video and how to convert a Google Slides presentation to a video to learn about turning your slides into video presentations .
Like this article? Please share
Microsoft PowerPoint, PowerPoint Tools Filed under PowerPoint Tutorials
Related Articles

Filed under PowerPoint Tutorials • July 30th, 2024
How to Add a Timer to PowerPoint
Generate expectations for your presentation introductions by mastering how to add a timer to PowerPoint. Step-by-step instructions + templates.

Filed under PowerPoint Tutorials • July 24th, 2024
How to Find Quick Access Toolbar in PowerPoint
Easily customize PowerPoint’s UI by locating and editing the Quick Access Toolbar in PowerPoint

How to Translate in PowerPoint
Unlock the experience of PowerPoint translation! Learn methods, tools, and expert tips for smooth Spanish conversions. Make your presentations global.
Leave a Reply

- Explainer Videos
- How To Videos
- Whiteboard Animation
- Educational Videos
- Commercial Videos
- Social Media Videos
- Animated Video Series
- Internal Videos
- Product Videos
- Music Videos
- Interactive Video Production
- Animated Videos for Education
- Finance Explainer Videos
- Healthcare Explainer Videos
- Manufacturing and Logistics
- Music Industry
- Products and Retail Videos
- Professional Services Videos
- Tech Industry Explainer Videos
- Real Estate Explainer Videos
- How We Work
- Animated Video Script Timer
- Video ROI Calculator
- Explainer Video Types
- Top 10 Explainer Video Companies
- Top 10 Best Whiteboard Animation Companies
- Top 10 Best Explainer Videos 2024
- Top 10 Company Explainer Videos
- Top 10 Best Product Explainer Video Examples
- Top 10 Best Real Estate Explainer Videos
- Top 10 Animated Music Videos 2022
- Top 10 Free Sound Effects Websites
- The Revisions Process
- Terms and Conditions
Embed Videos in PowerPoint: Easy Step-by-Step Guide

Table of Contents
Are you looking for a way to make your business presentations stand out in 2024? Adding videos or short clips isn’t just an eye-catching trick – it can also help get your message across in ways that speaking alone can’t.
Luckily, there are several easy methods to embed video into Microsoft PowerPoint . In this blog post, we will discuss how anyone with basic tech literacy knowledge can embed video into their business presentation slides with minimal effort and cost.
Keep reading if you want to learn how to quickly, easily, and effectively add a bit of flair and pizzazz while giving your professional presentations the added punch they need!
Embedding Video in Microsoft PowerPoint Essential Steps
Embedding a video in Microsoft PowerPoint is a great way to make your presentation more engaging and interactive. Whether you want to demonstrate a concept with an explainer video or show off a marketing video , embedding videos into PowerPoint can help you get your point across.
Here’s how to do it:
1 . find the video you want to use.
There are several sources for videos that you can use in PowerPoint presentations. YouTube, TikTok, Instagram are just a few of the most popular options; all offer free content that you can easily access and copy for use in your presentation. If you’re looking for other types of video material—such as stock footage or commercial clips—you’ll need to purchase them from a licensed provider.
2. Copy the Video’s Embed Code
Once you’ve found your video, copy the embed code that is provided. On YouTube and Vimeo, this will usually be located in the share or embed section of the page. The code should start with “ <iframe> ” and end with “ </iframe> “, and will include all the information needed to embed the video into your presentation.
3 . Open Your PowerPoint Presentation
Open Microsoft PowerPoint and open up the presentation where you would like to add the video clip. Select one of your slides; this will be where we’ll paste the embed code later on.
4. Insert an Object Into Your Presentation
Go to the Insert tab at the top of your screen, and select Object . This will bring up a window that lets you insert objects into your presentation; find the “ Create from File ” option, and paste in the embed code you copied earlier.
5. Make Adjustments To Your Video
Once you’ve inserted your video into PowerPoint, you can make changes as necessary to fit it within the parameters of your presentation. You can resize or move the video around on your slide, or adjust its playback options to control when it starts and stops playing during your presentation.
And that’s all there is to it! Embedding a video in Microsoft PowerPoint is a great way to add visual interest and engage your audience.
Just remember to keep an eye on any copyright restrictions that may apply to the video content you use, and make sure you always have permission before using it in your presentation!
How to Embed a YouTube Video in PowerPoint Step by Step

Embedding a YouTube video in PowerPoint can add an extra level of impact to your presentation. Not only is it easy to do, but having the video right inside the presentation gives you control over how and when the audience sees it.
Here are some simple step-by-step instructions on how to embed a YouTube video into PowerPoint.
- Log in to your YouTube account and go to the page with the video you want to use in your presentation.
- Click “Share” underneath the video , then click “Embed” from the options below that appear.
- Copy the code for embedding by clicking inside of it and pressing Control + C (or Command + C on a Mac).
- Open the PowerPoint presentation that you wish to embed the video in and switch to “Slide Show” mode by clicking on the button in the bottom right corner of your screen.
- Select the slide where you want the video to appear, then click “ Insert” at the top of your toolbar.
- Click “Video”, then select “Online Video” from the options that will appear below it.
- Paste (Control + V or Command + V) your embed code into the box provided and click OK when it is done processing.
- Your YouTube video should now be embedded into your presentation. Test it by clicking on the video thumbnail that should now appear in the middle of your slide and see if it plays correctly.
And there you have it! You’ve successfully embedded a YouTube video into PowerPoint. Keep these steps handy for any future presentations you may give and you’ll be able to easily add engaging visuals with ease every time. Happy presenting!
With these simple steps, you’re well on your way to mastering the art of embedding YouTube videos into PowerPoint presentations.
Just follow the instructions outlined above and you’ll have a professional-looking presentation in no time.

How to Embed a TikTok Video in PowerPoint Step by Step

Embedding a TikTok video in PowerPoint is an easy way to add fun and interest to your presentations. Whether for personal or professional use, you can use the video-sharing platform’s vast library of content to make your presentation stand out.
Here’s how to do it.
Step 1: open microsoft powerpoint.
Open Microsoft PowerPoint and create a new slide, selecting either “ Blank Slide ” or one of the many pre-made style templates that come with it. If you already have an existing slide deck, simply add a new blank slide to it.
Step 2: Insert Video from Online Source
From the top menu bar, select “ Insert ” and then “ Video ”. A drop-down menu will appear with the option for “ Online Video ”. Select it, and a new window will open prompting you to search for an online video source.
Step 3: Find Your TikTok Video
Type in your keyword or phrase into the search bar of the new window that opened in Step 2, and click on the magnifying glass icon to initiate your search. Find the video you want to embed from among the results, and select it by clicking on its thumbnail image.
Step 4: Embed Your TikTok Video
Once you have found your desired video, click “ Insert ” at the bottom right corner of the window. This will embed the video into your slide, and you can reposition or resize it to fit your presentation’s design.
You can also add additional features such as audio or captions if desired , by selecting the “ Playback ” tab from the top menu bar and customizing them for your needs.
And there you have it! By following these steps, you now know how to embed a TikTok video into Microsoft PowerPoint .
With this new skill, you can make your presentations more engaging and visually stimulating than ever before!
How to Embed an Instagram Video in PowerPoint Step by Step

Embedding an Instagram video in PowerPoint can be a great way to add visual interest to your presentation . Whether you’re creating a slideshow for school, business, or personal use, embedding social media videos into your slides will make them more engaging and interactive for your audience.
In this section of the article, we’ll show you how to quickly and easily embed an Instagram video into PowerPoint step by step.
1. Visit the Video You Want to Embed
You’ll need the URL of the Instagram post to begin the process of embedding it in PowerPoint. Go to the post you want to embed and copy its URL from the address bar at the top of your browser window. Make sure it is a video post and not an image.
2. Open PowerPoint and Select the Slide You Want to Embed Into
Open your presentation in PowerPoint, select the slide you want to add the Instagram video to, and click “ Insert ” on the menu bar.
3. Select “Object” from Insert Menu Options
In the drop-down menu that appears, choose “ Object ”. This will bring up another window with a variety of options for inserting objects into your slides.
4. Choose “Create from File” Option
Scroll down until you see the option for “ Create from File ” and then click it to open a file browser window where you can find the Instagram video you want to embed. Paste the URL of the video into the search box at the top of the window and click “ Browse ”.
5. Select Video from Search Results
The video should appear in the search results below. Click it to select it and then press “ OK ” to insert it into your slide in PowerPoint. You will now be able to play, pause, and even edit your embedded Instagram video within your presentation!
By following these simple steps, you’ll be able to quickly and easily embed any Instagram video into your PowerPoint presentation for a more interactive experience that is sure to engage your audience.
Whether you’re creating slideshows for school or work , embedding social media videos is an easy and effective way to make your presentation more compelling.
Embed Videos in PowerPoint: Conclusion

That’s all there is to embedding a video in PowerPoint! It’s actually a very easy process, but it can make your presentations look much more professional and engaging .
If you have any questions or run into any problems while trying this out yourself, don’t hesitate to contact us for help.
We would be happy to walk you through the steps or even do it for you! Thanks for reading, and we hope you find this information useful.
Embed Videos in PowerPoint: FAQs
Q1: why should i embed videos in my powerpoint presentations.
A1: Embedding videos adds dynamic content, enhancing engagement and clarity. It’s an effective way to convey information and make your presentations more captivating.
Q2: What types of videos can be embedded in PowerPoint?
A2: PowerPoint supports a variety of video formats, including MP4, WMV, and AVI. Ensure your video is in a compatible format for seamless embedding.
Q3: Is it possible to embed videos from online platforms like YouTube or Vimeo?
A3: Yes! You can embed online videos by using the ‘Online Video’ feature in PowerPoint. This allows you to seamlessly integrate videos from popular platforms into your presentation.
Q4: Are there size limitations for embedded videos in PowerPoint?
A4: While PowerPoint doesn’t have strict size limitations, it’s advisable to optimize videos for smoother playback. Large files may affect presentation performance.
Q5: Can I customize the playback settings for embedded videos?
A5: Absolutely! PowerPoint offers playback customization options. You can set the video to play automatically, loop, or trigger on click, giving you control over the viewer experience.
Q6: How can I ensure the embedded video plays smoothly during a presentation?
A6: To ensure smooth playback, save your PowerPoint file and the video in the same folder. This avoids broken links and ensures the video plays seamlessly, even if you move the presentation.
Q7: Will the embedded video play on any computer?
A7: As long as the computer has PowerPoint installed and supports the video format, it should play. Consider using widely compatible formats for broader accessibility.
Q8: Can I edit the embedded video directly within PowerPoint?
A8: PowerPoint provides basic video editing tools, such as trimming and fading. For extensive edits, it’s recommended to use video editing software before embedding.
Q9: How can I share a PowerPoint presentation with embedded videos?
A9: When sharing the presentation, ensure the video file is included or share it in a format that retains the embedded video, such as a PowerPoint file or a video-supported format.
Q10: What should I do if the embedded video is not playing during the presentation?
A10: Check the video format, file path, and ensure the computer has the necessary codecs. If issues persist, consider converting the video to a more compatible format.
Embed Videos in PowerPoint An Article by Nicole Delgado 2024 | Marketing Manager | Explainer Video Company | Animated Explainer Video Production
Privacy Preference Center
Privacy preferences.
Critical PowerPoint Shortcuts – Claim Your FREE Training Module and Get Your Time Back!
How to Embed a Video in PowerPoint (Step-by-Step)
- PowerPoint Tutorials
- Shortcuts & Hacks
- September 27, 2019
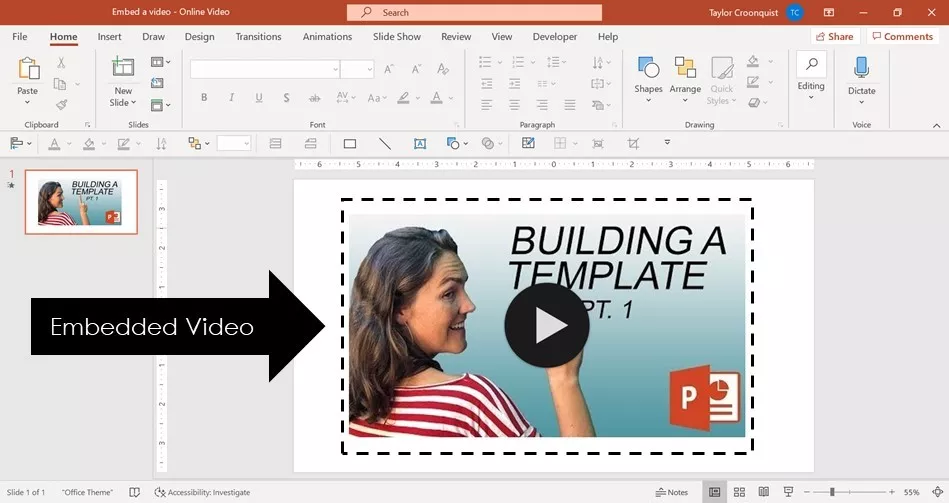
In this article, you’ll learn how to embed a video in PowerPoint directly from your hard drive as pictured below.
On top of that, you’ll learn what you can and can’t do when embedding videos into PowerPoint, including:
- How to trim a video (including how to trim a YouTube video)
- Getting your video to play full screen
- Creating a video thumbnail or Poster Frame
- How to compress your videos
If you want to grab the latest version of Microsoft Office (Microsoft 365) like I’m using in this tutorial, you can check it out here .
But before you get carried away adding videos to PowerPoint, it’s important to first understand what your options are.
Table of Contents
Embedding online videos vs. desktop videos.
- Videos from your computer
- Videos from online sources like YouTube
1. Video size
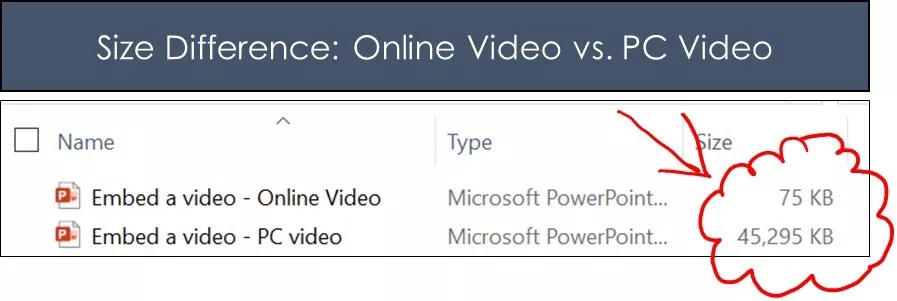
2. Internet connection
Online videos require a good – STRONG – internet connection to play properly.
That means that if you embed a YouTube video in your PowerPoint and the conference room you are presenting in has a weak internet connection, you are in trouble.
So I highly recommend spot checking the internet quality of the room you will be presenting in before working with any online video in your presentation.
If your internet connection is weak, be prepared to skip the video in your presentation.
3. Playback options
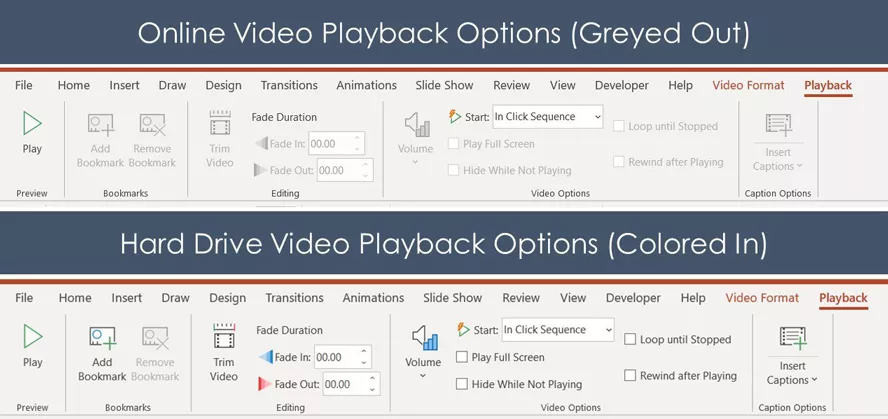
How to embed a video in PowerPoint
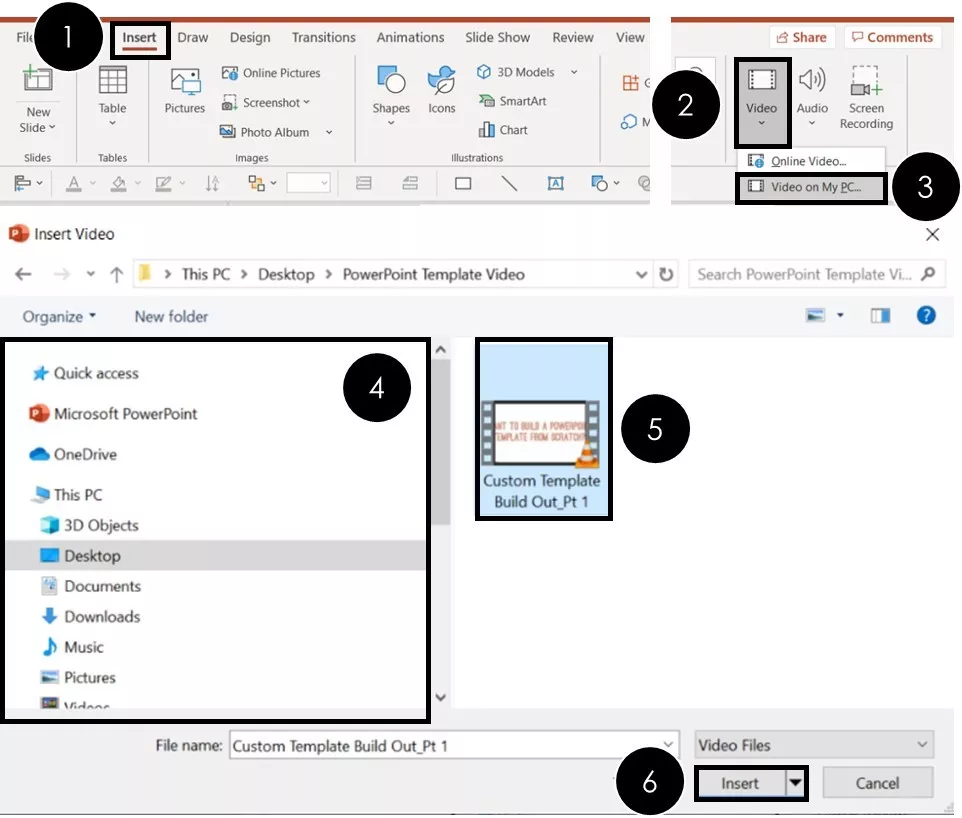
To embed a video in PowerPoint from your computer, simply:
- Navigate to the Insert tab
- Open the Video drop down (within the Media group)
- Choose Video on my PC
- Navigate to where the video resides on your PC
- Select the Video
- Click Insert
Clicking Insert , the video is added to your PowerPoint slide as an editable PowerPoint object, as you can see below.
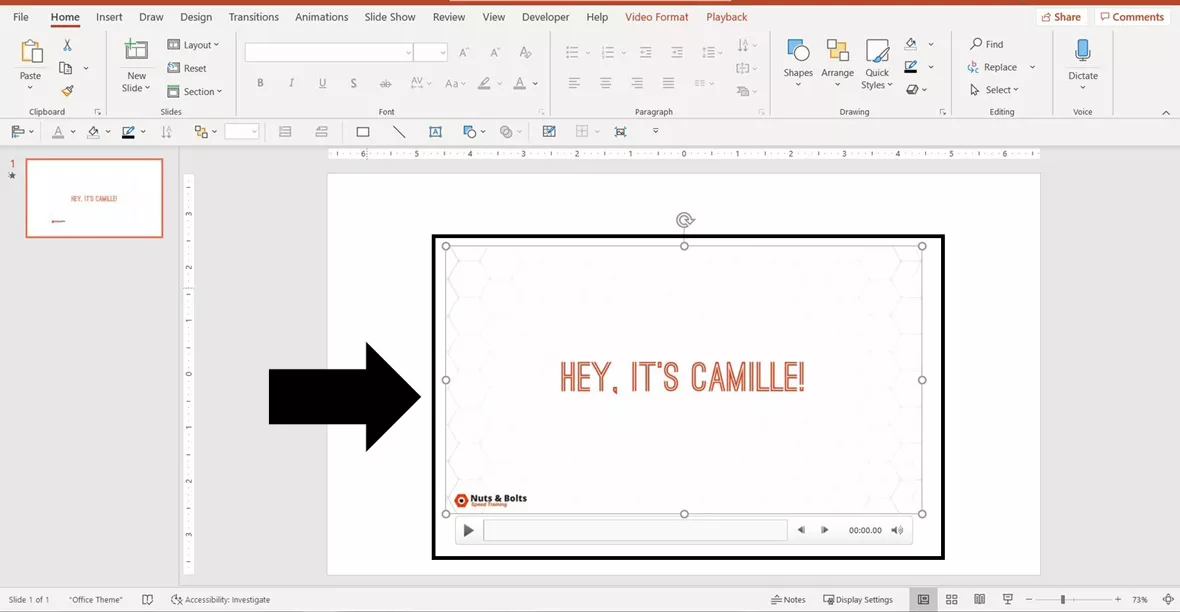
With the video now inserted on your slide, you can use the features found in the Video Playback and Formatting tabs. These tabs will be discussed below.
If you convert your presentation into a video, your embedded video will play within your video (if that makes sense). To learn how to convert PowerPoint to video, read our guide here .
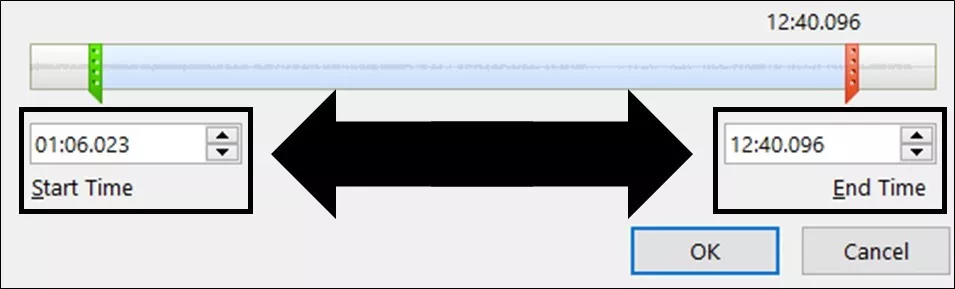
How to trim an embedded video in PowerPoint
- Select your video
- Navigate to the Playback tab
- Select the Trim Video command
- Adjust the Green Start Time cursor
- Adjust the Red End Time cursor
How to add a Video thumbnail
Adding a video thumbnail (or what PowerPoint calls a Poster Frame ) is super easy.
But this is only applicable to videos you add to your presentation from your computer. That’s because online videos will automatically populate with whatever thumbnail their creator gave it (you cannot edit it or change it in PowerPoint).
There are two types of thumbnails you can add to your videos in PowerPoint:
- Use a frame from your video as the thumbnail (easiest)
- Import your own custom thumbnail image (most flexible)
Neither is better or worse (your video will still play the same either way), it’s just a personal preference.
What is a video thumbnail and why is it important?
A video thumbnail is simply an image that is displayed before you play your video. You will see these on YouTube videos all the time before you click to play them.
In PowerPoint, the thumbnail image can become an important part of your overall slide design theme.
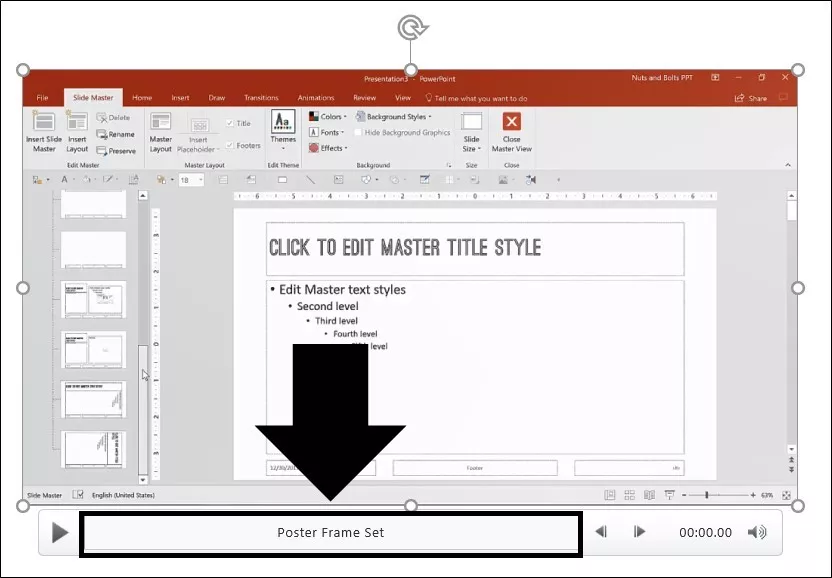
If you don’t add your own thumbnail, the first frame of your video will automatically be used as the video’s Poster Frame .
Adding a Poster Frame is an optional step, but can go a long way to improving the overall design of your PowerPoint slides.
Here are the different ways to add a thumbnail or Poster Frame to your embedded video:
1. Using a video frame as the thumbnail (or Poster Frame)
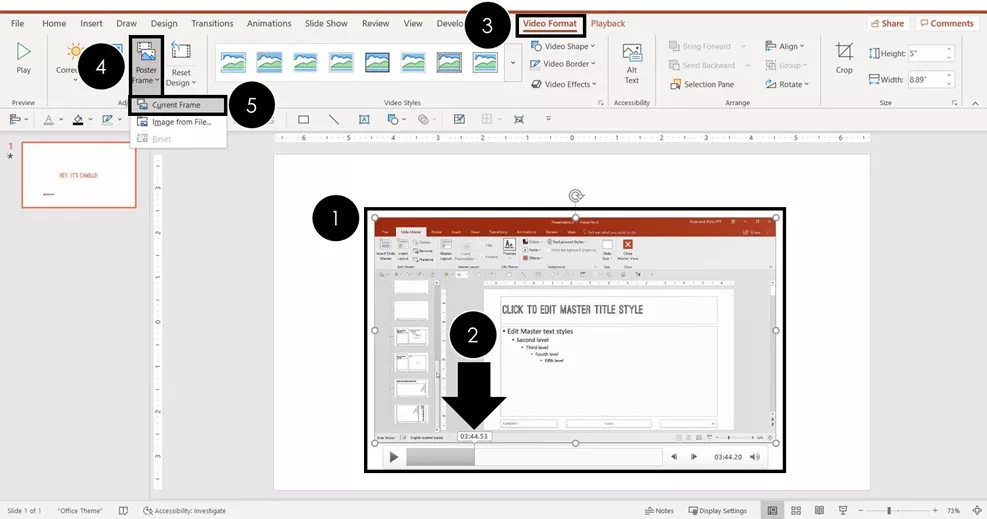
- Scrub to the video frame you want to use as your thumbnail
- Navigate to the Video Format tab
- Open the Poster Frame drop down
- Select Current Frame
2. Importing a video thumbnail (or Poster Frame)
- Choose Image from file…
- Select From a File
- Navigate to the image on your computer
- Select the image you wan to use
For help creating your own video thumbnail, you can see how to crop photos in PowerPoint and how to remove an image background .
How to reset a thumbnail (or Poster Frame)
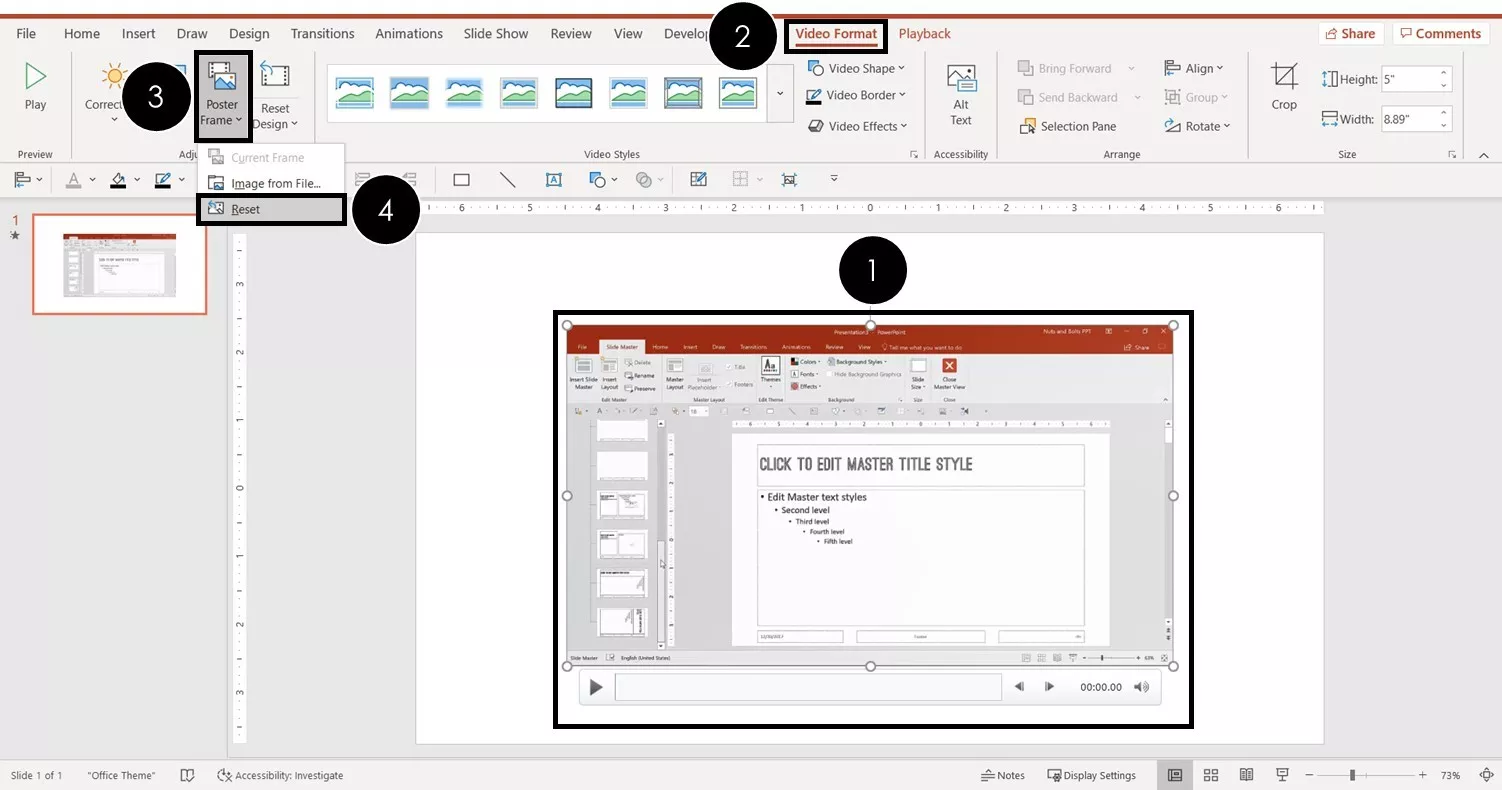
- Select Reset
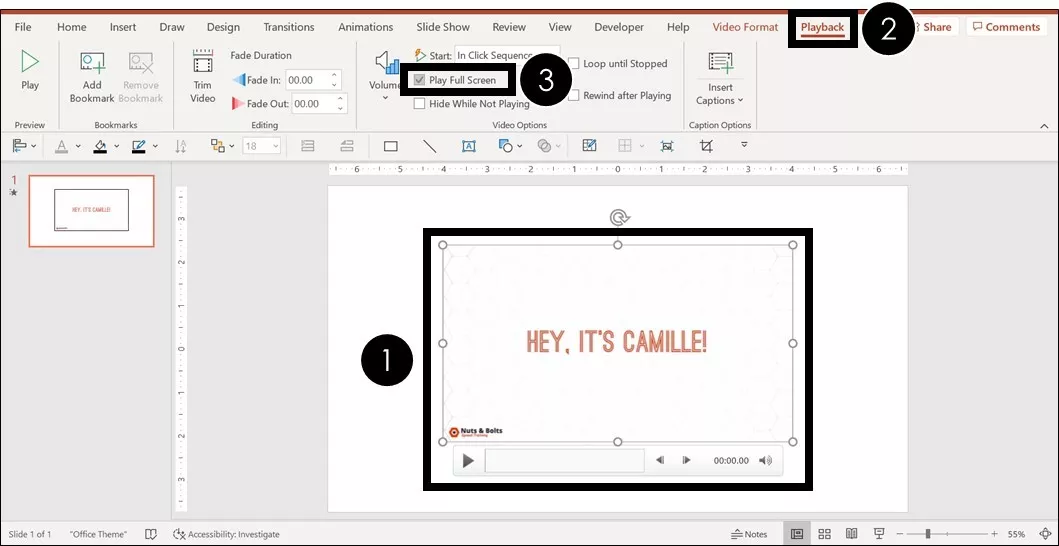
How to make a video play full screen
- Select the video on your slide
- Navigate to the Playback tab
- Click Play Full Screen
Getting an online video to play full screen
How to compress a video in PowerPoint
- Navigate to File
- Select the Info tab (selected by default)
- Open the Compress Media drop down
- Choose between 1080p , 720p and 480p
- Full HD (1080p) : Save space while maintaining overall audio and video quality.
- HD (720p): Quality will be comparable to media which is streamed over the Internet.
- Standard (480p): Use when space is limited, such as when sending presentations via e-mail.
So that’s how to embed a video in PowerPoint, including how to embed a YouTube video in PowerPoint.
You also learned about the different formatting options available to you, which can determine which type of video you want to embed in your PowerPoint presentations in the first place.
When used well, videos are a great way to back up your main points and improve the overall quality of your presentation as they are more engaging than static images.
🔒 Unlock the PowerPoint Shortcuts Trusted by Industry Leaders KKR, American Express, HSBC, and More!
Join over 114,880 professionals from diverse fields including consulting, investment banking, advertising, marketing, sales, and business development who have supercharged their PowerPoint game with our proven methods.
✅ Customize compelling presentations effortlessly.
✅ Master time-saving techniques for faster deck creation.
✅ Boost your career prospects with top-notch PowerPoint skills.
Get FREE access to the Critical PowerPoint Shortcuts module of our premium training course by entering your name and email below.
DISCLAIMER: PC Users Only!
We respect your privacy and will keep your info safe and confidential.
Related Articles
About the author.

Popular Tutorials
- How to Strikethrough Text (l̶i̶k̶e̶ ̶t̶h̶i̶s̶) in Word, Excel & PowerPoint
- How to Make Animated Fireworks in PowerPoint (Step-by-Step)
- Strikethrough Shortcut (l̶i̶k̶e̶ ̶t̶h̶i̶s̶) for Word, Excel & PowerPoint
- How to Create a Flash Card Memory Game in PowerPoint (Like Jeopardy)
- Keyboard Shortcuts Not Working: Solved
PowerPoint Tutorial Categories
- Strategies & Opinions
- Presentation Design
- Pictures, Icons, Videos, Etc.
- New Features
- Miscellaneous
- Charts & Data Viz
We help busy professionals save hours and gain peace of mind, with corporate workshops, self-paced courses and tutorials for PowerPoint and Word.
Work With Us
- Corporate Training
- Presentation & Template Design
- Courses & Downloads
- PowerPoint Articles
- Word Articles
- Productivity Resources
Find a Tutorial
- Free Training
- For Businesses
We help busy office workers save hours and gain peace of mind, with tips, training and tutorials for Microsoft PowerPoint and Word.
Master Critical PowerPoint Shortcuts – Secure Your FREE Training Module and Save Valuable Time!
⌛ Master time-saving expert techniques.
🔥 Create powerful presentations.
🚀 Propel your career to new heights.
We value your privacy – we keep your info safe.
Discover PowerPoint Hacks Loved by Industry Giants - KKR, AmEx, HSBC!
Over 114,880 professionals in finance, marketing and sales have revolutionized their PPT skills with our proven methods.
Gain FREE access to a full module of our premium PowerPoint training program – Get started today!
We hate spam too and promise to keep your information safe.
You are currently viewing a placeholder content from Facebook . To access the actual content, click the button below. Please note that doing so will share data with third-party providers.
- Video Marketing
- Events & Live Streaming
- Video Monetization
- Video Management
- Case Studies
- Creator Stories
- Staff Picks
- Pre-production
- Shooting & Gear
- Lighting & Sound
- Creation & Editing
- Post-production
- Vimeo Newsroom
- Investor Relations
- Product News
- Video Tools
- Vimeo Engineering Blog
How to embed videos in PowerPoint
Inserting a video into a Microsoft PowerPoint presentation is a great way to enhance your slides. Learn how to embed Vimeo and YouTube videos and insert MP4, AVI, and other formats to level up your deck.

For a lot of us, Microsoft PowerPoint represents a part of our lives we don’t often look fondly on. Whether that’s making presentations for school or work, with over one million companies using Office 365 worldwide, it’s safe to say you’ve either used it, or you will use it in the future.
However, PowerPoint (ppt) presentations don’t have to be boring with all text and a few images here and there. One trick you try to make your presentations more interesting and engaging is to embed video into your PowerPoint slides.
If the idea of adding video inside your slides is new to you (instead of minimizing the program and finding the video to play), then this guide will help you understand the benefits of using embedded videos, and how to do it with different video formats.
Table of contents
Videos help to explain complexity, videos minimize information overload, mixing mediums keeps your audience engaged, from your own video library, a video that’s not yours, add youtube video to powerpoint slide with a link, add youtube video to powerpoint slide with embed code, how to insert all other video types into powerpoint, what to do after you add a video to a powerpoint slide, adding video to powerpoint faqs, wrapping up, embed your beautiful videos anywhere with vimeo.
For reference, throughout this guide I’ll be using Version 16.51 PowerPoint for Mac (from Microsoft Office 365) and a standard design template for this tutorial. You may have a previous version of PowerPoint with slightly different wordings for buttons (which I’ll point out).
Why insert a video in a PowerPoint presentation?
First things first, let us take a look at some of the awesome benefits of adding video to PowerPoint presentations. While there are more than three benefits (particularly if you enjoy creating instructional videos ), or if your company makes use of asynchronous meetings , these are the main ones when it comes to the audience’s experience.

You may have heard some statistics floating around on the internet about how “65% of the population are visual learners”. While this particular stat isn’t actually based on empirical research to date, many people I’ve encountered throughout life seem to prefer videos in both learning and business environments.
The most obvious reason for these preferences is that videos often help to explain complexity a little easier than reading about it.
For example, in a 2018 Frontiers in Surgery study, viewing operative videos (vs reading a manuscript) greatly improved the confidence of trainee surgeons in performing difficult surgery.
Have you ever seen a presentation slide that was almost a full screen of block text and inwardly groaned at having to read it or watch the speaker read from the screen word for word?
Having too much information on a single slide is not only a design mistake but also contributes to information overload — which happens when someone faces “a level of information that is greater than their information processing capacity”.
Using video can help combat this problem by pacing out information at an easier rate than slamming someone with a huge wall of text all at once.
Similar to the point above, having a whole bunch of text in your presentation without anything else to break it up is a quick way to lose the interest of your audience.
Going to either extreme of using only text or only video isn’t likely to help people engage with the information you’re trying to give. However, giving a mix of mediums has a much better chance of increasing engagement in a learning environment.
In a business context, research suggests that the overwhelming majority (94%) of people surveyed report “watching explainer videos to learn more about a product, with 84% being swayed to make a purchase”. So including them in a sales deck may well work to persuade your audience into buying.
How to insert a Vimeo video into PowerPoint
Perhaps you have a portfolio of videos on your Vimeo account you want to add to your presentation instead. Thankfully, adding a Vimeo video to your slide show is just as easy as adding a YouTube video !
In fact, all the starting steps (insert video ➡️ online film ➡️ URL/embed code) are exactly the same. The only difference is the source of the video itself (and whether or not the video belongs to you).
So, from opening up the dialog box, you’ll want to head over to your Vimeo video library, which you can do by hovering over your profile picture and hitting the “videos” option in the drop-down menu:

From there, you’ll want to go to the video you want to embed (in this case, me playing a song I wrote) and click on the ‘link’ icon which will give you the option to either copy the URL or the embed code.
As I said before, for PowerPoint presentations, it doesn’t matter which one you choose since you need the internet to play them anyway.

With these options, simply paste your URL or embed code into the dialog box and it will insert the video to your slide.
As an additional measure, if for some reason the shortened embed code doesn’t work, you can also click on the video and copy the full embed code from the video options, like so:

From there, just as before you can paste the embed code in the PowerPoint dialog box and it works the same way.
To insert a video that doesn’t belong to you (but you have permission to use), it’s similar to how you would insert a YouTube video only the design is obviously different.
When you get to the Vimeo video you want to embed, click on the “share” button shaped like a paper airplane and you’ll get all the same options as before. All you have to do is copy either the URL or the embed code:

Just as before, paste either of these into the “online film” dialog box and your video will appear on the slide.
Quick note: to embed the video in PowerPoint, the video must be publicly available, or at least viewable via link. You can’t embed a video that is set to “Private”.
How to insert a YouTube video into PowerPoint
Whether you’re using the most updated version of PowerPoint or an older one, the steps are exactly the same here with the only difference being that older versions like PowerPoint 2010 may ask “video from website” rather than online video/film/movie depending on your localization.
There are two main ways you can insert a YouTube video into a slide in PowerPoint, and both require you to be connected to the internet when you add and play the video.
The easiest way to add a video in PowerPoint is to first, select the slide you want the video to appear on, then hit the insert tab and find the video icon towards the right:

From here, you’ll get a drop-down menu for various insert video options. Depending on your level of subscription, you may also see the “stock videos” option, which might be helpful in other situations. For now, choose “online film” (or movie/video).

After that, you’ll get a pop-up that asks you to paste the YouTube video URL into the box. In previous versions, you may also have the option here to search for a YouTube video inside PowerPoint, but it seems recent updates have removed that feature.

From here, you’ll need to find the YouTube video you want to add to your presentation, then either copy the URL from the address bar, from the right-click options, or hit the “share” button on the video and copy the URL from there:

Once you’ve copied the URL, paste it into the dialog box on PowerPoint and press “insert” or hit enter.
If you had an empty media box in the slide already (like I have in my slide above) your video will automatically paste into that box which you can resize afterward:

Shoutout to Abbie Emmons’ awesome YouTube channel for fiction writers.
However, if you had a blank slide before adding your video, it will appear in the middle of the slide. Resize and reposition however you want the video to appear.
Since YouTube videos require an internet connection for playback, it doesn’t necessarily matter whether you use the URL or the embed code. However, if you really want to use it, the embed code is a way for you to add the YouTube video without the link.
The starting steps are exactly the same as inserting a video via URL, except when you go to your chosen YouTube video, instead of copying the URL, you should click “Embed”. When you do, you’ll see the following screen:

If you click on the code box it should automatically select all of the code, but if you accidentally double-click you can either use your select-all keyboard shortcut (cmd+a for Mac, ctrl+a for Windows) or click off the box and back on it to reselect all.
Alternatively, if you right-click on the video itself, you can also copy the embed code from the options there.
Copy the embed code and paste it in the same dialog box as you do with the URL and you’ll get the same results.
After all of the above, what if you have a different video format to work with, or that the connection will be bad where you’re delivering your presentation? In this case, you’ll want to try embedding a video file from your computer.
Before you start, here’s a list of the video formats PowerPoint currently supports:
- AVI movie (Some .avi files may require additional codecs) (.avi or .vfw)
- MPEG-4 movie (.mp4, .mpg4)
- Apple MPEG-4 movie (.mv4)
- MPEG movie (.mpg, .mpeg, .mpe, .m75, .m15)
- MPEG-2 video (.m2v)
- MPEG-2 Transport Stream (.ts)
- QuickTime movie (.mov, .qt)
- DVI movie (.dif)
- Windows Video file (Some .avi files may require additional codecs) (.asf, .avi)
- MP4 Video file (only from 2013) (.mp4, .m4v, .mov)
- Movie file (.mpg, .mpeg)
- Windows Media Video file (.wmv)
As long as your video is one of the above formats, you’ll be fine. If not, you should try converting your file to one of the above before trying to embed it in your presentation.
So, in order to embed a video file, you’ll want to head back over to the “insert” tab and instead of clicking “online film”, select either “video browser” or “video from file”. Though in older versions, it will have “video on my pc” instead.

It may be unique to Mac, but if you select “video browser”, a “photos” window will pop up where you can browse videos from your photos app. In most cases though, you’ll want to pick “video from file” as it will take you to your folder manager (finder in Mac).
From here, you’ll be able to find the video you want to insert into your PowerPoint from the folder where it belongs:

When you select a video, the “insert” button will be available and you can click it to add the video to your slide.
Whether you decide to add a video from an online source or from your computer, here are the main points to keep in mind:
- Inserting a video from your computer will significantly increase the PowerPoint file size whereas an online video won’t.
- Using an online video requires an internet connection for the video to play while using a video file from your computer doesn’t.
Now you know how to add a video to your presentation, next we’ll briefly look at some of the options you have in terms of playing videos during your presentation.
Beyond simply adding the video to your slide, there are a couple of other considerations to take into account.
A lot of the time, you won’t have control over the thumbnail of the video you want to embed. However, if you want to change the thumbnail to an image you already have, you can do that by clicking on the “video format” tab and selecting either the “current frame” or “image from file” option, like so:

Changing the thumbnail also changes how it appears in the presentation overview in the left pane, and when you run through the presentation the video plays as normal.
Background video
If you want your video to appear in the background of your slide, all you need to do is make sure your video is high quality enough and resize it to fit the slide frame. If you want other elements to appear over the top, simply change the position using the “arrange” button in the Home tab.
The playback tab
The playback tab will also appear when you click on the embedded video, where you can change settings like whether the video starts automatically, when clicked on, or in the click sequence (handy if you have slide animations or text to work through first).
You can find these settings when you click on “start”:

Just below “start sequence” you can also check a box if you want the video to play full screen (not advisable with the automatic playback setting, or if you want the video to appear as part of the slide design).
If you’re working on a video you’ve embedded from your computer, you can also add bookmarks to let you quickly navigate different parts of the video, even during the presentation — great for topic changes or other segmentation.
You can either use a video stored on your computer by choosing the “video from file” option in the insert video tab or find the embed code of an online video.
Embed the video in your slide and then click on it to reveal the “Playback” tab. In there you’ll find the “start” settings where you can select “automatically” instead of the default “In Click Sequence” option.
You can either right-click on the video (on YouTube or any other site) and select the “copy embed code” option or hit the “share” button. In there you’ll find the “embed” option that brings up a window with the full embed code for you to copy.
At this point, you should know what the benefits are for including video in your presentations and exactly how to embed a video in PowerPoint, along with some bonus tips for using them.
Hopefully, you’ve come to realize just how easy it is to do and you’re feeling inspired to spice up your next presentation, or maybe even record your presentation to share it with the world!
Recording and sharing your presentation is a great, scalable way to asynchronously share information with your team or audience, so if you’re ready for the next step, check out video tools by Vimeo.
Your video, your brand
A video player engineered to make your work look beautiful anywhere.

Alexander Boswell
Alex is a freelance writer specializing in B2B SaaS and eCommerce marketing, as well as a business Ph.D. candidate. When he's not typing away, he's (slowly) learning Japanese and having a blast playing for the local baseball team.
Alex is a contributing writer. Vimeo commissions pieces from a variety of experts to provide a range of insights to our readers, and the views and opinions expressed here are solely those of the author. All content and any external links are provided for informational purposes only.
Up next in Hosting & Player
Vimeo vs. microsoft: which video software should you choose.
Vimeo offers a holistic video hosting and streaming platform for businesses and async team communications. See how Microsoft Stream (in Sharepoint), OneDrive, and Microsoft Teams compare on quality.
Vimeo vs. Brightcove: Which video platform should you choose?
Compare Brightcove and Vimeo based on features, integrations, more. Find out which software is best for personal use and for business.
Vimeo vs. Kaltura: Which video hosting site should you choose?
See how Vimeo compares to Kaltura as an agile and customizable video platform with plenty of integrations to choose from.
Your inbox needs more Vimeo.

Add media to a slide in PowerPoint
Using the Recording tab introduced in PowerPoint 2016, you can add a screenshot, screen recording, audio (such as background music), or video to a slide.
Tip: Don't see the Recording tab? Right-click any tab in PowerPoint and select Customize the Ribbon . On the right side of the dialog box you'll see a list of tabs. Make sure Recording is checked.
Insert a screenshot
Open the slide where you want the screenshot to be inserted.
Click Recording tab > Screenshot button > (the gallery of windows opens)
Either select one of the windows shown (for a full-window clipping of that app) or select Screen Clipping to define the area on your screen that you want to capture.
Insert a screen recording
You can record your computer screen and related audio, and then embed it into your PowerPoint slide―or you can save it as a separate file. See Record your screen in PowerPoint for directions.
Insert a video file
Open the slide where you want to add the video.
Click Recording tab > Video > and then browse to the location on your computer or network where the video file is stored. Select the file and click Insert .
The video will "auto-play" That means that when viewers look at the presentation in Slide Show, and they arrive at the slide where the video is placed, the video immediately begins to play. The viewer doesn't need to click Play to start it. When the video finishes playing, the slide show automatically advances to the next slide.
Important: If you insert a video this way, then subsequently trim the video, the trimming doesn't alter the auto-advance timing for the video. You must manually set the slide to advance at the appropriate time. (Select the video, click the Transitions tab of the ribbon, and at the far right end of the ribbon, adjust the Advance Slide > After setting to the amount of time that equals the length of the trimmed video.)

Embed a web video
Click Insert tab > Video > Online Video and then select or specify the video you want to embed.
See Insert or link to a video on YouTube for complete instructions.
Insert an audio file
Open the slide where you want to add the audio file.
Click Recording tab > Audio > Audio on My PC > and then browse to the location on your computer or network where the audio file is stored. Select the file and click Insert .
The recording will "auto-play" That means that when viewers look at the presentation in Slide Show, and they arrive at the slide where the audio recording is placed, it immediately begins to play. The viewer doesn't need to click Play to start it. When the audio finishes playing, the slide show automatically advances to the next slide.
Record sound and insert it on a slide
Open the slide where you want to add the audio.
Click Recording tab > Audio > Record Sound

Need more help?
Want more options.
Explore subscription benefits, browse training courses, learn how to secure your device, and more.

Microsoft 365 subscription benefits

Microsoft 365 training

Microsoft security

Accessibility center
Communities help you ask and answer questions, give feedback, and hear from experts with rich knowledge.

Ask the Microsoft Community

Microsoft Tech Community

Windows Insiders
Microsoft 365 Insiders
Was this information helpful?
Thank you for your feedback.
Make attention-worthy videos faster and better | Join us for a live VEED demo
How to apply code, 🇺🇦 ukrainians can now use all subtitle and translation features for free. use code 'ukraine', how to embed a video in powerpoint (step-by-step).

Today, I’m going to show you how to embed a video in PowerPoint to make your presentations come to life. I'm also going to cover some of the best practices for creating a PowerPoint presentation, as well as the frequently asked questions about inserting video in PowerPoint.
So, shall we get started?
How to upload a video to PowerPoint from your desktop or laptop
Embedding video in PowerPoint makes your file size larger. But it allows you to share a video with your audience without frantically looking for it on your computer while presenting. This tutorial is for PowerPoint 365. If you’re using an older version there might be some differences but you should still be able to follow along just fine. Just follow these five easy steps:
1. Start by opening your PowerPoint presentation and navigating to the slide where you want to insert your video.

2. Then, click the “Insert” tab.

3. Now, in the top right corner, click the arrow under the "Video" button, or in PowerPoint 365, click the arrow beside the "Video" button.

4. Next, click "Video on My PC/Movie from File" and select the video you want to insert. Then, click the “Insert” button.

5. The video will now appear on your slide. You can resize it or move it around on the slide as you see fit.

And that’s it. You’re good to go! Don’t forget to preview your entire presentation to ensure your video plays exactly as you want it to.
How to link a video in PowerPoint
Another method for inserting video in PowerPoint is to link the media on your slide to an external source or file. It will keep your presentation file size small as it will launch the video from its location on your PC. However, the link may be broken if you move the source video to a different location on your computer.
Here’s how to do it:
1. In the top left corner, click the “Insert” tab.
2. then, click the arrow under the “video” button, 3. on the drop-down menu, click “video on my pc/movie from file.”, 4. now, click the drop-down arrow beside or under “insert” and select “link to file.” if you’re using powerpoint 365, click the “option” button, then select “link to file.”.

4. Choose your video, then click “Insert.”

And voila! You’re all set! We suggest keeping your linked video and your PowerPoint presentation in the same folder so as not to lose either of them.
How to put a YouTube video in a PowerPoint
You can also add an online video to your PowerPoint presentation . This is a much better approach because you won’t have to download a video and it won’t add anything to your PowerPoint’s file size. However, to play the video during your presentation, you must have an internet connection.
Embedding a video from YouTube depends on the version of your PowerPoint. I’ll walk you through the process for PowerPoint 365, but it’s not that different from the earlier PowerPoint versions.
1. Copy the video’s URL from the address bar of your computer's web browser.

2. Choose the PowerPoint slide onto which you want to insert the video and click the "Insert" tab

3. Now, click “Video,” then choose “Online Video/Movie…

4. Once the online dialog box appears, paste the YouTube video URL and click “Insert.”

5. Now, click Play Video to ensure the video was successfully added.

Best Practices for Video PowerPoint Presentations from Ben, VEED’s Head of Enterprise
Download your videos to avoid issues from a bad internet connection when making and presenting your video powerpoint.
While inserting online videos in PowerPoint is a convenient way to avoid increasing the file size, you'll need an internet connection to play them while presenting. And what if your internet connection goes down during your presentation? Will you find your way out of this mess? Most likely, but it’s better to prepare for this situation.
Download video files from websites such as YouTube , Vimeo , or VEED, so you don't have to worry about retrieving them if your internet goes down. It's also a good idea to save your completed PowerPoint so you can present it if there are any connectivity issues during an in-person presentation.
Know when to upload a video vs. link to a video inside a PowerPoint
If you have lots of videos in your PowerPoint presentation, expect the file size to be huge. What you can do is to choose videos you can do without or whose content you can explain on your own, and then link to that video and let it stream over the internet. This is a great tip in case an internet connection issue arises. But, it’s always best to download the video as a backup just in case something happens.
Why should you embed a VEED video instead of a YouTube video for professional PowerPoint presentations?
Youtube videos play distracting off-topic advertisements, which we don’t want to see during a presentation. You’ll never have that problem with videos you create, edit, save, and share with VEED .
You can also use VEED to clean your audio, add subtitles to your video , and even translate it . This is useful when presenting to a global audience.
VEED can also help you take your presentation to the next level. Use our teleprompter to avoid forgetting your lines. You can also use our screen recorder tool to record yourself talking through your PowerPoint slides. Turn on your camera to keep your video personalized.
How to link to a VEED video inside of PowerPoint
- Upload your video to VEED. You can even import a YouTube video from the video’s URL.
- (Optional) Edit the video if needed
- Click on export
- Click on ‘share’ to copy and paste the video share link to the text (or image) on your presentation that’ll be hyperlinked.
Keep videos between 30 to 90 seconds long
Use videos to enhance your presentation, not to replace it. People don't have long attention spans , so keep it short but sweet. You only have the first 2.7 seconds of your video to capture your audience’s attention before they tune out.
In general, 60 to 90 seconds is the video duration sweet spot for engagement.
According to Forbes , the ideal video length for a presentation is only 30-60 seconds long because studies have shown that 75% of people will likely stick with a video if it’s only 60 seconds long.
Cover only one idea per video so the content is easy to digest.
Look into your camera’s lens and pace yourself
When recording, look directly into the camera lens. This is like looking your audience in the eyes.. They’ll feel as if you are speaking directly to them.
You can edit or re-record your lines using VEED's screen recording and teleprompter tool. You can also cut out the pauses before returning your gaze to the camera.
Frequently Asked Questions
How do you link to a video in powerpoint .
1. Take a screenshot of the video. For Mac users, simply press command + shift + 3; for PC users, press the PrtScn (Printscreen) key on your keyboard.
2. Click the slide where you want to insert the image.
3. Insert the screen-grabbed image onto the slide by clicking “Insert'' then clicking “Picture from file.”
4. Resize your image
5. Click the image, then go to “Insert,” then toggle down to “Hyperlink.”
6. Copy and paste the video link into the hyperlink dialogue box, then click OK. Use a YouTube video link if you don’t mind ads running. Use a video share link from VEED for an ad-free PowerPoint presentation.
How do I embed a video in a PowerPoint without a link?
The best option is to download it to your computer, then follow the steps for uploading video to PowerPoint from your desktop or laptop. You can also use VEED to download videos. Just paste the video’s URL into the upload screen. Export the video, then click “Download MP4”.
Why can I not embed a video in PowerPoint?
If you cannot insert video in PowerPoint, it’s possible the video you’re trying to embed isn’t compatible with Microsoft Office PowerPoint, the file is missing, the file moved, or the file is corrupted. It could also be because the actual PowerPoint file is missing plugins needed to insert the video.
How do you embed Vimeo videos in PowerPoint
1. Go to your Vimeo video library and find the video you want to embed.
2. Click on the “Link” icon.
3. Then select “Copy Video Link” or “Copy Embed Video.” It doesn’t matter which one you choose, as you’ll need the internet to play the video anyway.
4. Paste the URL or embed code into the PowerPoint, then proceed as if you were embedding a YouTube video.
How do you make a video on Powerpoint?1. Create slides- Structure your video with a title, body, and concluding slides by adding images, texts, and layer elements.
2. Add animations - Go to the animation ribbon and animate the key elements on your slide.
3. Insert video into PowerPoint - Navigate to the "Slideshow" tab and click "Record Slideshow" to insert an existing video or create screen recordings.Then hit the “Record” button.
4. Insert Audio- Go to the "Insert" tab and then click on the Audio in the top right corner of the PowerPoint. Then, from the drop-down menu, choose "Audio on My PC" or "Audio from file."
5. Export- Once you’re done adding animations, videos, and sound to your PowerPoint slides , it’s time to export the presentation as a video by clicking “File” and then “Export.” Then click on “Create a Video,” or for those using MS PowerPoint 365, choose where to save the video and change the file format to MP4.
How do you put a YouTube video in PowerPoint without ads?
1. Copy the YouTube video's URL that you want to embed.
2. Go to VEED.IO and paste the URL in the upload screen.
3. Export the video.
4. Click and copy the share link to put the ad-free YouTube video in the PowerPoint.
Make video presentations people love to watch quickly and easily
Now that you know how to embed a video in PowerPoint it's time to go give it a shot!
Make your presentation stand out by inserting videos in PowerPoint. Need to make a sales presentation at work? Make a screencast and use VEED’s screen recording and teleprompter tools. Harness the power of videos and make your PowerPoint more interesting.
Whether you’re an editing pro or a beginner, VEED can help you make and share videos people will love quickly and easily. No need to download any software! It’s an online video editor readily available to you! Try using it for your first or next PowerPoint presentation.
![How to Zoom Green Screen [Quick & Easy Guide]](https://cdn.prod.website-files.com/616e938268c8f0a92cb2b540/616e938268c8f0fe56b2c22e_Green-Screen-Blog-Thumbnail-1.png "insert a video in a powerpoint presentation")
How to Zoom Green Screen [Quick & Easy Guide]

Closed Captioning VS Subtitles: Differences & When to Use Them

0-1M ARR in 12 Months Bootstrapped
When it comes to amazing videos, all you need is veed.

How to Embed/Insert a Video in PowerPoint in Under 5 Minutes
- how to embed a video in power point

Don’t you dread those moments when a colleague opens up a drab Powerpoint presentation in the middle of a meeting? While it’s pretty easy to create a presentation on Powerpoint, you can’t deny that these soporific slides do little to engage your audience. Luckily, there’s a simple way to make your PowerPoint presentations engaging and fun: by embedding videos in them. With an intuitive online editing tool like InVideo , creating and editing videos is now easier than ever!
Create videos for your presentations
Using 5000+ customizable templates

If you are asking how to insert a video in a PowerPoint presentation, you are in the right place. We will cover 3 super simple ways to embed your videos into your PowerPoint presentation in this article and if you stick around to the end of this article, we will also cover how you can create professional videos for your presentation in minutes, even if you’ve never edited a video before!
Let’s dive in.
1. How to embed a video file from your PC/ Mac in a PowerPoint presentation 2. How to embed a video from YouTube in a PowerPoint presentation 3. How to embed a video from Vimeo in a PowerPoint presentation 4. Embed Video In PowerPoint - Online Vs. Offline 5. How to create professional videos for your PowerPoint presentation in minutes
1. How to embed a video file from your PC/ Mac in a PowerPoint presentation
Embedding a video to your PowerPoint depends on the version of Microsoft PowerPoint you have on your system. To make this easy for you, we share how you can embed a video in different versions of PowerPoint - before 2013, and 2013 onwards.
A. How to embed a video file from your PC/ Mac in a PowerPoint presentation (older versions of Office)
Find out how to insert a video in PowerPoint if you’re using Microsoft Office versions 2007, 2010 and 2011.
Step 1: Open up your presentation and go to the slide you wish to embed your video in.

Step 2: Go to the Insert tab.

Step 3: Now click on the "Video" drop-down and select the “Video from File” option.

Step 4: Now browse and select the video you want to upload to your presentation and click “Insert.” Note that if you are embedding a large video file, it may take some time for the video to be visible on your PowerPoint presentation.

Step 5: Now edit your video and adjust its position by dragging it. Use the “Format” and “Playback” options to further edit the size, position and colors of your video. You can also set how your embedded video will play during presenting - on click, or automatically, by going to Playback>Start and selecting the relevant option.

B. How to embed a video file from your PC/ Mac in a PowerPoint presentation (newer versions of Office)
Find out how to insert a video in PowerPoint if you’re using Microsoft Office versions 2013, 2015, 2017, 2018, 2019, 365.

Step 2: Go to the Insert menu and click on the "Video" drop-down.

Step 3: Now select the “Video on my PC” option.

Step 4: Now browse and select the video you want to insert. Once done, hit the Insert button.

Step 5: Adjust your video position, size, and look by using the options available.

That’s it. Simple right?
2. How to embed a video from YouTube in a PowerPoint presentation
Once again, embedding a YouTube video in PowerPoint depends on the version of Microsoft Office you are using. To make this simple for you, let’s look at the 2 most popular methods on how to insert a video in a PowerPoint presentation .
A. How to embed a video from YouTube in a PowerPoint presentation in Microsoft Office 365

Step 3: In the drop-down menu, select the “Online Video” option.

Step 4: Next you’ll see a pop-up asking for a video URL or link on your screen. Now go to YouTube and copy the video URL you want to embed in your PowerPoint.

Step 5: Navigate back to PowerPoint and paste the YouTube video URL in the search bar. Once done, you’ll see a preview of your YouTube video on the screen. Now click the “Insert” button.

Step 6: Now you will see your video embedded in your PowerPoint slide. Next, adjust it using the “Design Ideas” and the “Format’ and “Playback” menus.

B. How to embed a video from YouTube in a PowerPoint presentation in PowerPoint 2019, 2016, 2013, and 2010
Step 1: Open up the YouTube video you want to embed in your PowerPoint and click the “Share” option.

Step 2: Now click on the “Embed” option to get the Embed link for your YouTube video.

Step 3: Click the “Copy” button to copy your embed link.

Step 4: Now launch your PowerPoint presentation and open the slide you want to embed a video in.

Step 5: Next go to Insert> Online Videos

Step 6: Now select the “From a Video Embed Code” option.

Step 7: Now Paste your YouTube embed code in the space provided and click the arrow once done. That’s it. You will find your YouTube video embedded in your slide!

Step 8: Now you can reposition and adjust your video by clicking and dragging it. You can also right-click on it and use the “Style” option to edit the size, position of your video.

Step 9: Right-click on the video and choose the “Start” option to select how your video will play. Select this or your video might not play automatically!

3. How to embed a video from Vimeo in a PowerPoint presentation
Embedding a Vimeo video to your PowerPoint is also pretty similar to embedding a YouTube video. Once again, the methods depend on the version of Microsoft Office you work with. Let’s look at the steps.
A. How to embed a video from Vimeo in a PowerPoint presentation in Microsoft Office 365

Step 4: Next you’ll see a pop-up asking for a video URL or link on your screen. Now go to Vimeo and copy the video URL you want to embed in your PowerPoint.

Step 5: Navigate back to PowerPoint and paste the Vimeo video URL in the search bar. Once done, you’ll see a preview of your Vimeo video on the screen. Now click the “Insert” button.

B. How to embed a video from Vimeo in a PowerPoint presentation in PowerPoint 2019, 2016, 2013, and 2010
Step 1: Open up the Vimeo video you want to embed in your PowerPoint and click the “Share” option.

Step 2: Now click on the “Show Options” menu. Your pop-up will expand and you will see multiple options at the bottom that allow you to customise the code so that your video looks a certain way when you embed it in your PowerPoint.

Step 3: You can select the “Fixed Size” option if you want your video dimensions of a particular size. You can select the “Responsive” option if you want your video dimensions to change when viewed on different screens. You can control how your embedded video will look in your presentation by selecting one of the “Special Options,” changing the color of your video, and more.

Step 4: Once done with selecting the relevant options, go to the “Embed” section and copy the embed code.

Step 5: Now launch your PowerPoint presentation and open the slide you want to embed a video in.

Step 6: Next go to Insert> Video> Online Video

Step 7: Now select the “From a Video Embed Code” option.

Step 8: Now Paste your Vimeo embed code in the space provided and click the arrow once done. That’s it. You will find your YouTube video embedded in your slide!

Step 9: Now you can reposition and adjust your video by clicking and dragging it. You can also right-click on it and use the “Style” option to edit the size, position of your video.

Step 10: Right-click on the video and choose the “Start” option to select how your video will play. Select this or your video might not play automatically!

And that’s how you embed a Vimeo video in a PowerPoint presentation. Now let’s look at which options you should choose and when.
4. Embed Video In PowerPoint - Online Vs. Offline
Now that you are familiar with the different methods you can use to embed a video in a PowerPoint presentation, it’s time to look at the pros and cons of using each method.
|
|
|
|
| Embed a video file from your PC to PowerPoint | Since you can embed these videos from your computer, you don’t need access to the internet | You need to and have it saved on your PC. |
| Embed a YouTube video to PowerPoint (Microsoft Office 365) | It is a super quick and easy method to embed your videos to a PowerPoint presentation. | |
| Embed a YouTube video to PowerPoint (Microsoft Office 2019 or older - using the Embed code) | You can edit the embed code that you get from YouTube to better fit your needs. | You need to know HTML to be able to edit the embed code. You need the internet to be able to present this video. |
| Embed a Vimeo video to PowerPoint (Microsoft Office 365) | It is a super quick and easy method to insert your videos to PowerPoint. | You need the internet to be able to present this video during your presentation. |
| Embed a Vimeo video to PowerPoint (Microsoft Office 2019 or older - using the Embed code) | You get the option to control features like the size, the color as well as the way your video will appear on your presentation using this option. You can also edit the HTML embed code to customise your video, if you know how to edit HTML. | You need to know HTML to be able to edit the embed code manually. You need the internet to be able to present this video. |
5. How to create professional videos for your PowerPoint presentation in minutes
Although embedding your videos is a great way to make your PowerPoint interesting, what's really going to move the needle is creating your own impactful videos . Your own, branded, professional videos will help present your ideas in the right light. And now creating professional-looking videos is super easy and hassle-free.
While there are many methods to create your own videos the easiest way for you is to create your videos online for free.
A majority of business owners thought leaders, and marketers are using this method.
The best part? You don’t need to know any fancy editing or download any software. All you need is access to an online video creation one-stop shop like InVideo .
With an extensive library of over 5000+ templates along with ready-made assets like stock videos , animated text boxes, stickers, call to actions, and more, it’s super easy to create super professional videos on InVideo in minutes.
Here’s how you can create your own professional videos for PowerPoint presentations:
Step 1: Sign up or login to your InVideo account. Next select the “Pre-Made Templates” option. Now select the dimension you want your video to be in.

Step 2: Once done, type keywords related to the video you want to create in the search bar. For example, if you want to create a business video presentation for a PowerPoint, type “video presentation” in the search bar and hit enter.

Step 3: You can search for different types of templates relevant to a presentation such as a demo video , a quote video , a business presentation video or review videos and more. Click on different templates to expand them and watch a preview. Once you have decided which template you wish to use, just click on the “Use This Template” button and you will be redirected to the InVideo editor.

Step 4: Once the InVideo editor is launched, you can customise your chosen template by editing the text and colors to your brand colors, adding your logo and other elements as you see fit. To edit the text in your template, all you need to do is select the text by clicking on it. Next just go to the menu on top of your video to edit the font, color, and size of your text.

Step 5: You can also edit or add different elements to your video from the panel on the left side of your screen. Edit or add sound , music or a voiceover, add stock videos, graphics, effects, and transitions to make your video look professional.

To know more about accessing and customising 5000+ templates on InVideo for free, check out the video below.
So now that you know how to embed a video in a PowerPoint presentation, go ahead and experiment. In fact, you can completely ditch the presentation altogether in favour of a video presentation . Here’s our favourite template for you to build a stunning review presentation in the form of a video.
Use This Template
Create professional videos in minutes
Without learning pro skills

Wrapping Up
If you’ve found value in this article, and are looking to create your own stunning video presentations, check out these video presentation templates that you can get started with today. Also, look at this guide where we’ve put together 200+ video ideas for businesses and brands that you can take further inspiration from.
For more quick tips and hacks on editing and creating videos, subscribe to InVideo’s YouTube Channel . Finally, if you’re looking to create thumb-stopping videos in minutes (even if you’re not a PRO)- sign-up for a free account on InVideo.io today.
This post was written by Upasna and edited by Abhilash from Team InVideo
Let’s create superb videos
Ready to get started?
How to embed a video in powerpoint from youtube, pc, or mac.

- 26 Oct 2017
Raise your hand if you tune out as soon as someone opens a PowerPoint deck during a meeting at work. Everyone? Of course. While PowerPoint remains one of the simplest ways to create a presentation, it’s also become one of the most hated parts of office life. We’ll show you how to embed a video in PowerPoint so you can overcome the dreaded death-by-too-many-slides.
This article covers how to insert a video into a PowerPoint presentation directly from YouTube or another video site, as well as embedding a video from your PC or Mac.
Create videos that drive action
Activate your audience with impactful, on-brand videos. Create them simply and collaboratively with Biteable.
Before we dive in, it’s important to remember that embedding a video into a PowerPoint presentation isn’t fool-proof. Your presentation is only as good as the video embedded within it. If you need to make engaging and relevant presentation videos to add to your PowerPoint, you can do it in minutes with Biteable.
Grab a video template from the Biteable template library, punch it up with your own text, and embed that video into your PowerPoint presentation like a pro.
How to insert a video in PowerPoint from YouTube or another site
The process for inserting a video into PowerPoint from YouTube varies depending on your operating system and version of PowerPoint.
To insert an online video into a presentation in PowerPoint 365:
- Open your presentation in PowerPoint 365 .
- click “Insert Video”
- Choose “Online Video”
- Insert the URL for any web video from YouTube, SlideShare, Vimeo, or Stream.
Note: For this to work, you’ll need internet during your presentation.

To insert an online video into a presentation in PowerPoint from your PC:
The following steps work for embedding YouTube videos in PowerPoint 2019, 2016, 2013, and 2010 from a PC.
1. On YouTube, find the video you want, click the share button below the video frame, and choose Embed .
2. Copy the Embed code. Make sure it’s the right code. Don’t copy the URL on the initial “Share” popup screen. After clicking the “Embed” icon, wait for a popup screen called “Embed Video”. Here, click the “Copy” button in the bottom right corner. The correct code should start with <iframe width .
3. Switch to PowerPoint and select the slide you’ll add your video to .
4. Click “Insert”. Here, you can insert different objects into the slide.
5. Click Video > Online Video. If you’re in PowerPoint 2019 or earlier, choose “Video from Website” instead.
6. Click “Paste Embed Code Here” and paste the Embed code you copied in Step 2. For PowerPoint 2010, click “Insert Video From Website.”
7. Select the video and click “Playback”.
8. Click the Start menu to select how the video plays. This is important. Your video won’t work unless you choose one of these options.
9. Be online when you hit “Play”. You’ll need the internet for your video to work.
To insert an online video into a PowerPoint in Mac OS:
The following steps work for embedding YouTube videos in PowerPoint for Mac.
1. On YouTube, find the video you want, click the share button below the video frame, and copy the link.
2. Go to PowerPoint and select your slide.
3 Click insert > Add-ins > Store
4 Type ”web video player” into the search bar, then hit enter
5. Select web video player . Click add .
6 In the popup window labeled web video player , paste the link you copied from YouTube in Step 1.
7. Hit set video .
How to embed a video in PowerPoint from your PC or Mac
There are two ways to insert a video file into PowerPoint from your PC or Mac. The first is to insert an embedded video from your computer (which we’ll go over in this section). The second is to link to a video file stored on your computer. We’ll show you that option in the next section.
There are pros and cons to embedding a video into your PowerPoint (verses linking to a video).
When you embed a video, you add that video into the PowerPoint itself. If you send the PowerPoint presentation to someone else, they’ll be able to play the video without trouble. The only downside is that a PowerPoint with an embedded video will have a larger file size. Be mindful of this.
Follow these steps to embed a video in PowerPoint from your PC or Mac:
1. Click on the PowerPoint slide you want, then go to Menu > Insert.

2. In the top right corner, click Video > Video on My PC.

3. Find the video you want to embed and click “Insert”.
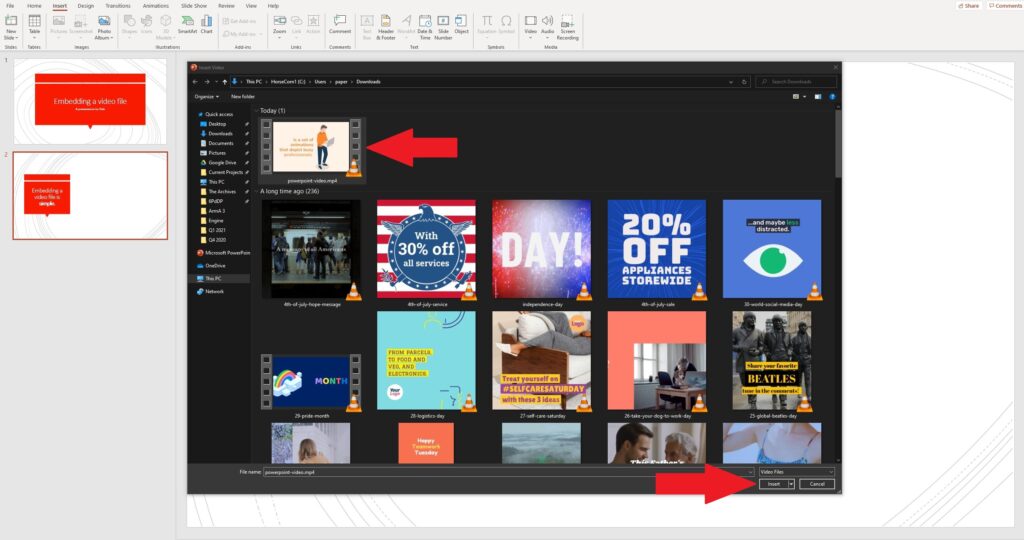
4. Adjust the settings in the Video Format toolbar
To make sure your embedded video file plays the way you want, go to the Video Format toolbar and check the settings. For example, if you want your video to take center stage as soon as you click on the slide, select “Play Full Screen” and “Start Automatically”.

5. Preview your presentation
The final step to embedding a video in a PowerPoint presentation is to check if your video plays exactly how you want it to. That’s it! You’re done.
How to insert and play a video file link from your computer
If you’d rather insert a link to a video stored on your computer, that’s an option too. The process is very similar to the one you use when you embed a video in your PowerPoint.
Compared to embedding a video directly into a PowerPoint, linking to a file stored on your PC or Mac keeps the file size of your presentation smaller. The downside is that links break and videos get deleted from computers.
For the video to play in your PowerPoint, an actual copy of the linked video must be stored on your computer. If you choose this option, keep the video itself in the same folder as the PowerPoint presentation. When you send the PowerPoint to someone else, be sure to send the linked video as well.
Follow these steps to insert and play a video file link from your computer:
- Click on the PowerPoint slide, then go to Menu > Insert.
- Click Video > Video on My PC
- Find the video you want to link to and click “Link to File”.
Why can I not embed a video in PowerPoint?
If you can’t embed a video in PowerPoint from your PC or Mac, then you’re probably using an unsupported format. Your video needs to be WMV, ASF, or MP4. Microsoft recommends embedding a video file in MP4 format encoded with H.264 (MPEG-4 AVC).
Master video-centered PowerPoint presentations with these tips
There are a few best practices when creating Biteable videos for presentations .
Be clear with your script.
The video you embed in your PowerPoint replaces bullet points, so use clear and concise language. A simple message makes it easier for your audience to follow along.
Pick colors that pop.
A good-looking video goes a long way to keeping your audience’s attention. Increase engagement with colorful (but not gaudy) backgrounds and animations. You can find a ton of easy-to-edit animation scenes in the Biteable animated templates library.
Keep it short and sweet.
Generally, a video between 30-60 seconds is ideal for a presentation. If a video runs longer than a minute, break it up across multiple slides so it can be digested in bite-sized chunks.
Make videos to embed in your next smash-hit PowerPoint presentation with Biteable
Biteable makes it easy to create embedded videos for PowerPoint so your next important presentation becomes a smash-hit. Create infographics, explainer videos , or video presentations in a no time.
Make stunning videos with ease.
Take the struggle out of team communication.
Try Biteable now.
- No credit card required
- No complicated design decisions
- No experience necessary
Animoto Blog
- Video Marketing
- Video Ideas
- News & Features
How to Embed a Video in Powerpoint (The Easy Way)
May 21, 2018
The persuasive power of video is not limited to the social media feed.
Many a presentation has been improved with the addition of a video, and in this article, we’ll lay out how to add video to PowerPoint. We’ll cover how to embed directly or from a YouTube video, as well as the steps to take once you’ve successfully inserted the video into your PowerPoint presentation to help you put your best foot forward.

For both of these techniques, make sure that Microsoft Office is updated to the latest version.
How to add video from a file
The first approach, adding video to PowerPoint using a file on your computer, is fairly straightforward.
Step 1: Choose your slide.
First thing’s first, open your presentation and navigate to the slide you want to add a video to. You can always reorder your slides later if you change your mind.
Step 2: Select your video.
Click “Insert” in the top navigation bar, select “Movie” and then click “Movie from File.” From there, select the file you’d like to insert.

Alternatively, select “Media” (or “Movie,” depending on whether you’re using a Mac or PC) from the “Insert” section of the Home menu in the PowerPoint control panel and follow the same steps as above.

Step 3: Format your video.
Once your video is inserted, you can make adjustments, including whether you want it to play automatically or upon being clicked, choosing a thumbnail, adding a border, visual effects, and more. Start your slideshow to make sure everything is to your liking, and you’re done!
How to put a YouTube video in Powerpoint
If you don’t have the file on your computer, embedding from YouTube is a fine alternative. Note that the steps listed below are only applicable to PC owners. For Mac instructions, you’ll need to download a free app, which is linked to on Microsoft Office’s support page here .
Stop us if this sounds familiar: Open your presentation and navigate to the slide in question. You can always reorder your slides later if you change your mind.
Step 2: Find your YouTube video.
You probably saw this one coming. Once you’ve navigated to the video, click “SHARE,” then “EMBED,” and look over the options for your embedded file before you copy the code. You may want to uncheck the suggested videos, for instance. Then copy that code by pressing “CTRL+C” or “Command+C,” and return to PowerPoint.
Step 3: Insert your video.
Click the “Insert” tab, select “Video,” and then click “Online Video.” Older versions of PowerPoint will say “Video from Website.” Paste your embed code into the field that appears. You can also embed videos from other sources, such as Vimeo, using either this approach, or the app mentioned in the support page linked to above.
Click the “playback” tab to decide whether you want your video to play automatically or upon being clicked, choose a thumbnail, add a border, visual effects, and more. Start your slideshow to make sure everything is to your liking, and you’re done!
**NOTE: **For YouTube embeds, ensure that you’ll have internet access wherever you’ll be giving your presentation, as you won’t have downloaded the file itself.
Google Slides
If you’re creating a presentation in Google Slides, rather than PowerPoint, then we’ve got you covered there as well.
Step 1: Choose your video.
Navigate to the slide you’ll be playing your video on, click “Insert” from the navigation bar, and select “Video.” You’ll be given the option to search within YouTube for a video, input a YouTube URL, or select a file from your Drive. Choose one, select your desired video, and it’ll appear on your slide.

Step 2: Format your video.
Feel free to position your video however you choose on your slide, as well as drag from the corner of the video to resize it. You can also right-click on the video to open “Video Options,” which will allow you to choose the points at which your video will start and end, as well as whether you’d like the sound to play, and whether or not you want your video to autoplay.
Any questions?
Make sense? Let us know if you have any questions, and we wish you the best of luck in your upcoming presentation!
- Marketing video
- How-to video
- Slideshow video
- Social media
- Promo video
- Birthday video
- Intro / Outro videos
- Explainer video
- Email marketing
- Training video
- Internal communications video
- Presentation video
- Photography
- Real Estate
- Marketing Agency
- HR / People Ops
- Video commenting tool
- Screen recorder
- Photo video maker
- Music library
- Online video editor
- Video trimming
- Stock library
- Privacy policy
- Terms of use
- Animoto Tutorials
© 2024 Animoto Inc. All Rights Reserved.
- Vote: Reader’s Choice
- Meta Quest 4
- Google Pixel 9
- Google Pixel 8a
- Apple Vision Pro 2
- Nintendo Switch 2
- Samsung Galaxy Ring
- Yellowstone Season 6
- Recall an Email in Outlook
- Stranger Things Season 5
How to use Microsoft PowerPoint

Creating a successful slideshow is no small task. So, if you’re new to Microsoft PowerPoint, you’ll need to familiarize yourself with the features and tools you need to build a presentation.
How to create a slideshow
How to add a slide, how to insert slide elements, how to use different views, how to add speaker notes, how to start and end a presentation.
We’ll guide you through the process of creating a PowerPoint slideshow by adding slides and elements as well as how to present the show when you finish. These basics are just what you need as a beginner and should get you off to a terrific start with PowerPoint.
Note : The information in this tutorial applies to PowerPoint for Microsoft 365 on Windows. While you may see variations in features or menus, most PowerPoint versions have the same basic options.
When you open the application, you can create a new blank slideshow or use a built-in PowerPoint template . To best familiarize yourself with the application and the items we’ll walk through here, select a Blank slideshow on the Home screen and follow along.
Next, you’ll want to name and save your presentation file. Select File > Save or Save As name the file on the right, choose a location for it, and select Save .
Be sure to continue saving your slideshow regularly as you work on it by selecting Save in the Quick Access Toolbar.
A Blank presentation in PowerPoint starts you off with a main slide. You’ll notice a text box at the top for the title and one beneath for the subtitle. Simply click inside these boxes to enter your text.
While it’s good to get in the habit of using title slides like these to begin future presentations, you’ll also need to know how to insert the additional slides.
Go to either the Home or Insert tab and open the New Slide menu in the ribbon.
Choose the layout you want to use for the new slide. You’ll see several options that include placeholders, which is handy for popping in what you need like text, lists, or images.
Once the slide appears, click inside a placeholder to add the necessary elements.
Continue to insert as many slides as you want the same way.
Along with using the placeholders on the slides, you can add your own items. This is helpful if a slide doesn’t contain the number or type of placeholders you need.
Add a text box
One popular slide element to add is a text box, which is just like the title and subtitle boxes on the title slide. With it, you can insert and format text as you wish.
Go to the Insert tab and select Text box in the Text group.
You can use your cursor to draw the size of the box you want or simply click the slide and begin typing inside the box.
To format the text in the box, select it and go to the Home tab. Use the options in the Font section of the ribbon to adjust the style, size, color, or emphasis.
Specific to PowerPoint on Windows, you’ll also see a floating toolbar appear near the text that you select. This toolbar contains the same features as on the Home tab along with additional options.
Add images, shapes, and icons
Because a slideshow is a visual tool, you’ll likely want to add photos, illustrations, shapes, or icons to slides.
Go to the Insert tab and open the Pictures , Shapes , or Icons menu.
- Pictures : Pick an image from your device, one of the stock images, or an online picture and select Insert .
- Shapes : Pick a shape from the menu and use your cursor to draw it on the slide.
- Icons : Search or use the categories to find the icon, select it, and click Insert .
Once you insert one of the above on your slide, you’ll see the corresponding tab appear to format the object. For pictures, you have a Picture Format tab, for shapes, you have a Shape Format tab, and for icons, you have a Graphics Format tab.
You can use the tools in the ribbon to do things like change the color, add a border, align or rotate the object, and resize it.
Add audio or video
Another useful object to add to your slides is an audio file or video. You can then play the sound or video clip during your presentation.
Go to the Insert tab and open the Audio or Video menu.
- Audio : Pick an audio file on your device or record audio on the spot.
- Video : Pick a video from your device, one of the stock videos, or an online video and select Insert .
Like with images and shapes, you’ll see tabs appear to format the file you insert. For audio, you have an Audio Format tab, for video, you have a Video Format tab, and for both types of files, you have a Playback tab.
Use the Format tabs to adjust the color, add a border, or apply an effect and the Playback tab to set a fade in or out effect, loop the playback, or play it in the background.
You can take advantage of different views in PowerPoint for accomplishing various tasks. This is helpful for seeing all of your slides in a grid, viewing a notes page, or working with an outline.
Go to the View tab and you’ll see the options in the Presentation Views group.
- Normal : Use this to create and edit your slides.
- Outline View : Use this to work with an outline of your presentation. Each slide is numbered with a hierarchy of slide elements.
- Slide Sorter : Use this to see your slides in a grid format for an overall slideshow view.
- Notes Page : Use this to view your presentation with notes if you decide to print it .
- Reading View : Use this to play your slideshow in the same window without entering full-screen mode.
Use the tools in the Show section of the View tab to display a Ruler , Gridlines , or Guides . These items can help you line up your slide elements.
You can also select the Zoom and Fit to Window options in the Zoom section of the ribbon to get a better view of slide items or the overall slide.
Presenting a slideshow is similar to giving a speech where you may want to use speaker notes. Like note cards, you can add notes to each slide in your presentation. When you present the slideshow, only you can view your notes; your audience cannot see them.
Select Notes in the Status Bar at the bottom of the PowerPoint window or go to View > Notes .
Add your notes in the section that appears below the slide.
You can use the options in the Font section of the Home tab to add emphasis or create a list.
For more detail, check out our how-to for adding notes in PowerPoint .
When you’re ready to present your PowerPoint slideshow or to see it as your audience will, you can start the presentation anytime.
Go to the Slide Show tab.
To display your speaker notes and a dashboard of controls while you present, check the box for Use Presenter View in the Monitors section. Then, select the monitors for the slideshow display and presenter view using the Monitor drop-down menu.
On the left side of the ribbon, pick From Beginning or From Current Slide per your preference.
When the slideshow starts, you’ll see what your audience sees on one monitor with Presenter View on the other. This is a super helpful way to present your slideshow because the Presenter View window provides you with controls.
If you’re unable to use more than one monitor, you’ll also see controls on the bottom left of the slides.
In the Presenter View window, you’ll see the current slide on the left with the controls beneath and the next slide on the right along with your speaker notes.
To use a control, hover your cursor over each button for a brief description.
From left to right, you can choose a laser pointer or pen, see all slides in a grid, zoom in on the slide, display a black screen, turn the subtitles or camera on or off, and view additional options like changing the subtitle settings or ending the presentation.
To stop presentation mode, press your Esc key, select End Slide Show at the top, or use the three dots to choose End Show .
While this beginner’s guide to using PowerPoint should get you off to a great start creating and presenting your first slideshow, there’s plenty more to learn. Check out how to use Presenter Coach for rehearsing your presentation and best practices for making awesome PowerPoint slides for tips and suggestions.
Editors’ Recommendations
- What is Microsoft Teams? How to use the collaboration app
- What is Microsoft Edge and how to use it
- Best Microsoft Office deals: Get Word, PowerPoint, and Excel for free
- Copilot Pro: how to use Microsoft’s advanced AI sidekick
- Microsoft Copilot: how to use this powerful AI assistant

Microsoft hasn't been shy about pushing first-party services and apps in Windows, but this time, it's getting a little ridiculous. As reported by Windows Latest, the Microsoft application PC Manager claims you can "fix" your computer simply by changing Bing to be the default search engine.
The change was spotted when using the Edge browser and having, for example, Google as the default search engine. After you run a health check, one of the suggested changes will be to set Bing as your default search engine. If that's how you want to go, there's a button to make it happen.
In its Annual Work Trend Index, Microsoft has, unsurprisingly, published some fresh data around AI in the workplace. The big stat is that according to its survey, 75% of "knowledge workers" are already using generative AI at work, with that number doubling in the last six months alone.
The survey defines "knowledge workers" as "those who typically work at a desk (whether in an office or at home)," which is a pretty broad demographic.
Microsoft Teams was introduced in 2017 as a unified communication and collaboration platform aimed at helping businesses and organizations get things done. Microsoft leveraged the company's existing Office software experience and created a unified experience between Teams, Office 365, and Skype for Business. However, as with all software, things don't always go according to plan. Sometimes you can run into Teams problems.
We're big Teams users here at Digital Trends -- it's our go-to communication and meeting tool -- and we've come across a few issues ourselves over the years. In the event you're having Microsoft Teams issues, here's how to fix some of the most common problems.
Home > Video Repair Tips > Troubleshooting PowerPoint: Resolving the Issue of Inserting Videos from Selected Files
HitPaw Video Enhancer
- AI upscaling your video with only one click
- Solution for low res videos, increase video resolution up to 8K
- Provide best noise reduction for videos to get rid of unclarity
- Exclusive designed AI for perfection of anime and human face videos

Troubleshooting PowerPoint: Resolving the Issue of Inserting Videos from Selected Files
Incorporating videos into your PowerPoint presentation can greatly enhance your message by providing visual support and illustrating complex ideas. But when you try to add a video, you may encounter an annoying “powerpoint cannot insert a video from the selected file” error. But don't panic. Many users are facing the same error.
We will provide you troubleshooting solutions to get you back on track and help you create engaging and dynamic presentations. Let’s get started.
Part 1. Understanding the Issue of PowerPoint Not Inserting Videos
Sometimes when you try to add video into a PowerPoint presentation, an error meassage stating “powerpoint cannot insert video from the selected file” may appear. This issue usually occurs due to compatibility problems with the video format or the codec used to encode the video. Although it's a typical issue the first step in finding a solution is understanding why it occurs.
Videos play important role in PowerPoint presentations. They make your writing more engaging, explain difficult concepts and grab the attention of your audience by bringing your content to life with dynamic graphics. A well-selected video can add uniqueness to your presentation.
It is important to use formats that PowerPoint supports in order to prevent problems while inserting videos. One of the most frequently used formats is MP4, which has wide compatibility and high quality. Although MOV, WMV and AVI are other frequently used formats, you can avoid issues by making sure the video format you are using is suitable.
Part 2. Common Reasons Why PowerPoint Cannot Insert a Video from the Selected File
Unsupported video formats.
Using the file format which is not supported by PowerPoint is one of the most frequent reasons PowerPoint cannot insert a video from the selected file. Some formats like WMV, AVI and MP4 are compatible with your version of PowerPoint but there are other formats that may not. PowerPoint may face trouble handling your video if it is in a less popular format which would result in the error.
File corruption issues
If the video file you are trying to add to your PowerPoint presentation is corrupted, you won't be able to insert it. This may occur if the file was corrupted during transfer, improperly downloaded or encountered conversion problems, which would result in errors.
Compatibility Issues with PowerPoint Versions
Various video formats and codecs are not supported by older versions of PowerPoint. So, if you try to insert a video file whose format or the codec is not supported by PowerPoint, it would not be able to handle newer video formats. This compatibility gap may cause issues including PowerPoint cannot insert a video from the selected file.
Part 3. Step-by-Step Guide to Fix PowerPoint Cannot Insert a Video from the Selected File
You can overcome the frustrating issue where PowerPoint cannot insert a video from the selected file by trying out some common solutions given below:
A. Checking video format compatibility
Sometimes the video format you are trying to insert might not be supported by PowerPoint. Although MP4 is most widely used format, problems may still arise even if you're using a widely used format like MP4. You can resolve “PowerPoint cannot insert a video from the selected file MP4” issue by converting video to compatible format.
1. First step is to check if the format is compatible with your version of PowerPoint.
2. If not not supported then convert it to compatible format. Formats like MP4, AVI and WMV usually work well.
3. When your video is converted try inserting it into your presentation to see if the issue is fixed.
B. Updating PowerPoint and System Software
Older versions of PowerPoint may not support newer media formats or might have bugs that cause playback issues. Keeping PowerPoint and your operating system updated ensures they support the latest video formats and avoid these compatibility issues.
Here’s how you can update PowerPoint to the latest version:
1. Open a new slide on a PowerPoint.
2. Go to the File tab at the top of the screen.

3. Select “Account” from the File menu.

4. Select “Update” Options, then click on “Update Now” or Check for Updates depending on your PowerPoint version.

5. After updating, try playing the media file again to see if the problem is resolved.
If still the issue is present, update your operating system. Outdated software may lead to malfunctions. Here is how to update the operating system.
1. Go to "Settings" > "Update & Security" > "Check for updates."
2. Download and install if updates are available.

C. Repairing corrupted video files: Recommended tool - HitPaw Video Enhance
If the above methods don’t fix the "PowerPoint cannot insert video from the selected file" issue consider using HitPaw Video Enhancer . This tool is great for repairing video files that have become corrupted, broken or damaged during transfer. It is designed to handle videos that cause problems when played on a computer or other devices.
Whether your video files are corrupted or just not compatible with PowerPoint, HitPaw Video Enhancer can help. It repairs all kinds of corrupted videos and makes them playable again.

HitPaw Video Enhancer - The Best 8K Video Enhancer with Only 1 Click
Secure Verified. 349,500 people have downloaded it.
- Fix corrupted or unplayable video files with cutting-edge AI technology.
- Enhance video quality by upscaling them to as high as 8K resolution for stunning clarity.
- A simple and clean interface makes it easy to navigate and use.
- Review your repaired videos without any distracting watermarks.
- HitPaw's AI technology is well-developed which ensures accurate and effective repair.
Secure Verified. More than 120,860 people have purchased it.
Here is how to fix powerpoint cannot insert a video from the selected file using HitPaw Video Enhancer:
Step 1. Start by downloading and installing HitPaw Video Enhancer on your Windows or Mac computer. Launch the program and select the "Video Repair" feature.

Step 2. Choose the video file that PowerPoint is unable to insert. Drag and drop the file into the program to upload it for repair.

Step 3. Click on the “Start Repair” to initiate the repairing corrupted videos.

Step 4. After the repair is complete, download the fixed video to your computer. You can now insert the repaired video into your PowerPoint presentation without any issues.

Learn More about HitPaw Video Enhancer
Part 4. Alternative Solutions for Inserting Videos in PowerPoint
A. embedding videos from online sources.
One useful solution for issues importing video files into PowerPoint is to embed videos straight from websites like YouTube. This technique help you avoid compatibility problems because it uses the internet to play the video instead of your file.
B. Utilizing Alternative Presentation Software
If you are still having problems using PowerPoint you might want to think about using another presenting program. Programs such as Google Slides or Prezi may handle media files more effectively and provide greater video format options.
There are several potential causes behind the "PowerPoint cannot insert a video from the selected file" error, but fortunately, there are also multiple ways to fix it. If these solutions don’t resolve the issue, your video file may be corrupted. In that case HitPaw Video Enhancer is a reliable tool to repair damaged and corrupted video files. Give it a try, repair your video, and effortlessly insert it into PowerPoint for a smooth presentation.
Share this article:
Select the product rating:

Editor-in-Chief
I have been working as a freelancer for more than five years. It always impresses me when I find new things and the latest knowledge. I think life is boundless but I know no bounds.
Leave a Comment
Create your review for HitPaw articles

AI-Powered Video Enhancer for Improving Video Quality to 4K/8K
Recommend Products

An Award-winning video editor to bring your unlimited creativity from concept to life.

Best all-in-one AI photo editor to boost images potential

All-in-one video, audio, and image converting, downloading, and editing solutions.
You May Be Interested

Best Live Wallpaper App for Macbook in 2024

2024 Best AI GIF Generator You Should Know

How Can I Have Live Weather Radar As My Screen Background?

- All about AI
- Google Gemini AI
- Inflection AI Pi Chatbot
- Anthropic Claude
- Multimodal AI
- Generative AI
- AI Image Generation
- AI VIdeo Generation
- AI Coding Assistants
- AI Regulation
- AI Research
- Large Language Models (LLM)
- Microsoft Azure
- Google Cloud
- Amazon Web Services (AWS)
- Surface Pro
- Surface Laptop
- Surface Book
- Surface Duo
- Surface Neo
- Surface Studio
- Surface Hub
- Surface Pen
- Surface Headphones
- Surface Earbuds
- About WinBuzzer
- Follow Us: PUSH, Feeds, Social
- Join our Team
- Cookie Policy and Privacy Policy
- Terms of Service
How to Embed a Video in Google Slides and Customize Playback
We show you how to insert a video in Google Slides and how you can customize its appearance during playback.

Table of Contents:
Embedding videos in Google Slides can significantly enhance your presentations, making them more engaging and informative. Whether you’re incorporating a YouTube video, a video from your Google Drive, or a local file, the process is straightforward. This tutorial will guide you step-by-step on how to embed a video in Google Slides, whether it’s from YouTube, Google Drive, or your device, and how to customize the playback options to suit your presentation needs.
Google Slides is a powerful tool for creating presentations, but many users are unaware of the various ways they can integrate multimedia elements like videos. Adding a video to your slides can help convey your message more effectively, whether it’s a tutorial, a product demo, or any visual content that supports your narrative.
This guide will cover three key methods: embedding a YouTube video, embedding a video from Google Drive or your local device, and customizing the playback settings of the embedded video. By the end of this tutorial, you’ll have a well-rounded understanding of how to enhance your Google Slides presentations with video content.
How to Embed a YouTube Video in Google Slides
This method allows you to embed videos directly from YouTube into your Google Slides presentation. This is particularly useful if the video is publicly available on YouTube and you want to add it without downloading the file.

How to Embed a Local or Google Drive Video in Google Slides
If your video is stored locally on your device or in Google Drive, you can still embed it in your Google Slides presentation. This method is ideal for internal videos or content not available on YouTube.

How to Customize Playback of an Embedded Video in Google Slides
Customizing the playback of your embedded video can enhance how your audience interacts with your content. You can set videos to autoplay, loop, or start at a specific point, among other options.
3. Video Playback The “Video playback” section allows you to control how the video behaves when the slide is presented:
- Start at and End at : Specify the exact start and end times for the video. This is particularly useful if you only want to show a specific segment of the video.
- Autoplay when presenting : Enable this option to have the video automatically play as soon as the slide appears during your presentation.
- Mute audio : This option will mute the video’s audio if you prefer to have it play silently.
4. Size & Rotation The “Size & Rotation” section allows you to adjust the dimensions and orientation of your video:
- Width and Height : Manually input the width and height, or adjust them by dragging the corners of the video.
- Lock aspect ratio : Maintain the video’s original aspect ratio while resizing, ensuring that the video does not become distorted.
- Rotation : Rotate the video by a specified number of degrees, allowing you to align it with other elements in your slide.
5. Position In the “Position” section, you can precisely place the video on your slide:
- X and Y coordinates : Set the exact position of the video on the slide using X (horizontal) and Y (vertical) coordinates.
- Move with arrow keys : Fine-tune the video’s position using your keyboard’s arrow keys for precise placement.
6. Drop Shadow The “Drop shadow” section adds a shadow effect behind the video, which can give it a floating appearance and make it stand out on the slide:
- Enable drop shadow : Toggle this option on to apply a shadow behind the video.
- Color : Choose the color of the shadow to match your slide’s design.
- Transparency : Adjust how transparent the shadow is, from solid to barely visible.
- Angle : Set the angle of the shadow relative to the video.
- Distance : Determine how far the shadow appears from the video.
- Blur radius : Control the sharpness of the shadow edges, making it either crisp or diffused.
7. Alt Text The “Alt Text” section is essential for accessibility, providing a text description of the video for those using screen readers:
- Title : Enter a brief title that describes the content or purpose of the video.
- Description : Provide a detailed description of the video’s content, which will be read aloud by screen readers.
8. Final Adjustments and Review After configuring these options, review your slide to ensure the video appears and behaves as intended. You can always return to the “Format options” panel to make further adjustments if needed.
FAQ – Frequently Asked Questions About Videos in Google Slides
Can you embed a video in google slides without internet access.
Internet access is essential when first embedding a video from YouTube or Google Drive into Google Slides since this process involves streaming. For presentations without internet access, consider using videos stored locally on your device, though you must first upload these videos to Google Drive while connected to the internet.
How do you embed a video from YouTube without advertisements in Google Slides?
Direct control over YouTube’s advertisement settings is not possible within Google Slides. To avoid interruptions from ads, a practical solution is to use videos hosted on platforms that do not feature advertisements, or upload a clean version of the video to Google Drive and embed from there, ensuring a smoother presentation without interruptions.
Is it possible to embed a video directly from Dropbox to Google Slides?
Direct embedding from Dropbox into Google Slides isn’t supported due to compatibility restrictions. Instead, download the video from Dropbox, upload it to Google Drive, and then insert it into your Slides presentation. This extra step ensures your video is stored in a compatible cloud service for easy access during your presentation.
Can you set up a video in Google Slides to play across multiple slides?
Currently, Google Slides doesn’t support continuous video play across different slides. To create a semblance of continuous play, clip the video into parts and embed each segment on subsequent slides, adjusting their start and end times to maintain continuity.
Can the video in Google Slides have clickable links?
While embedded videos in Google Slides cannot directly contain clickable links, you can overlay text boxes or shapes with hyperlinks over the video or around it. This method will allow viewers to click on links while the video is either paused or playing, directing them to additional resources or related content effectively.
How can you add subtitles or captions to a video in Google Slides?
Google Slides doesn’t support adding subtitles directly to videos. To include subtitles, use video editing software to hardcode them into the video file before uploading to Google Drive. Alternatively, if using YouTube videos, activate YouTube’s captioning features, ensuring they are visible when played in your presentation.
What are the steps to replace an embedded video with another in Google Slides?
To replace an embedded video, click on the video in your presentation and press the delete key. Then, go to the “Insert” menu, select “Video,” and upload or choose the new video file from YouTube or Google Drive. Insert it into the slide and adjust its placement and format options as required.
Can you lock the position of a video in Google Slides to prevent accidental moving?
Google Slides does not offer a lock feature for video elements at this time. To mitigate accidental placement changes, carefully place your video and avoid selecting it unnecessarily. Regularly save your presentation to preserve the intended layout.
What privacy settings should be checked if embedding a video from Google Drive?
Before embedding a video from Google Drive into Google Slides, adjust its sharing settings to either “Anyone with the link can view” or ensure all specific viewers or groups have been granted access. This ensures all participants in your presentation can view the video without restrictions.
How does one ensure accessibility for video content in Google Slides?
To enhance accessibility, utilize the ‘Alt Text’ feature to provide a descriptive title and detailed description of the video for screen reader users. Additionally, ensure embedded videos have embedded subtitles or captions for the deaf and hard of hearing. These practices help make your presentations inclusive.
How can you ensure videos play smoothly in Google Slides on different devices?
For optimal playback across various devices, use widely compatible video formats like MP4. Maintain a balance between video quality and file size to facilitate smoother streaming, especially if Internet speeds vary among viewers. Check playback in different network settings to ensure consistency.
How do you fix a video that isn’t playing in a Google Slides presentation?
Verify the internet connection and ensure browser compatibility. Double-check that the video URL is valid and hasn’t been moved or deleted. Test the video’s accessibility permissions in its host service (YouTube, Google Drive) and make sure it aligns with the privacy settings needed for your audience.
How does embedding videos in Google Slides impact the file size and loading times of the presentation?
While videos are streamed and don’t add to the physical file size of your Google Slides presentation, consider the internet bandwidth and loading times, especially for viewers with slower internet connections. Opt for lower-resolution videos if playback smoothness is a concern.
How do you extract a video from a Google Slides presentation?
Videos embedded within Google Slides cannot be extracted directly from the presentation as they merely link to their source files on YouTube or Google Drive. To access the original video, visit the particular platform where the video is hosted and download it from there, provided you have the necessary permissions.
What video file formats are supported for embedding into Google Slides from a local device?
Google Slides supports major video file formats like MP4 and MOV. Ensure you first upload these files to Google Drive, adhering to supported formats for seamless integration and playback within your Slides presentation.
Related: How to Add Music to Google Slides
Related: how to get a youtube link with timestamp on mobile or desktop, related: how to embed a youtube video in powerpoint.

- Alphabet Inc.
- Google Slides
- Google Workspace
- Presentation Software
Recent News

Google Files App Introduces Gemini AI Document Summarization Feature

Microsoft Sway Users Targeted in QR Code Phishing Surge

Windows Downdate Tool Exploits System Weaknesses
IMAGES
VIDEO
COMMENTS
On the PowerPoint window, in the left sidebar, click the slide in which you want to add a video. At the top of the PowerPoint window, click the "Insert" tab. In the "Insert" tab, under the "Media" section (which is to the extreme right side of the interface), click "Video." You'll now see an "Insert Video From" menu.
Adjust the playback settings. Select the video and click the Playback tab. You'll be able to edit how your video plays on the slide. To adjust when the video plays, click the drop-down menu next to Start:.Select In Click Sequence, Automatically, or When Clicked On.; Check the boxes to apply any of the following: Play Full Screen, Hide While Not Playing, Loop until Stopped, and/or Rewind after ...
Step 3: Insert the URL from YouTube. Right-click the video to copy the video link or embed code, or click Share to get the embed code. Then, paste the URL or embed code in the link field. A preview of your video will appear in the Insert video dialog box. Click Insert to embed the video in your presentation.
Copy the address of the web page from the Address bar of your browser. Switch to PowerPoint for the web and select the slide where you want to place the video. On the Insert tab of the ribbon, in the Media group, select Online Video. In the Online Video dialog box, paste the address you copied in step 2. Select Insert.
On the Insert tab, click the arrow under Video, and then select This Device (or Video on My PC ). In the Insert Video box, click the file that you want to link to, click the down arrow next to the Insert button, and then click Link to File. Newer versions of PowerPoint support the playback of video with multiple audio tracks.
Haily is here to run you through the ins-and-outs of how to embed video in PowerPoint presentations — whether that's by inserting a video, uploading a linked...
Select Format to put frames and effects on your video. Select Video Effects, Video Border, or Video Shape to add effects, borders, or crop your video to a shape. Select Corrections or Color to adjust the video's color tone. Select Poster Frame to choose the video's opening frame, and then click and drag with your mouse to select your ...
In this video, you'll learn the basics of inserting videos in PowerPoint 2019, PowerPoint 2016, and Office 365. Visit https://edu.gcfglobal.org/en/powerpoint...
1. Navigate to the right slide. First, open your PowerPoint file and navigate to the slide that you want to put the video on. 2. Select Insert > Video > From File. Next, navigate to the top PowerPoint menu and select Insert. Then toggle down to Video, and select Movie from File.
This video guides about how to insert video in powerpoint.To learn how to put a video in powerpoint, follow the simple step-by-step guide.Adding videos in Po...
To insert a video from a file and embed it on a slide: In Normal View, navigate to the slide where you want to insert a video. Click the Insert tab in the Ribbon. Click Video. A drop-down menu appears. Depending on your PowerPoint version, choose Video on My Computer, Video on My PC or This Device. A dialog box appears.
To insert an offline video in PowerPoint: - Go to the Insert Tab: Open your PowerPoint presentation and navigate to the Insert tab on the Ribbon. - Select Media: In the Insert tab, find the Media group and click on Video. - Choose Video from This Device: Select Video on my PC from the dropdown menu.
Step 1: Open Microsoft PowerPoint. Step 2: Insert Video from Online Source. Step 3: Find Your TikTok Video. Step 4: Embed Your TikTok Video. How to Embed an Instagram Video in PowerPoint Step by Step. 1. Visit the Video You Want to Embed. 2. Open PowerPoint and Select the Slide You Want to Embed Into.
Select the Video. Click Insert. Clicking Insert, the video is added to your PowerPoint slide as an editable PowerPoint object, as you can see below. With the video now inserted on your slide, you can use the features found in the Video Playback and Formatting tabs.
All you have to do is copy either the URL or the embed code: Just as before, paste either of these into the "online film" dialog box and your video will appear on the slide. Quick note: to embed the video in PowerPoint, the video must be publicly available, or at least viewable via link.
Click Recording tab > Video > and then browse to the location on your computer or network where the video file is stored. Select the file and click Insert.. The video will "auto-play" That means that when viewers look at the presentation in Slide Show, and they arrive at the slide where the video is placed, the video immediately begins to play.The viewer doesn't need to click Play to start it.
Just follow these five easy steps: 1. Start by opening your PowerPoint presentation and navigating to the slide where you want to insert your video. 2. Then, click the "Insert" tab. 3. Now, in the top right corner, click the arrow under the "Video" button, or in PowerPoint 365, click the arrow beside the "Video" button. 4.
How to embed a video from Vimeo in a PowerPoint presentation in Microsoft Office 365. Step 1: Open up your presentation and go to the slide you wish to embed your video in. Step 2: Go to the Insert menu and click on the "Video" drop-down. Step 3: In the drop-down menu, select the "Online Video" option.
In this step-by-step tutorial video, learn how to insert a video on YouTube into a Microsoft PowerPoint presentation. Along with embedding the video, I also ...
Click Video > Online Video. If you're in PowerPoint 2019 or earlier, choose "Video from Website" instead. 6. Click "Paste Embed Code Here" and paste the Embed code you copied in Step 2. For PowerPoint 2010, click "Insert Video From Website.". 7. Select the video and click "Playback". 8.
Step 1: Choose your video. Navigate to the slide you'll be playing your video on, click "Insert" from the navigation bar, and select "Video.". You'll be given the option to search within YouTube for a video, input a YouTube URL, or select a file from your Drive. Choose one, select your desired video, and it'll appear on your slide.
Go to the Insert tab and open the Audio or Video menu. Audio: Pick an audio file on your device or record audio on the spot. Video: Pick a video from your device, one of the stock videos, or an ...
This compatibility gap may cause issues including PowerPoint cannot insert a video from the selected file. Part 3. Step-by-Step Guide to Fix PowerPoint Cannot Insert a Video from the Selected File. You can overcome the frustrating issue where PowerPoint cannot insert a video from the selected file by trying out some common solutions given below:
To insert a YouTube video on PowerPoint is super easy and will make your pre... In this video learn how to embed a YouTube video into a PowerPoint presentation.
To replace an embedded video, click on the video in your presentation and press the delete key. Then, go to the "Insert" menu, select "Video," and upload or choose the new video file from ...
Learn about the options for adding videos to your PowerPoint presentations in this intermediate-level PowerPoint tutorial. There are three main ways to add ...