Azure RBAC: role assignments and ARM templates

This post is about Azure's role assignments and ARM templates. Role assignments can be thought of as "permissions for Azure".
If you're deploying to Azure, there's a good chance you're using ARM templates to do so. Once you've got past "Hello World", you'll probably find yourself in a situation when you're deploying multiple types of resource to make your solution. For instance, you may be deploying an App Service alongside Key Vault and Storage .
One of the hardest things when it comes to deploying software and having it work, is permissions. Without adequate permissions configured, the most beautiful code can do nothing . Incidentally, this is a good thing. We're deploying to the web; many people are there, not all good. As a different kind of web-head once said:

Azure has great power and suggests you use it wisely .
Access management for cloud resources is critical for any organization that uses the cloud. Azure role-based access control (Azure RBAC) helps you manage who has access to Azure resources, what they can do with those resources, and what areas they have access to. Designating groups or individual roles responsible for specific functions in Azure helps avoid confusion that can lead to human and automation errors that create security risks. Restricting access based on the need to know and least privilege security principles is imperative for organizations that want to enforce security policies for data access.
This is good advice. With that in mind, how can we ensure that the different resources we're deploying to Azure can talk to one another?

Role (up for your) assignments
The answer is roles. There's a number of roles that exist in Azure that can be assigned to users, groups, service principals and managed identities. In our own case we're using managed identity for our resources. What we can do is use "role assignments" to give our managed identity access to given resources. Arturo Lucatero gives a great short explanation of this:
Whilst this explanation is delightfully simple, the actual implementation when it comes to ARM templates is a little more involved. Because now it's time to talk "magic" GUIDs. Consider the following truncated ARM template, which gives our managed identity (and hence our App Service which uses this identity) access to Key Vault and Storage:
Let's take a look at these three variables:
The three variables above contain the subscription resource ids for the roles Storage Blob Data Contributor , Key Vault Secrets Officer and Key Vault Crypto Officer . The first question on your mind is likely: "what is ba92f5b4-2d11-453d-a403-e96b0029c9fe and where does it come from?" Great question! Well, each of these GUIDs represents a built-in role in Azure RBAC. The ba92f5b4-2d11-453d-a403-e96b0029c9fe represents the Storage Blob Data Contributor role.
How can I look these up? Well, there's two ways; there's an article which documents them here or you could crack open the Cloud Shell and look up a role by GUID like so:
Or by name like so:
As you can see, the Actions section of the output above (and in even more detail on the linked article ) provides information about what the different roles can do. So if you're looking to enable one Azure resource to talk to another, you should be able to refer to these to identify a role that you might want to use.
Creating a role assignment
So now we understand how you identify the roles in question, let's take the final leap and look at assigning those roles to our managed identity. For each role assignment, you'll need a roleAssignments resource defined that looks like this:
Let's go through the above, significant property by significant property (it's also worth checking the official reference here ):
- type - the type of role assignment we want to create, for a key vault it's "Microsoft.KeyVault/vaults/providers/roleAssignments" , for storage it's "Microsoft.Storage/storageAccounts/providers/roleAssignments" . The pattern is that it's the resource type, followed by "/providers/roleAssignments" .
- dependsOn - before we can create a role assignment, we need the service principal we desire to permission (in our case a managed identity) to exist
- properties.roleDefinitionId - the role that we're assigning, provided as an id. So for this example it's the keyVaultCryptoOfficer variable, which was earlier defined as [subscriptionResourceId('Microsoft.Authorization/roleDefinitions', 'ba92f5b4-2d11-453d-a403-e96b0029c9fe')] . (Note the use of the GUID)
- properties.principalId - the id of the principal we're adding permissions for. In our case this is a managed identity (a type of service principal).
- properties.scope - we're modifying another resource; our key vault isn't defined in this ARM template and we want to specify the resource we're granting permissions to.
- properties.principalType - the type of principal that we're creating an assignment for; in our this is "ServicePrincipal" - our managed identity.
There is an alternate approach that you can use where the type is "Microsoft.Authorization/roleAssignments" . Whilst this also works, it displayed errors in the Azure tooling for VS Code . As such, we've opted not to use that approach in our ARM templates.
Many thanks to the awesome John McCormick who wrangled permissions with me until we bent Azure RBAC to our will.
- Role (up for your) assignments
- Creating a role assignment

Manage Azure Role Assignments Like a Pro with PowerShell

Today’s blog post is a little bit different. I have a couple of examples of how you can use PowerShell snippets and simple commandlets to get or set role assignmnets in your Azure Subscriptions.
PowerShell examples for managing Azure Role assignments
List all role assignments in a subscription, get all role assignments for a specific resource group, get all role assignments for a specific user, add a role assignment to a user, remove a role assignment for a user, remove all role assignments for a specific user, list all built-in roles, list all custom roles, create a custom role, update a custom role, delete a custom role, list all users or groups assigned to a specific role, list all permissions granted by a specific role, list all resource groups that a user has access to, create a role assignment for a service principal, powershell script to manage azure role assignments.
And now there is a script that combines some of these examples into one usable function:
I hope this was useful. Let me know if you liked the format of this blog and if you want me to include more of these examples.
Vukasin Terzic
Recent Update
- Writing your first Azure Terraform Configuration
- Transition from ARM Templates to Terraform with AI
- Getting started with Terraform for Azure
- Terraform Configuration Essentials: File Types, State Management, and Provider Selection
- Dynamically Managing Azure NSG Rules with PowerShell
Trending Tags
Retrieve azure resource group cost with powershell api.
The Future Of Azure Governance: Trends and Predictions
Further Reading
In my previous blog posts, I wrote about how simple PowerShell scripts can help speed up daily tasks for Azure administrators, and how you can convert them to your own API. One of these tasks is...
Azure Cost Optimization: 30 Ways to Save Money and Increase Efficiency
As organizations continue to migrate their applications and workloads to the cloud, managing and controlling cloud costs has become an increasingly critical issue. While Azure provides a robust s...
Custom PowerShell API for Azure Naming Policy
To continue our PowerShell API series, we have another example of a highly useful API that you can integrate into your environment. Choosing names for Azure resources can be a challenging task. ...
| { | |
| "description": "Grant service principal X reader access on application Z.", | |
| "client_type" : "application", | |
| "client_principal_name": "service-principal-x-prod", | |
| "server_app_registration_name": "app-registration-z-prod", | |
| "role_name": "reader" | |
| }, |
You can use the script like this:
- Download the script and the config file.
- Update the config files to your needs
- Trigger the script via PowerShell
If you are interested, this is how the script looks like:
| param ( | |
| [string] $TenantId, | |
| [string] $ConfigFilePath | |
| ) | |
| $ErrorActionPreference = "Stop" | |
| Write-Host Start Azure AD role assignment script | |
| Write-Host "-Tenant Id:" $TenantId -ForegroundColor Gray | |
| Write-Host "-Config File Path:" $ConfigFilePath -ForegroundColor Gray | |
| Write-Host Installing and importing AzureAD Module | |
| if (Get-Module -ListAvailable -Name AzureAD) { | |
| Import-Module -Name "AzureAD" | |
| } | |
| else { | |
| Install-Module -Name "AzureAD" -Force | |
| } | |
| Write-Host Connecting to Azure AD Tenant within current security context | |
| $azure_context = Get-AzContext | |
| $account_id = $azure_context.Account.Id | |
| Write-Host "-Account Id:" $azure_context.Account.Id -ForegroundColor Gray | |
| Connect-AzureAD -TenantId $TenantId -AccountId $account_id | |
| Write-Host Loading role assignments from config file | |
| $role_assignments = (Get-Content $ConfigFilePath -Raw) | ConvertFrom-Json | |
| Write-Host Looping each configured role assignment | |
| foreach($role_assignment in $role_assignments) | |
| { | |
| Write-Host Applying role assigment... started -ForegroundColor Green | |
| Write-Host "-Description:" $role_assignment.description -ForegroundColor Gray | |
| Write-Host "-Client principal Name:" $role_assignment.client_principal_name -ForegroundColor Gray | |
| Write-Host "-Server App Registration Name:" $role_assignment.server_app_registration_name -ForegroundColor Gray | |
| Write-Host "-Role Name:" $role_assignment.role_name -ForegroundColor Gray | |
| Write-Host Getting the server application registration | |
| $aad_filter = "DisplayName eq '" + $role_assignment.server_app_registration_name + "'" | |
| $server_application_registration = Get-AzureADApplication -Filter $aad_filter | |
| if (!$server_application_registration) { throw "Cannot find configured server application registration with name '" + $role_assignment.server_app_registration_name + "'" } | |
| Write-Host Getting the server service principal id | |
| $aad_filter = "AppId eq '" + $server_application_registration.AppId + "'" | |
| $server_service_principal = Get-AzureADServicePrincipal -Filter $aad_filter | |
| $server_service_principal_id = $server_service_principal.ObjectId | |
| Write-Host "-Server service principal Id: " $server_service_principal_id -ForegroundColor Gray | |
| Write-Host Getting the Id for the configured application role | |
| $role_id = ($server_application_registration.AppRoles | Where-Object DisplayName -eq $role_assignment.role_name).Id | |
| if (!$role_id) { throw "Cannot find configured application role with name '" + $role_assignment.role_name + "'" } | |
| Write-Host "-Role Id: " $role_id -ForegroundColor Gray | |
| if(($role_assignment.client_type -ne "application") -and ($role_assignment.client_type -ne "user")) { throw "Incorrect client_type '" + $role_assignment.client_type + "' provided." } | |
| switch ($role_assignment.client_type) | |
| { | |
| "application" | |
| { | |
| Write-Host Getting the configured client service principal | |
| $aad_filter = "DisplayName eq '" + $role_assignment.client_principal_name + "'" | |
| $client_service_principal = (Get-AzureADServicePrincipal -Filter $aad_filter) | |
| if (!$client_service_principal) { throw "Cannot find configured client service principal with name '" + $role_assignment.client_principal_name + "'" } | |
| $client_service_principal_id = $client_service_principal.ObjectId | |
| $client_service_principal_name = $client_service_principal.DisplayName | |
| Write-Host "-Client service principal Id:" $client_service_principal_id -ForegroundColor Gray | |
| Write-Host Assigning the Azure Ad role to the configured service principal | |
| try | |
| { | |
| New-AzureADServiceAppRoleAssignment -Id $role_id -ResourceId $server_service_principal_id -ObjectId $client_service_principal_id -PrincipalId $client_service_principal_id | |
| } | |
| catch | |
| { | |
| if( $_.Exception.Message -like '*Permission being assigned already exists on the object*') | |
| { | |
| Write-Host Permission already exists | |
| } | |
| else | |
| { | |
| Write-Error $_.Exception.Message | |
| } | |
| } | |
| } | |
| "user" | |
| { | |
| Write-Host Getting the configured client user | |
| $user = Get-AzureADUser -searchstring $role_assignment.client_principal_name | |
| if (!$user) { throw "Cannot find configured client users with name '" + $role_assignment.client_principal_name + "'" } | |
| $user_id = $user.ObjectId | |
| Write-Host "-User Id:" $user_id -ForegroundColor Gray | |
| Write-Host Assigning the Azure Ad role to the configured user | |
| try | |
| { | |
| New-AzureADUserAppRoleAssignment -Id $role_id -ResourceId $server_service_principal_id -ObjectId $user_id -PrincipalId $user_id | |
| } | |
| catch | |
| { | |
| if( $_.Exception.Message -like '*Permission being assigned already exists on the object*') | |
| { | |
| Write-Host Permission already exists | |
| } | |
| else | |
| { | |
| Write-Error $_.Exception.Message | |
| } | |
| } | |
| } | |
| } | |
| Write-Host Applying role assigment... done -ForegroundColor Green | |
| } |
I hope that this script helps you to accelerate your security automation.
Cheers Toon
UPCOMING TRAININGS
CHECK OUT OUR TRAININGS
Azure Integration Services
Azure migration.
- Azure Governance
Azure Security
Azure foundations, recent posts.
- Looking back at INTEGRATE 2024
- Azure Service Bus vs Event Grid Pull Delivery
- Trying the new Microsoft Applied Skills
- Finally a correct way to configure RBAC for DevOps agents!
- What do the new API Management v2 tiers mean for you?
- Announcement
- API Management
- Architecture
- Azure App Service
- Azure Data Factory
- Azure DevOps
- Azure Event Grid
- Azure Functions
- Azure Kubernetes Service
- Azure Policy
- Azure Resource Graph
- Azure Resource Manager
- Azure Service Bus
- Azure Stream Analytics
- BizTalk Server
- Container Apps
- Geen categorie
- Home Automation
- Microsoft Learn
- Service Bus
MEET THE YOUR AZURE COACH TEAM
Your Azure Coach is specialized in organizing Azure trainings that are infused with real-life experience. All our coaches are active consultants, who are very passionate and who love to share their Azure expertise with you.
Toon Vanhoutte
Azure integration services & serverless.

Wim Matthyssen
Azure infra, security & governance, azure development and ai/ml, azure identity and security, stéphane eyskens, cloud-native azure architecture, geert baeke, azure kubernetes service & containerization, maik van der gaag, azure infrastructure as code & devops, bart verboven, sammy deprez, azure ai, ml & cognitive services, sander van de velde.
Assigning groups to Azure AD roles and Privileged access groups, a first look!
On August 13th 2020, Alex Simons (Microsoft Identity PM) announced that assigning groups to Azure AD roles in now in public preview . This feature is one of the most requested features to be found in the Azure AD feedback forum .
I have been following this feature request for a while now, and up until recently Microsoft stated that implementing Azure AD role assignment for Azure AD groups wasn’t the issue, the issue was more related to who is able to manage those groups. For example, if enabled how can we circumvent that someone with the “User Administrator” role (capable of adding users to groups) is capable of adding someone to the group used to assign Global Administrator rights. When implemented incorrectly, this new “feature” could then introduce a new security risk in your environment.
Assigning groups to Azure AD roles requires an Azure AD Premium P1 license at minimum, for the Privileged Identity Functionality an Azure AD Premium P2 license is needed.
Disclaimer: This post reflects the status of assigning groups to Azure AD roles as of August 20, 2020. Functionality may change, even right after this post has been published.
So, let’s walk through on what was announced and see..
So, up until now when you wanted to assign a user an Azure AD role, you had to include the user account directly in the role. Verifying which account has what privileges is therefore hard, especially if you don’t have Azure AD Privileged Identity Management (PIM) licensed.
For a more in depth overview of what Azure AD Privileged Identity Management (PIM) is, please see another blogpost I wrote on this subject here: Lessons learned while implementing Azure AD Privileged Identity Management (PIM)
Changed behaviour while adding members to Azure AD Roles
On the topic of PIM, I also noticed some changed functionality when adding users when you have PIM enabled in your environment. If you don’t have PIM enabled you can assign a user to a role, but if you have PIM enabled there is another experience where when you want to assign an Azure AD role you are actually redirected to the Privileged Identity Management blade, where you can directly create an Eligible (must be activated) or Active (always active) assignment.
Adding users to Azure AD roles via Group membership
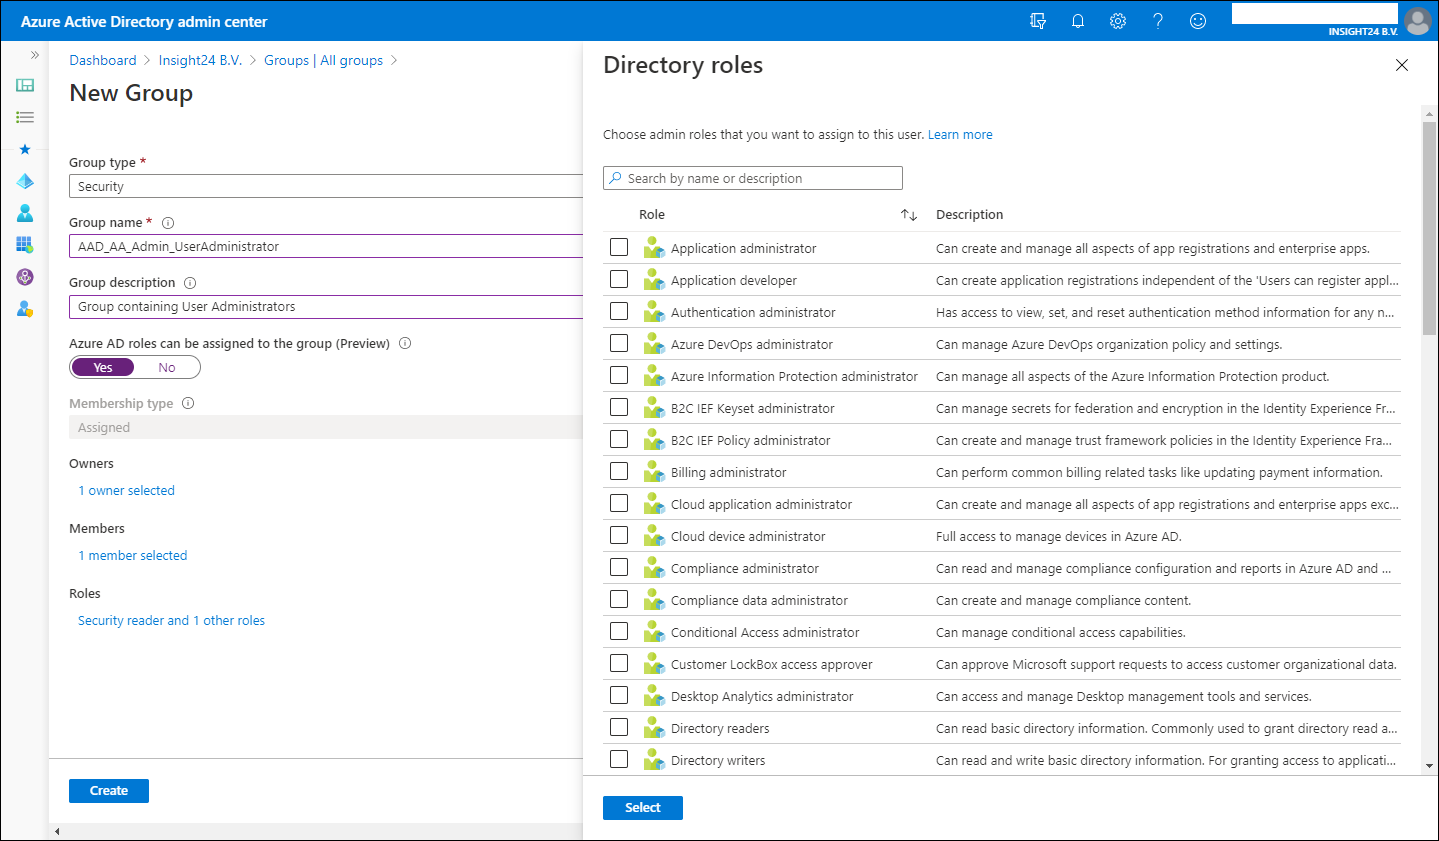
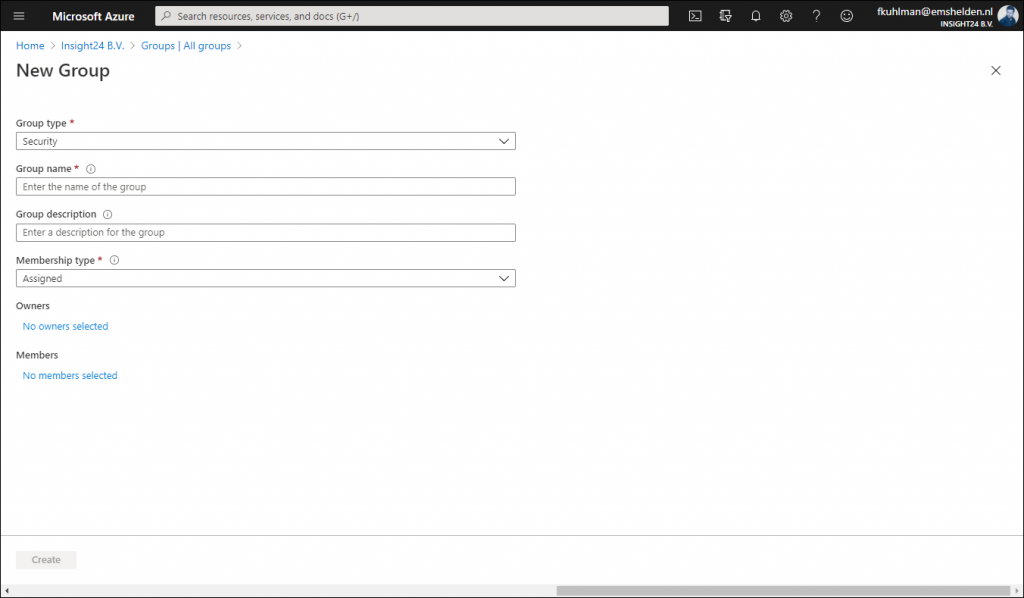
In order to add users to Azure AD roles via Group membership you first have to create a new group, so it’s not possible to repurpose an existing group for this.
New groups have the option to set the “Azure AD roles can be assigned to the group (Preview)” option which can be set to either “No” or “Yes”. When you switch this setting to ‘Yes’ the group’s eligibility for role assignment is permanent. Besides that you can only have a membership type of Assigned, so using Dynamic Groups is not supported, and within the wizard you can only add users as member and not groups (group nesting). Interestingly, you can assign multiple Azure AD roles to the group.

If you want to create the Group with the “Azure AD roles can be assigned to the group (Preview)” option enabled you will get an extra confirmation screen:

The option “Azure AD roles can be assigned to the group (Preview)” is only visible if you are member of either the Global Administrator or Privileged Role Administrator role.
Privileged access groups
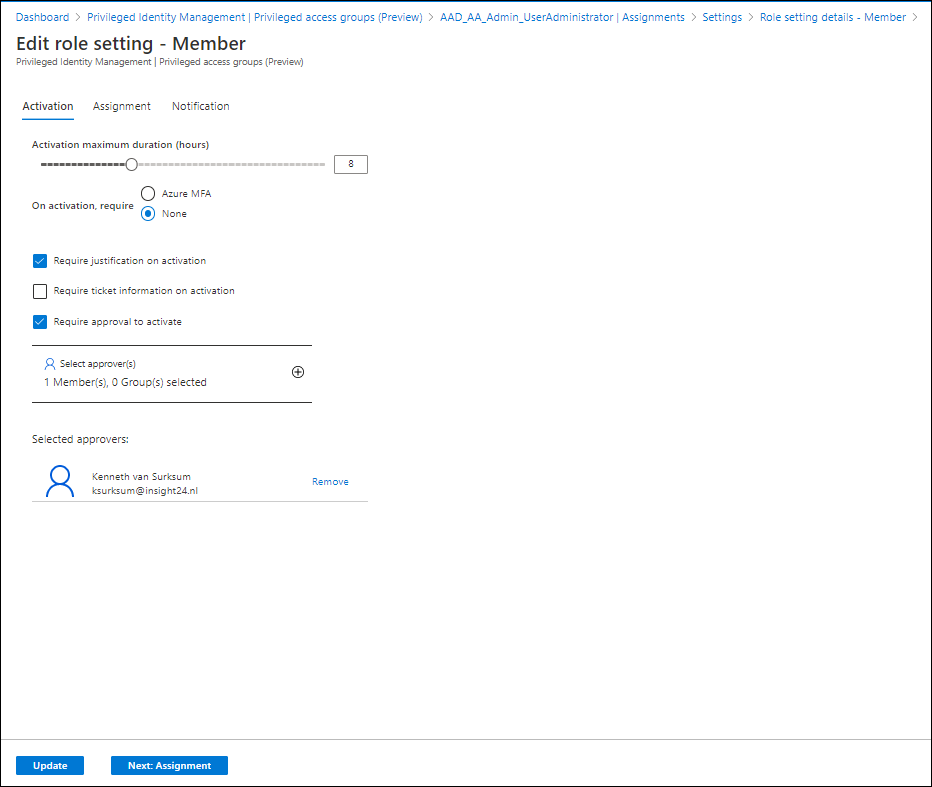
Once a group with the option to enable Azure AD role assignments is created and you have PIM enabled, a new option becomes available called “Privileged access (Preview)”.
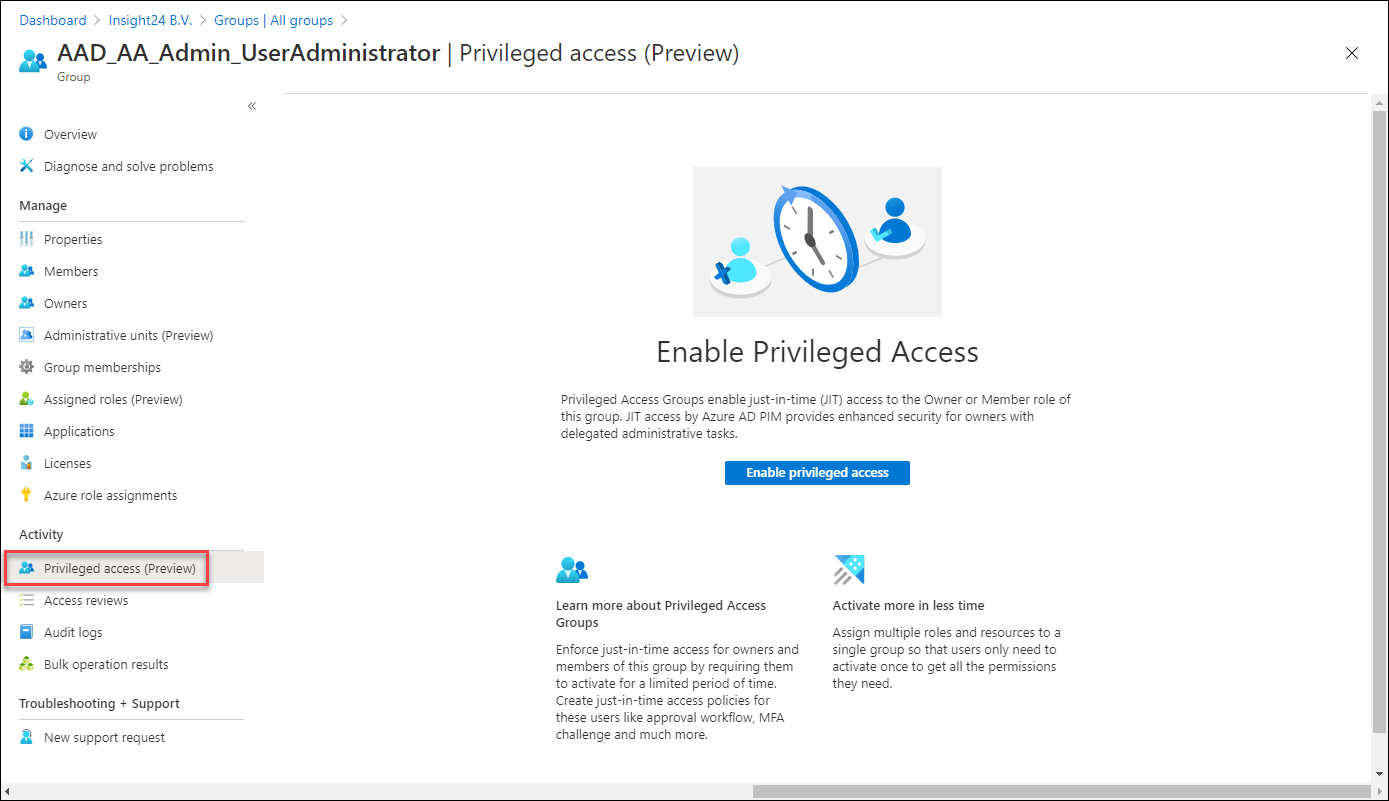
Enabling this option gives us the following options:
Define Eligible or Active assignments to the group
On the group you can assign members or owners using the capabilities provided by PIM. So for example, while adding our user as a member of the group permanently earlier in this article, I now have the option to make the membership Eligible. Also notice that this assignment type is time bound, with a maximum of 1 year.
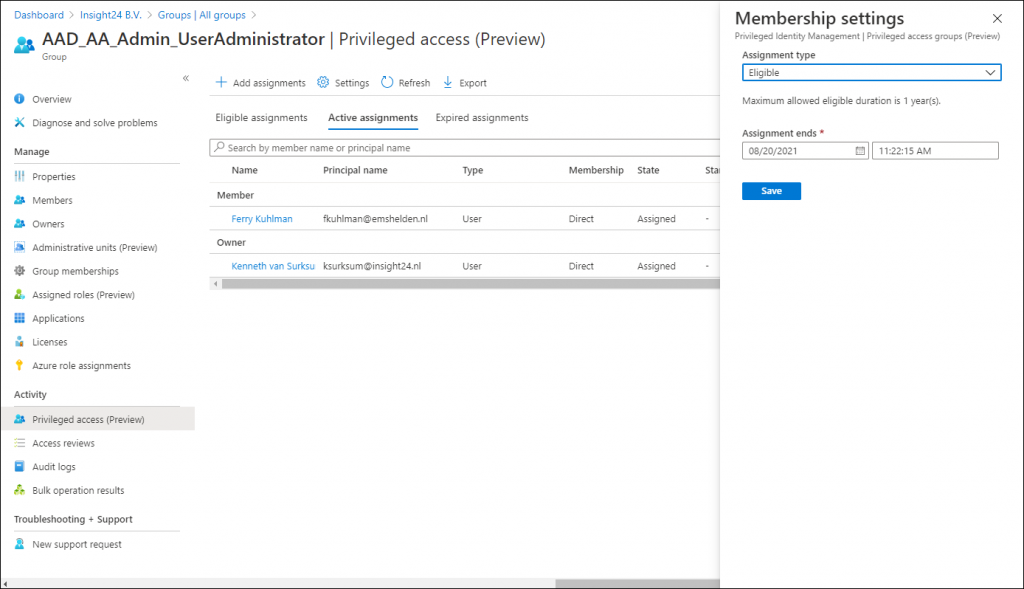
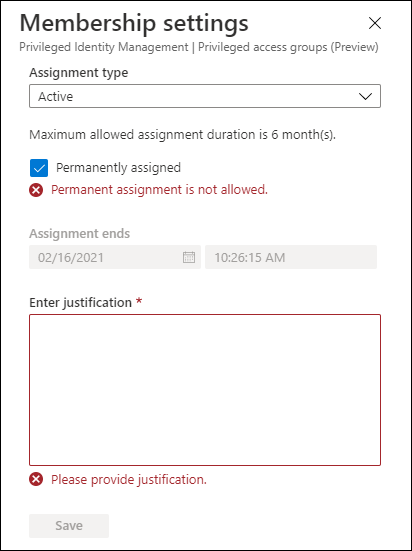
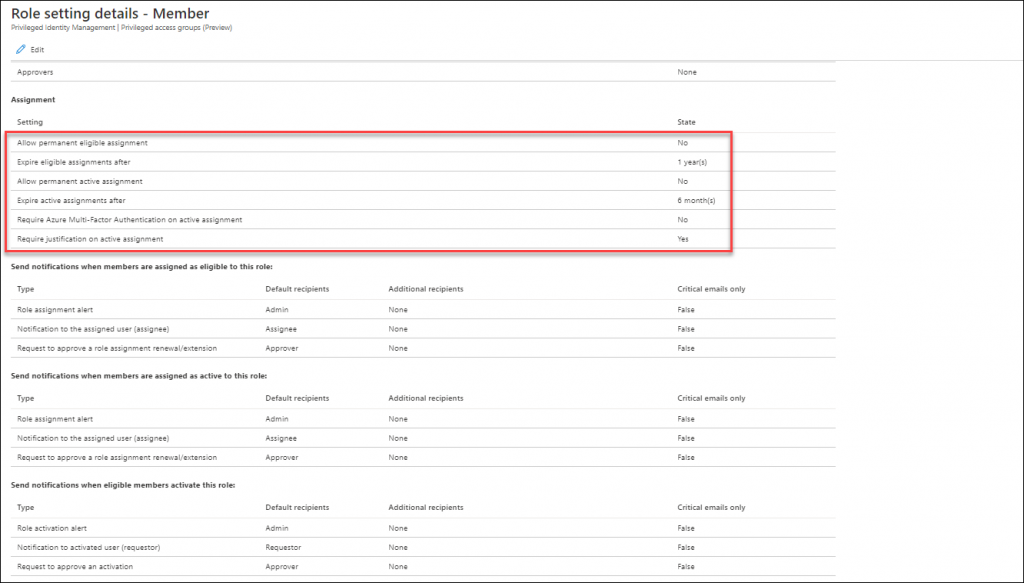
It’s also interesting to notice that if you want to update an Active Assignment you will not be allowed to Permanently assign an Active role by default. And that assigning an Active role has a maximum allowed assignment duration of 6 months. Once the group is enabled for Privileged Access and you want to add a member, then you don’t have the option “Permanently assigned” available. Also notice that providing a justification is mandatory.
The default options described above are configurable though, trough the settings, so you are able to configure these depending on your requirements.
Activating your Azure AD role while using Privileged access groups
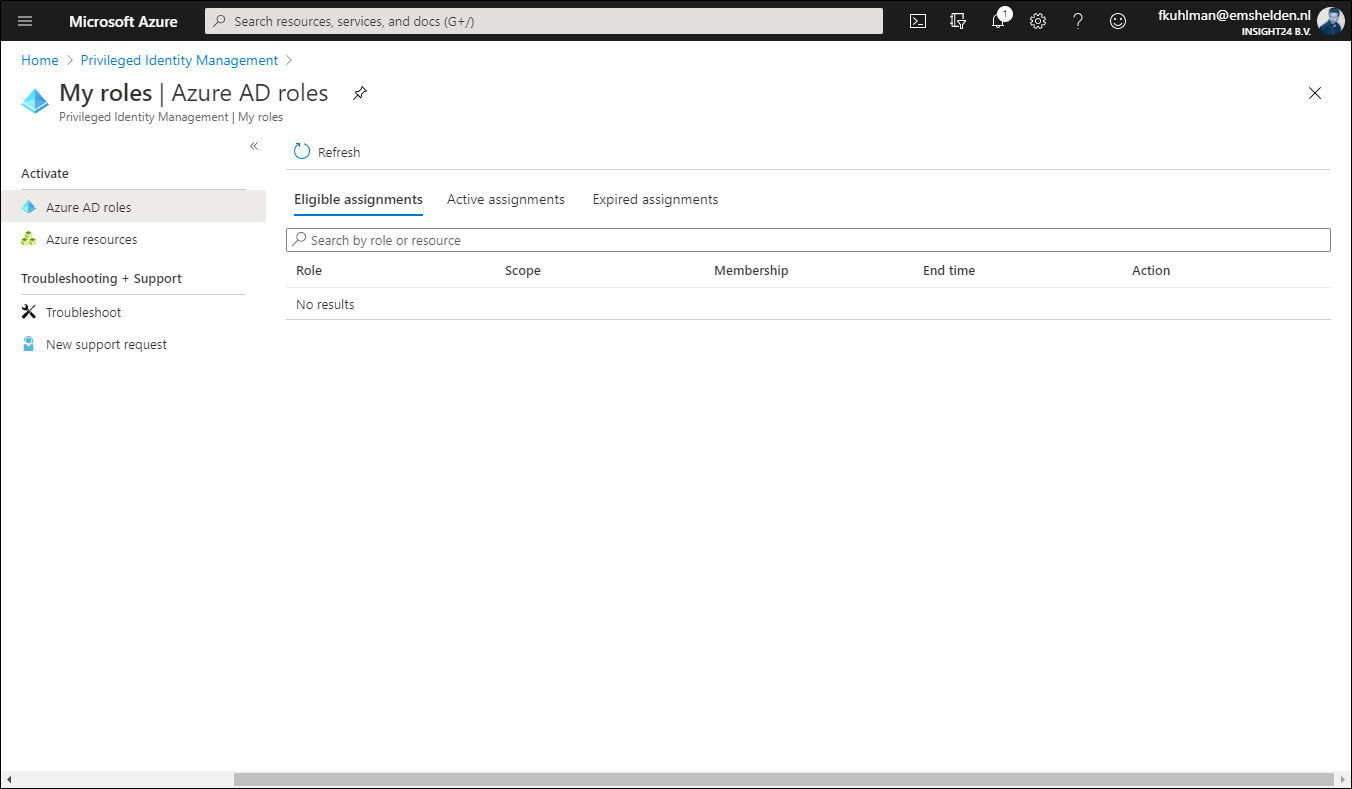
It’s interesting to see that once a user is set to Eligible for the privileged access group, that the Azure AD role doesn’t show up under Eligible Assignments when the user browses to My Roles in PIM. In order to active the Azure AD role in this scenario, the user must go to Privileged access groups (Preview) and active the role from there.
Once the role is activated via the group, it will show up under Active assignments, and what’s interesting to see is that at this time it’s still displayed as being permanent. But I expect that to be fixed while the functionality is still in preview.
Within the PIM settings of the group you can also specify that any Activation request for the group must be approved. This works similar to approval in PIM as we already know it. You define that approval is mandatory and specify who can approve. This can either be a user or a group.
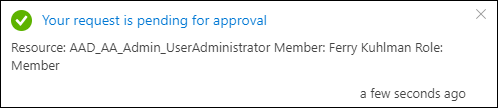
If the user now requests to activate the privileged access group, he will receive the message that the request is pending for approval
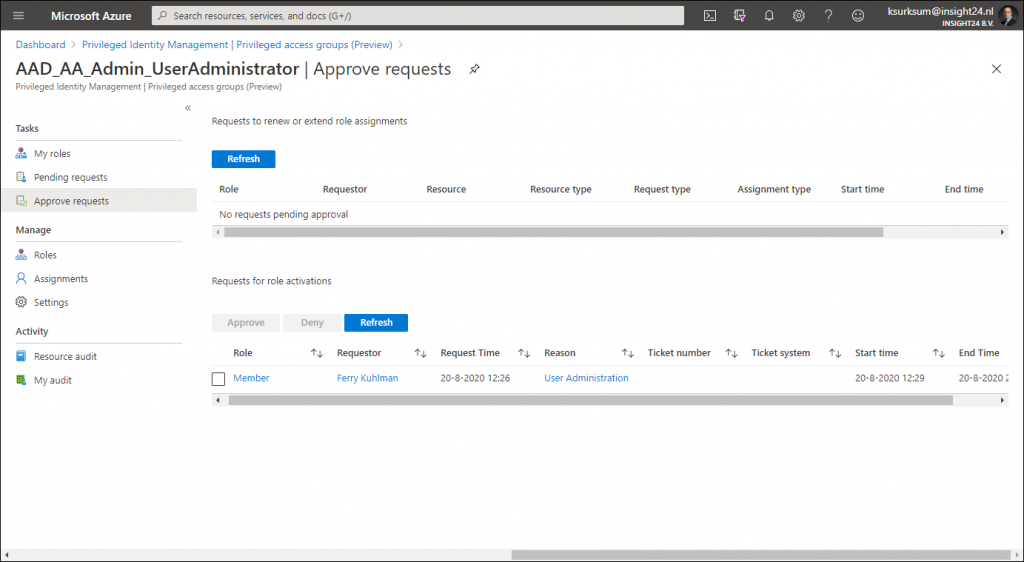
The approver doesn’t see the request under Privileged Identity Management | Approve requests but has to go to Privileged Identity Management | Privileged access groups (Preview) and select the group, from there the Approve Requests functionality is providing the ability to approve the request.
I hope this walkthrough gave you an idea on the new possibilities as announced in the public preview. And there is much more to cover actually when it comes to PIM, like more in depth information about auditing and access reviews.
Microsoft has addressed its own concerns by only allowing Global Administrators and Privileged Role Administrators to create the groups enabled for Azure AD role assignment. And having this functionality combined with Privileged Identity Management (PIM) makes the solution even better. Another reason to buy an Azure AD Premium P2 license for your administrative accounts at least.
A winning feature is that by using Privileged access with Azure AD Groups is that you can enable multiple Azure AD roles at once, this could save you creation of a custom role in some cases when using PIM.
While there are still some little fixes which must be applied, for now this looks like a welcome addition for any Azure AD tenant using Premium functionality.
Assigning groups to Azure AD roles is now in public preview!
Use cloud groups to manage role assignments in Azure Active Directory (preview)
Management capabilities for privileged access Azure AD groups (preview)
2 thoughts on “ Assigning groups to Azure AD roles and Privileged access groups, a first look! ”
- Pingback: Active Directory Identity Governance – Privileged Identity Management - JanBakker.tech
make the Security Admin Role a member Privilege Role Admin in Privilege Identity Management in Azure AD is this possible??
Leave a Reply Cancel reply
Your email address will not be published. Required fields are marked *
This site uses Akismet to reduce spam. Learn how your comment data is processed .
Privacy Overview
- Adding or removing role assignments using Azure Portal
Go back to AZ-304 Tutorials
In this article you will learn about assigning roles using Azure portal and the process of adding and removing role assignments.
However, Azure’s role-based access control (RBAC) refers to the authorization system for managing access to Azure resources. And, to grant access, you assign roles to users, groups, service principals, or managed identities at a particular scope.
Prerequisites
For adding or removing role assignments, you must have:
- Firstly, Microsoft.Authorization/roleAssignments/write
- Secondly, Microsoft.Authorization/roleAssignments/delete permissions, such as User Access Administrator or Owner
Access control (IAM)
Access control (IAM) is the page that is for assigning roles to grant access to Azure resources. It’s also known as identity and access management and appears in several locations in the Azure portal. There are questions for assigning roles to help in understanding about the Access control (IAM) page.
- Who needs access? This refers to a user, group, service principal, or managed identity.
- What role do they need? Permissions are grouped together into roles, so you can select from a list of several built-in roles orcan use custom roles.
- Where do they need access? This refers to the set of resources that the access applies to. However, “where” can be a management group, subscription, resource group, or a single resource such as a storage account.
Adding a role assignment
- Firstly, in the Azure portal, click All services and then select the scope that you want to grant access to.
- Secondly, click the specific resource for that scope.
- Then, Click Access control (IAM).
- Fourthly, click the Role assignments tab for viewing the role assignments at this scope.
- After that, click Add > Add role assignment. However, if you don’t have permissions to assign roles, the Add role assignment option will be disabled.

- Then, in the Role drop-down list, select a role such as Virtual Machine Contributor.
- There in the Select list, select a user, group, service principal, or managed identity. And, if you don’t see the security principal in the list, you can type in the Select box to search the directory for display names, email addresses, and object identifiers.
- Lastly, click Save to assign the role.
Assigning a user as an administrator of a subscription
For giving users the role of an administrator of an Azure subscription, first assign them the Owner role at the subscription scope. As the Owner role gives the user full access to all resources in the subscription, including the permission to grant access to others. However, these steps are the same as any other role assignment.
- Firstly, in the Azure portal, click All services and then Subscriptions.
- Then, click the subscription where you want to grant access.
- Thirdly, click Access control (IAM).
- After that, click the Role assignments tab to view the role assignments for this subscription.
- Then, click Add > Add role assignment. However, if you don’t have permissions to assign roles, the Add role assignment option will be disabled.
- And, in the Role drop-down list, select the Owner role.
- Then, in the Select list, select a user.

Adding a role assignment for a managed identity
For adding role assignments for a managed identity use the Access control (IAM) page. However, when you use the Access control (IAM) page, you start with the scope and then select the managed identity and role. In this section, you will learn about an alternate way to add role assignments for a managed identity. Using these steps, you start with the managed identity and then select the scope and role.
System-assigned managed identity
- Use these steps for assigning a role to a system-assigned managed identity by starting with the managed identity.
- Firstly, in the Azure portal, open a system-assigned managed identity. Then, in the left menu, click Identity.

- After that, under Permissions, click Azure role assignments. However, if roles are already assigned to the selected system-assigned managed identity then you will see the list of role assignments.
- For changing the subscription, click the Subscription list. Then, click Add role assignment.
- Then, use the drop-down lists to select the set of resources that the role assignment applies to such as Subscription, Resource group, or resource. And, if you don’t have role assignment write permissions for the selected scope, an inline message will be displayed.
- After that, in the Role drop-down list, select a role such as Virtual Machine Contributor.
User-assigned managed identity
- Use these steps for assigning a role to a user-assigned managed identity by starting with the managed identity.
- Firstly, in the Azure portal, open a user-assigned managed identity. Then, in the left menu, click Identity.
- After that, under Permissions, click Azure role assignments. However, if roles are already assigned to the selected user-assigned managed identity then you will see the list of role assignments.

Removing a role assignment
In Azure RBAC, for removing access from an Azure resource, you first remove a role assignment. Use these steps to remove a role assignment.
- Firstly, Open Access control (IAM) at a scope, such as management group, subscription, resource group, or resource, where you want to remove access.
- Then, click the Role assignments tab to view all the role assignments for this subscription.
- After that, in the list of role assignments, add a checkmark next to the security principal with the role assignment you want to remove.
- Then, Click Remove.
- Lastly, in the remove role assignment message that appears, click Yes.
However, if you see a message that inherited role assignments cannot be removed, then you are trying to remove a role assignment at a child scope. So, you should open Access control (IAM) at the scope where the role was assigned and try again.

Reference: Microsoft Documentation
Prepare for Assured Success
- Product overview
- All features
- Latest feature release
- App integrations
CAPABILITIES
- project icon Project management
- Project views
- Custom fields
- Status updates
- goal icon Goals and reporting
- Reporting dashboards
- workflow icon Workflows and automation
- portfolio icon Resource management
- Capacity planning
- Time tracking
- my-task icon Admin and security
- Admin console
- asana-intelligence icon Asana AI
- list icon Personal
- premium icon Starter
- briefcase icon Advanced
- Goal management
- Organizational planning
- Project intake
- Resource planning
- Product launches
- View all uses arrow-right icon
Featured Reads

- Work management resources Discover best practices, watch webinars, get insights
- Customer stories See how the world's best organizations drive work innovation with Asana
- Help Center Get lots of tips, tricks, and advice to get the most from Asana
- Asana Academy Sign up for interactive courses and webinars to learn Asana
- Developers Learn more about building apps on the Asana platform
- Community programs Connect with and learn from Asana customers around the world
- Events Find out about upcoming events near you
- Partners Learn more about our partner programs
- Asana for nonprofits Get more information on our nonprofit discount program, and apply.
- Project plans
- Team goals & objectives
- Team continuity
- Meeting agenda
- View all templates arrow-right icon
- Collaboration |
- How to define roles and responsibilitie ...
How to define roles and responsibilities for team success

It’s challenging to stick to a project plan without clearly defined roles and responsibilities. When you define team roles, you can help teammates collaborate and work through projects more efficiently. In this guide, we’ll explain how to establish roles and responsibilities and why doing so will benefit your team’s mission.
You know that chaotic feeling of managing a project where roles and responsibilities are unclear? As one team member moves forward with the design, another moves forward with the content. Both team members write the copy included in the images, assuming this is part of their role. Because of the miscommunication and duplicated work, the copy takes longer to deliver and you must delay the project.
What are roles and responsibilities and why do they matter?
Roles and responsibilities are the cornerstones of effective teamwork and organizational structure. A role refers to an individual's job title or position within a team or company, such as project manager, team leader, or software developer.
Responsibilities, on the other hand, encompass the specific tasks, duties, and deliverables associated with a particular role. For example, a project manager's key responsibilities may include planning, coordinating, and overseeing projects from start to finish, while a software developer's responsibilities may involve coding, debugging, and implementing software solutions.
Defining roles and responsibilities is important because it provides clarity, accountability, and structure within an organization. When roles and responsibilities are clearly outlined, each team member understands their particular roles, job description, and what is expected of them. Without well-defined roles and responsibilities, teams may struggle with miscommunication, lack of direction, and suboptimal performance.
Benefits of clearly defined roles and responsibilities
When you establish roles and responsibilities, you create a team structure that’s built to last. Team performance will improve when individuals feel confident in the duties they’re assigned.

When team members have individual roles, the team also benefits in other ways, including:
Increased productivity: You’ll notice an increase in productivity when you assign key responsibilities to each team member. When team members have a clear understanding of their roles and responsibilities, they can prioritize the right work and get their most high-impact work done.
Improved hiring process: When you clarify job responsibilities for different roles, you make it easier for human resources to meet team needs when searching for new hires. Without a clear list of responsibilities, it may be difficult for recruiters to explain job roles to candidates.
Boost team morale: When there’s a lack of clarity in what your team members should do, they may feel unsure of their skill sets. Defining roles and responsibilities can boost team morale because everyone will have a task to accomplish. You can also align team members to work on tasks that complement their natural abilities so they feel confident in what they’re doing each day.
More efficient resources: Your organization will waste less time and money when team members perform the correct job roles. As seen in the example above, two team members who didn’t know their job responsibilities on a project doubled up on work. This duplicate work wasted valuable project time, and as a result, it also wasted money. The more efficient your team is, the leaner the budget and timeline will be.
With clear and concrete team roles, your team members should feel confident and motivated to achieve their responsibilities.
How to define team roles and responsibilities in 4 steps
Defining team member roles and responsibilities is a crucial process that requires careful planning and execution. Follow these four steps to establish clear roles and responsibilities within your project team:
Step 1: Determine what needs to get done
You can use the following steps when identifying roles and responsibilities at both the organizational and project levels. The first step when defining team roles is to determine the various tasks that need to get done. Some questions you can ask to identify these tasks include:
Were past projects completed successfully?
If not, what could have been done better?
What tasks are still on your team’s day-to-day task list?
What tasks does each team member complete daily?
Are these tasks part of each team member’s job description?
When you know how much work needs to get done, you can delegate tasks accordingly.
2: Identify gaps in responsibilities
While this step is most relevant when defining roles at the organizational level, you may also have gaps in responsibilities when working on projects.
After creating your to-do list , compare and contrast these tasks with what team members are doing. This comparison will help you identify any gaps in responsibilities. If team members' original job descriptions are unclear or if others pull them into other tasks, these gaps may happen unintentionally.
When you identify gaps in responsibilities, these gaps become your starting point for team realignment. You can then move team members back to their intended roles and figure out who should take over any additional tasks they were handling. This helps eliminate redundancies.

3. Clarify roles using a RACI matrix
A RACI matrix is a great tool for clarifying team member roles. RACI stands for responsible, accountable, consulted, and informed. You can set up a RACI matrix—or a table—with your tasks on the Y-axis and your team members on the X-axis.
Assign one of the four RACI letters to each task and team member. This makes it easy for team members to know what their specific role is for each task and provides a clear understanding of deliverables.
The legend below explains in greater detail what team roles work best with each letter of the RACI chart.
R = Responsible . This person performs the work. There should only ever be one Responsible per task, so everyone on the team knows who to go with for questions and updates.
A = Accountable . This person is responsible for approving the work and will likely be a manager.
C = Consulted . This person should give input on the work. This could be a team member or someone on another team.
I = Informed . This person should be informed of the progress and the outcome of the work, but they don’t give input on the work as it’s being performed.

Additional tips for the RACI matrix:
There should only ever be one Responsible per task ( R ) so team members know who is in charge of the work. If a task has more than one Responsible, team members can easily become confused.
While only one person should be accountable for each task ( A ), that same person can also be Responsible for the task ( AR ).
It’s also important to limit the number of people you inform, as this can make your project unnecessarily complex ( keep I’s low ).
You can use a RACI matrix to set clear expectations for your team members and as a reference when executing projects.
4. Get feedback from team members
Asking team members for candid feedback after you complete your RACI matrix can encourage team collaboration and provide insight into whether the roles you’ve assigned seem functional.
When your team members can voice their opinions, you create healthy team dynamics in the workplace by facilitating communication.
You can ask for feedback in several ways, such as:
Hold a team meeting and ask, “Does anyone have an opinion on the team roles I’ve assigned?”
Schedule 1:1 meetings so team members have a safe space to voice concerns.
Put out an anonymous survey so team members can share their honest responses.
When to clarify roles and responsibilities
There are roles and responsibilities at the organizational and project levels. As a project manager, your job is to define both for your team at different times. Creating a solid team structure at the organizational level is crucial and should be addressed first if you’re noticing gaps in this area.
For example, if a writer on your team is handling a lot of the project planning, it may be time to refocus their priorities and tasks. If a designer is responding to emails all day, realign your team structure so they have more heads-down time to create.
Once your team knows their roles and responsibilities at the organizational level, you can approach each project individually. A designer may have general duties for their job role, but for a specific project, they may also be responsible for sending designs back and forth.
Team member roles and responsibilities
Understanding the roles and responsibilities of individual team members is essential for fostering a collaborative and productive work environment.
Examples of team member roles
Team member roles vary depending on the organization and the specific project or function. Some common team member roles include:
Project manager
Software developer
Marketing specialist
Data analyst
Customer service representative
How to define team member responsibilities
To define team member responsibilities, start by identifying the key tasks and deliverables associated with each role. Collaborate with team members to ensure that responsibilities are clearly understood and aligned with their skills and expertise. Document these responsibilities in job descriptions or a roles and responsibilities matrix.
Team leader roles and responsibilities
Team leaders play a critical role in guiding, supporting, and motivating their team members to achieve shared goals and objectives.
Key roles of a team leader
Some of the key roles of a team leader include:
Setting direction and goals
Delegating tasks
Monitoring progress
Providing feedback and guidance
Fostering a positive team culture
Team leaders also serve as a bridge between their team and other stakeholders, such as upper management or clients.
Responsibilities of a team leader
Team leader responsibilities encompass a wide range of tasks, such as:
Developing project plans
Assigning responsibilities
Managing resources
Facilitating communication
Resolving conflicts
Ensuring that team members have the necessary tools and support to perform their roles effectively
Additionally, team leaders are responsible for evaluating team performance, recognizing achievements, and identifying areas for improvement.
Roles and responsibilities examples
Every role has key responsibilities that fit with that position. When aligned correctly, team members should know their role and only be responsible for tasks that fit under their job role. Take a look at some common roles and the responsibilities these roles may have.
Example 1: Project manager
A project manager is responsible for overseeing the entire project lifecycle, from planning to execution and delivery, ensuring that projects are completed on time, within budget, and to the required quality standards.
Responsibilities:
Plan and develop the project
Create and lead the project team
Monitor and share project progress
Having a clearly defined role allows the project manager to focus on key responsibilities, ensuring effective project management and enabling the team's success.
Example 2: Visual designer
A visual designer creates engaging and visually appealing designs that align with the project's goals and brand guidelines, effectively communicating ideas and messages through visual elements.
Responsibilities:
Produce consistent visual work
Keep team members up to date with project milestones
Create direction for projects and guide team members
With a clear understanding of their role, visual designers can contribute their skill sets effectively, enhancing the overall quality of the project and supporting the entire team's efforts.
Example 3: Content writer
A content writer researches, creates, and edits written content for various mediums, ensuring that the content is engaging, informative, and aligned with the project's objectives and target audience.
Research and write copy
Communicate with designers and managers on progress
Revise copy after receiving feedback from clients
By having clearly defined roles and responsibilities, content writers can focus on their specific tasks, collaborate effectively with other team members, and contribute to the project's success.
These responsibilities may change based on the organizational culture , work environment, and abilities of each individual team member. You can make your own job responsibilities template that includes more detail, such as who the team member reports to and the requirements of the role. An organizational chart can help visualize roles and reporting structures.
Tips for successfully implementing roles and responsibilities
Implementing roles and responsibilities effectively is key to team success. Consider the following tips to ensure a smooth transition and long-term benefits when establishing or redefining roles within your team:
Leverage team strengths
When assigning roles and responsibilities, consider the strengths and skills of each team member. Leveraging individual strengths can lead to increased productivity and job satisfaction. Conduct a skills assessment or discuss with each team member to identify their areas of expertise and interest. Assign clear roles that align with these strengths to create a more efficient and motivated team.
Align roles with individual goals
Ensure that role definitions align with individual career goals and aspirations. When team members understand how their particular role contributes to their personal growth and the organization's success, they are more likely to be engaged and committed. Discuss career objectives with each team member and look for opportunities to assign new roles or responsibilities that support their development.
Regularly review and adjust roles
Regularly review roles and responsibilities to ensure they remain relevant and effective. As projects, priorities, and team dynamics change, roles may need to be adjusted. Schedule periodic check-ins with team members and stakeholders to gather feedback and assess the impact of current role assignments. Be open to modifying job titles and responsibilities as needed to maintain optimal team performance. Consider how each particular role fits into the larger context of the team and organization.
Encourage open communication
Foster a culture of open communication where team members feel comfortable discussing their roles and responsibilities. Encourage team members to ask questions, provide feedback, and raise concerns about their roles. Create opportunities for team members to collaborate and share knowledge, especially when new employees join the team. Open communication helps ensure that everyone understands their roles and how they contribute to the team's success.
Maintaining and evolving roles and responsibilities over time
As your organization grows and evolves, so should your team's roles and responsibilities. Regularly assess the effectiveness of current role assignments and be proactive in making changes when necessary. Encourage team members to take on new roles and responsibilities that challenge them and support their growth.
As new employees join the team , ensure that their roles are clearly defined and integrated with the entire team. Continuously communicate any changes in roles and responsibilities to all stakeholders to maintain clarity and alignment.
By treating roles and responsibilities as a dynamic aspect of your team, you can foster a culture of adaptability, growth, and continuous improvement.
Build a strong project team with clear communication and structure
As a team leader, it’s your job to prepare your team members for every project. The best way to create a strong team structure is through open communication. With team communication software, you can meet deadlines and reach team goals by making sure everyone knows their roles and responsibilities, when tasks are due, and where work stands. Team communication platforms like Asana facilitate effective decision-making and problem solving across the team.
By leveraging Asana for onboarding, you can ensure new employees have a clear understanding of their roles and responsibilities from day one. Asana allows you to create project templates, assign tasks, and provide relevant documentation all in one place.
As your entire team grows and evolves, you can easily track metrics within Asana to measure the impact of your role clarity efforts over time.
Related resources

How to build your critical thinking skills in 7 steps (with examples)

10 tips to improve nonverbal communication

Scaling clinical trial management software with PM solutions

6 ways to develop adaptability in the workplace and embrace change
- Stack Overflow for Teams Where developers & technologists share private knowledge with coworkers
- Advertising & Talent Reach devs & technologists worldwide about your product, service or employer brand
- OverflowAI GenAI features for Teams
- OverflowAPI Train & fine-tune LLMs
- Labs The future of collective knowledge sharing
- About the company Visit the blog
Collectives™ on Stack Overflow
Find centralized, trusted content and collaborate around the technologies you use most.
Q&A for work
Connect and share knowledge within a single location that is structured and easy to search.
Get early access and see previews of new features.
What Role or Scopes Does An Azure Service Principal Need to Create Applications
I currently create a service principal using the Azure CLI:
az ad sp create-for-rbac --name foo --role Contributor
I need the service principal to have enough permissions to create/modify/delete various Azure AD resources including Applications, other Service Principals and Service Principal Passwords. When I use the above service principal to create other service principals, I currently get 403 Forbidden errors.
I have also tried using the 'Owner' and 'User Access Administrator' roles but these still give me a 403 error. What do I need to add to the above Azure CLI command or what additional role assignments do I need to add?
I'd like to use the service principal in a Pulumi program with their Azure AD provider (based on Terraform's Azure AD provider). See:
https://github.com/pulumi/pulumi-azuread/issues/246
- azure-active-directory
- azure-service-principal
- Did my answer help solve your question or is something still unclear? – Alex AIT Commented Feb 24, 2023 at 8:06
4 Answers 4
In order for a service principal to be able to manage applications it requires API permissions. There is no such thing as a scope, because the API permissions are against the Azure AD API. Scopes are only applicable when it is related to the Resource Manager API. These are not the same thing.
When you go to application registrations in Azure AD, you can find the application, this is also where you will be able to assign the API permissions and grant consent. You will do this either on the Azure Active Directory Graph, or on the Microsoft Graph. In my experience only the permissions assigned with the Azure Active Directory Graph worked.
Application.ReadWrite.All Application Read and write all applications
Application.ReadWrite.OwnedBy Application Manage apps that this app creates or owns
You will find these two application permissions that you could use. The first you can use manage all applications.
The az cli command you are using is to create a role assignment. This is RBAC on the subscription, it has nothing to do with Azure AD aside from the service principal being an AAD resource.
- Thank you for explaining that. Is there a way to add the necessary Azure AD permissions via the Azure CLI or PowerShell commandlets? – Muhammad Rehan Saeed Commented Feb 25, 2022 at 13:40
- I have never used these, but the documentation on it seems solid: learn.microsoft.com/nl-nl/cli/azure/ad/app/… – Marco Commented Mar 3, 2022 at 9:32
- Also this one for powershell on SO is solid: stackoverflow.com/questions/61457429/… . Please mark my reply as the answer if it answered ur initial question. – Marco Commented Mar 3, 2022 at 9:33
- this is exact, but you would need to admin consent to grant permission. – Thomas Commented Jun 2, 2022 at 6:49
- The 'grant admin permission' part is already in the answer @Thomas. And did the answer help you out @Muhammad? – Marco Commented Jun 10, 2022 at 7:46
You need to add the scope of this service principal and also change the Azure role of this Service Principal to 'User Access Administrator' to enable you to modify resources in Azure AD. Also, 'User Access Administrator' role will give the service principal the required permissions for that Azure role to assign RBAC permissions. Please refer the below command for more details: -
Also, ensure that the user ID through which you are creating this service principal and assigning the role to it has permissions to register and create applications in Azure AD. If not, then please assign that ID 'Application Administrator' Azure AD role or you should be allowed to create and register applications by an administrator even though being a 'User' .
- The User Access Administrator role doesn't seem to give the right permissions and Application Administrator doesn't exist when using the --role argument above. – Muhammad Rehan Saeed Commented Feb 11, 2022 at 17:38
- I would suggest you to mention 'User Access Administrator' as role in the command as above and give the user ID through which this command has to be executed the 'Application Administrator' Azure AD role and try it. – Kartik Bhiwapurkar Commented Feb 11, 2022 at 18:06
- I still seem to get a 403, so I don't think that is the correct role. – Muhammad Rehan Saeed Commented Feb 22, 2022 at 11:16
- Are you the subscription owner?? If yes, then please execute my stated given command with those credentials in powershell. As you are assigning a 'Administrator' level role assignment to a service principal, so you should have higher privileges to assign that role to the concerned service principal. – Kartik Bhiwapurkar Commented Feb 24, 2022 at 6:47
- That command still doesn't seem to give me enough permissions. Unless there is something wrong with Pulumi which I am using to deploy my Azure resources. See github.com/pulumi/pulumi-azuread/issues/246 for more info. – Muhammad Rehan Saeed Commented Feb 24, 2022 at 14:46
You need to give your service principal "App admin" permissions. This allows you to create application registrations and also set their credentials. And it does not give it rights to do anything else such as manage users and groups. If your intent is to include those, you need to add additional roles to the service principal.
https://learn.microsoft.com/en-us/azure/active-directory/roles/permissions-reference#application-administrator
- How can I set these in the above Azure CLI command? – Muhammad Rehan Saeed Commented Feb 11, 2022 at 17:38
As was mentioned in other answers, your default RBAC role assignments don't apply because you need permissions on the AAD level, not on the level of subscriptions or resources. You need to assign the serviceprincipal a role on the level of the Active Directory.
As far as I can see, the required permission to create service principals would be "Cloud Application Administrator". You might be able to get away with "Application Developer" in some situations, but from the way your question is phrased I believe this is the correct one. You can check the built in roles in the documentation if you have a clearer understanding for what actions you want to execute.
To create a service principal with such permissions using the Azure CLI:
These commands are fully tested and working, except for the parts like $spDetails.id where I manually used copy paste instead.
- I need a fully working tried and tested solution. I'd also like to apply the minimum level of permissions. I've spent a lot of time trying to figure this out. Not sure why this is so hard. – Muhammad Rehan Saeed Commented Feb 24, 2023 at 9:59
- @MuhammadRehanSaeed my solution is tried and tested. Just parts like $spDetails.id are pseudo code. And I believe these are the minimal permissions for the things mentioned in your question. – Alex AIT Commented Feb 24, 2023 at 10:33
- @MuhammadRehanSaeed the solution is complete for the question "I need the service principal to have enough permissions to create/modify/delete various Azure AD resources including Applications, other Service Principals and Service Principal Passwords". You can also do the role assignment to Cloud Application Administrator manually in AAD if you don't need that as a script. Do you need anything else? – Alex AIT Commented Feb 27, 2023 at 15:52
- A Cloud Application Administrator has too many permissions. – Muhammad Rehan Saeed Commented Feb 28, 2023 at 15:13
- @MuhammadRehanSaeed this is the role with the least permissions of all built in roles that still can do everything that you described in your question. Just search for /applications/ . If you need something in between, you will have to create a custom role. Does this solve your question? – Alex AIT Commented Feb 28, 2023 at 15:52
Your Answer
Reminder: Answers generated by artificial intelligence tools are not allowed on Stack Overflow. Learn more
Sign up or log in
Post as a guest.
Required, but never shown
By clicking “Post Your Answer”, you agree to our terms of service and acknowledge you have read our privacy policy .
Not the answer you're looking for? Browse other questions tagged azure azure-active-directory terraform pulumi azure-service-principal or ask your own question .
- The Overflow Blog
- At scale, anything that could fail definitely will
- Best practices for cost-efficient Kafka clusters
- Featured on Meta
- Announcing a change to the data-dump process
- Bringing clarity to status tag usage on meta sites
- What does a new user need in a homepage experience on Stack Overflow?
- Feedback requested: How do you use tag hover descriptions for curating and do...
- Staging Ground Reviewer Motivation
Hot Network Questions
- What is the difference between negation-eliminiation ¬E and contradiction-introduction ⊥I?
- How do I learn more about rocketry?
- Getting error with passthroughservice while upgrading from sitecore 9 to 10.2
- Why do sentences with いわんや often end with をや?
- Light switch that is flush or recessed (next to fridge door)
- Is the set of all non-computable numbers closed under addition?
- What are the most commonly used markdown tags when doing online role playing chats?
- Testing if a string is a hexadecimal string in LaTeX3: code review, optimization, expandability, and protection
- How to resolve this calculation prompt that appears after running the drawing program?A Bug in version 14.1.0
- Can I Use A Server In International Waters To Provide Illegal Content Without Getting Arrested?
- Why doesn’t dust interfere with the adhesion of geckos’ feet?
- Convert 8 Bit brainfuck to 1 bit Brainfuck / Boolfuck
- How do I safely download and run an older version of software for testing without interfering with the currently installed version?
- How would you slow the speed of a rogue solar system?
- In roulette, is the frequency of getting long sequences of reds lower than that of shorter sequences?
- Directory of Vegan Communities in Ecuador (South America)
- In Lord Rosse's 1845 drawing of M51, was the galaxy depicted in white or black?
- Is this schematic ready to be made into a circuit?
- What other marketable uses are there for Starship if Mars colonization falls through?
- How should I tell my manager that he could delay my retirement with a raise?
- Is it possible to recover from a graveyard spiral?
- Possible thermal insulator to allow Unicellular organisms to survive a Venus like environment?
- Using ON-ON switch instead of ON-OFF switch?
- Can Christian Saudi Nationals Visit Mecca?
- Hall of Heroes
- Campus Services
- Accreditation
- Command and Governance
- Recognition
- Job Opportunities
- Academic Programs
- Schools and Departments
- Scholarship and Research
- Student Success and Outcomes
- Getting Started
- Request Information
- Schedule a Visit
- Parents / Mentors
- Admissions Officers
- AIM Summer Program
- Transfer Cadets
- International Cadets
- Enlisted Personnel
- Admission Requirements
- Application Process
- Prep School
- Outreach Team
- Congressional Staff
- Varsity Sports
- Club Sports
- HPE Courses
- Hall of Fame
- Staff Directory
- Bears Athletic Fund
- The Cadet Experience
- Cadet Blogs
- Swab Summer
- Clubs and Societies
- Religious Programs
- Community Service
- Parents Weekend
- Regimental Reviews
- Leader Development
- Professional Development
- Loy Institute for Leadership
- Fourth Class Year
- Third Class Year
- Second Class Year
- First Class Year
- Tall Ship EAGLE
- Simulators and Labs
- Waterfront Assets
- Summer in the Field
- CG Roles and Missions
- Your First Assignment
- Flight School
- Career Paths
- Pay and Benefits
- Lifestyle and Family
- Graduate Programs
- After the Coast Guard
- Academy News
- Bears Den Login
A Way FORWARD for 1/c Mackenzie Bucki: Summer Assignment Series

“For this patrol, our mission was to intercept drugs from smuggling vessels in the Caribbean. We left Virginia on May 28th and made four port calls along the way: Key West, Puerto Rico, Columbia, and Cuba,” said Bucki.
Bucki witnessed, first-hand, the training that goes into cutter operations to prep for a mission. She and the crew simulated a “fast cruise” which is a simulated underway day, which allowed the crew to conduct various trainings before the patrol begins. FORWARD also did a “shakedown cruise” where the crew trains in their actual roles while the ship is underway. The shakedown cruise is vital for crewmembers to familiarize themselves with shipboard functions at sea.
“There are many different training scenarios for responding to various casualties aboard. I participated in simulated progressive flooding and crankcase explosion casualty,” said Bucki. “During the shakedown cruise the day was jam-packed with training. We simulated a man overboard, practiced dropping anchor, and ensured that everyone knew their assigned role for getting underway.”
Bucki also became qualified in flight operations tasks, which involve the many aspects that go into a helicopter returning to and taking off from the ship. She learned and demonstrated her skills in hose handling, personal protective equipment (PPE), and basic firefighting. She also familiarized herself with the engineering aspects during this patrol, memorizing many parameters (pressure, temperature, etc.) and functions of engine room and auxiliary systems.
Bucki’s action and adventure packed time on USCGC FORWARD led to the building of Coast Guard bonds with crew members, more confidence in her forthcoming role as ensign and a newfound awareness of her own leadership style.
“I am first generation military, so I am not as familiar with the Coast Guard compared to others. This experience helped me explore some possible career paths and understand the life of a junior officer. I came to realize that there are many factors that influence one’s experience as an ensign. Although location and platform are the main components taken into consideration for billet picks, there are many other things that influence what life will be like on a ship. This includes command climate, status of the ship’s equipment, and collateral duties,” said Bucki.
Bucki would like to receive a Buoy Tender or Fast Response Cutter as her first assignment upon graduation.
- CGA In The News
- Academic News
- Mission News
- EAGLE In The News
Sponsor Family Application
Thank you for submitting your application to be part of the Sponsor Family Program. Your application will be processed in the upcoming week. Coast Guard Academy’s policy on background screening now requires all adults (everyone 18 and older living in the home) who volunteer to mentor, teach, coach or sponsor cadets, whether on or off Coast Guard Academy grounds, to be screened every 5 years. They are required to provide personal information (name, birth date and social security number) for the purpose of conducting a criminal background check.
The Security Officer at the Coast Guard Academy, CWO2 Gina Polkowski, is overseeing this process. Her email is: [email protected].
Sponsor Family designations fall into several different categories. Below are the guidelines to help you determine how best to meet the background screening requirement:
- If you are Coast Guard active duty you do not need to apply for an additional Background Check. You will be vetted through the Coast Guard system by CWO2 Polkowski.
- If you are a Civilian working for the Coast Guard you do not need to apply for an additional Background Check. You will be vetted through the Coast Guard system by CWO2 Polkowski.
- If you are non-Coast Guard Active Duty, you are required to provide proof of your current security clearance or National Agency Check that is to be emailed by your Command Security Officer (CSO)/ Security Office to CWO2 Polkowski at [email protected].
- If you are non-Coast Guard civilian who has a current security clearance or National Agency check, you are required to provide proof of your current security clearance or National Agency Check that is to be emailed by your Command Security Officer (CSO)/ Security Office to CWO2 Polkowski at [email protected].
- All civilians in the families who are 18 years or older and do not have a security clearance or a National Agency Check are required to be vetted through Mind Your Business, the third party vendor hired by the Coast Guard Academy for the vetting process.
After you complete your application, please e-mail the Sponsor Family Program Coordinator at [email protected] . In your e-mail, you must include the e-mail address and phone number of every adult living in the home. The Sponsor Family Coordinator will then initiate the background check process and you will receive an email with further instructions.
Important things to note:
There is a Sponsor Family Training that is a one-hour training which we ask sponsors to attend once every four years. This training is designed to give you an overview of the program, what is expected of you as a sponsor, and what you can expect from your cadets. This training will also help familiarize you with the cadet regulations onboard CGA. You will be notified via e-mail once the training is scheduled.
The matching process of swabs to families will occur during July and August. Please bear with us and remain flexible through this process. There will be a meet and greet scheduled on Campus, typically in late August. This will give families an opportunity to formally meet their cadet if they have not already done so. Details on this will also be via email.
Twins’ Byron Buxton starts rehab assignment; Emmanuel Rodriguez promoted to St. Paul
Byron Buxton began a rehab assignment with the Class AAA St. Paul Saints on Monday. He has been on the 10-day injured list since Aug. 15 because of right hip inflammation.
By Bobby Nightengale

ST. PETERSBURG, FLA. – An important three-game road series in Kansas City looms later this week, and the Twins could welcome a key member of their roster back into the lineup.
Byron Buxton started a rehab assignment with the Class AAA St. Paul Saints on Monday. He went 1-for-3 with a walk and a strikeout while playing seven innings in center field during the Saints’ 11-8 loss to the Iowa Cubs at CHS Field.
The Saints are off Tuesday, and it’s likely Buxton will play another rehab game Wednesday before potentially rejoining the Twins. Buxton has been on the 10-day injured list since Aug. 15 because of right hip inflammation.
“We’re really getting there with Buck,” Twins manager Rocco Baldelli said. “He’s been waiting to get back out there. This is good. It’s the first step, but it’s an important step. Hopefully, everything goes well and we can see him back out there with us before you know it.”
If Buxton returns for the Royals series, after the Twins play four games against the Tampa Bay Rays, it would a nice jolt for a series that carries playoff implications. The Twins and Royals entered Monday tied in the standings.
Buxton is batting .275 with 16 homers, 23 doubles, 49 RBI and 54 runs in 90 games with the Twins this season. He showed more power after the All-Star break, homering in seven of his first 18 games.
Royce wants to stay at third
Royce Lewis played three innings at second base Sunday, the first time he has played the position in his major league career, after the Twins used a pinch-hitter for Edouard Julien .
Lewis has taken some ground balls at second base during batting practice, but he doesn’t like the idea of playing an unfamiliar position during a playoff race.
“I’m terrified out there,” Lewis said, adding he didn’t want to make a mistake on covering a bunt or lining up for a relay. “Little things like that are just adding extra elements to a September push that’s important to me. I don’t know. We have plenty of really good second basemen, and I don’t want to mess up our defense just because we’re going to try something new. It’s not spring training or Triple-A for that.”
The toughest adjustment, Lewis said, is everything looks different on the other side of the infield. He would feel more comfortable playing shortstop, a position he played throughout his minor league career, but it takes time to learn how to read the ball off the bat and turn double plays from the opposite side.
“The moment you have to think in this game is when the game speeds up on you,” he said. “That’s where I’m worried I’m not ready yet.”
Related Coverage

Lewis had three balls hit in his direction Sunday, fielding each of them cleanly.
“I think we proved I’m an athlete,” Lewis said. “Now, let’s just keep playing normal baseball, play third and win baseball games.
Rodriguez promoted
Twins outfield prospect Emmanuel Rodriguez played only 37 games at Class AA Wichita because of right hand injuries this season, but he will end his season with the Saints.
Rodriguez, a 21-year-old center fielder, was promoted to St. Paul on Monday after rehabbing in Fort Myers. The lefthanded batter hit .298 in Class AA with eight homers, 12 doubles, 20 RBI and 40 runs. He drew nearly as many walks (42) as he had strikeouts (46), producing a .479 on-base percentage.
Baseball America ranks Rodriguez as the No. 2 prospect in the club’s farm system behind 2023 first-round pick Walker Jenkins .
* Max Kepler was scratched from the Twins lineup Monday with left knee soreness, the same injury that sidelined him for a few games last week.
* Manuel Margot , who was placed on the 10-day injured list Sunday, was diagnosed with a mild adductor tendon strain after he underwent a magnetic resonance imaging exam. It’s not an adductor muscle strain, which could have jeopardized the rest of his season, but he is shut down from baseball activities for at least the next five days.
Margot traveled with the Twins and received applause from Rays fans when a “Thank You Manny” tribute was played on the video board. After Margot waved to the crowd, Carlos Santana tried to push Margot out of the dugout to lengthen the ovation.
about the writer
Bobby nightengale.
Bobby Nightengale joined the Star Tribune in May, 2023, after covering the Reds for the Cincinnati Enquirer for five years. He's a graduate of Bradley University.
More from Twins
Imanaga, 2 relievers combine for no-hitter, lead cubs over pirates 12-0.

Shota Imanaga wasn't disappointed when he was removed after seven hitless innings and 95 pitches.
Louie Varland’s ugly fourth inning epitomizes Twins’ struggles in 9-4 loss to Rays

The eight runs Louie Varland allowed in 2⅓ innings were a career high, and sloppy defense contributed to the Twins’ 11th loss in their past 16 games.
Inside the Twins’ decision to give a hesitant Royce Lewis playing time at second base

Manager Rocco Baldelli understands the discomfort, but the team needs to get some flexibility from players, he said.
Assigning Testpoints on the Board
Testing is an important part of the board manufacturing process. After fabrication, the board is typically tested to ensure no short or open circuits. Once fully populated with all its components, a board is often tested again to ensure signal integrity and device operation. To aid in this process, it is fundamentally beneficial to have a scheme of points on the board - Testpoints - which the testing equipment can probe and perform the required tests.
The location of testpoints on a board will depend on factors including the mode of testing (including bare-board fabrication testing, in-circuit assembly testing, etc..) and the method of testing (including automated testing using flying probe and bed-of-nails fixtures, hand testing, etc..). For example, when performing bare-board fabrication testing, the board is not populated and so all pads and vias are 'fair game' when it comes to assigning testpoints. The locations used for testpoints when performing in-circuit assembly testing however, will almost always be different. As the board is populated, you may no longer have probe access to component pads and certainly no access to pads and vias under a component!
Altium Designer provides a powerful system to handle your testpoint needs and enhance the testability of your boards, allowing you to separately assign testpoints for bare-board fabrication testing and/or in-circuit assembly testing as required. Testpoints can be assigned manually, or in a more streamlined and automated fashion, by using the Testpoint Manager dialog .
Considering Your Testpoint Strategy
Before jumping into the assignment of pads and vias for use as testpoint locations, it is a good idea to step back and think about what is required. The following are just some pointers to consider when defining a strategy to incorporate testpoints into a design:
- When choosing the side of the board that testpoints will be allowed on, consideration should be given to the testing processes and associated fixtures that will be used. For example, will the board be probed from the bottom side only, the top side only, or both sides.
- A testpoint underneath a component (on the same side of the board as the component) is usually used at the bare-board testing stage. This should be taken into consideration when planning testpoint locations for assembled board testing.
- It is advisable to locate all testpoints on one side of the board only, using vias to achieve this if necessary. The reason for this lies in the fact that a dual-head test fixture incurs a greater cost than a single-head test fixture.
- The more non-standard and complex your pattern of testpoints, the more costly it will be to configure a fixture with which to test the board. The best philosophy is to develop a methodology that will result in generic testability. A well-honed and adaptable testpoint policy will allow different designs to be tested efficiently and cost-effectively.
- Careful consideration should be given to any via tenting requirements of the design. Tenting a testpoint-designated via will effectively block test probe contact. Even partial tenting using a Liquid Photo Imageable (LPI) solder mask will cause contact problems, as the mask liquid will tend to run away through the via hole. Peelable solder mask may indeed be used to provide temporary tenting of such designated vias, but this can often prove quite costly.
- Consult with your fabrication and assembly houses closely to make sure any specific design parameters are taken into account when specifying testpoints. These could include testpoint-to-testpoint clearances and testpoint-to-component clearances that may be more strict than normal placement and routing clearances.
The following sections take a closer look at fabrication and assembly testing, including specific testpoint constraints and considerations associated with each.
Fabrication Testing
Fabrication testing relates to the testing of a printed circuit board at the pre-assembly phase of manufacture, before any components have been placed onto the board. As such, it is often referred to as bare-board testing. This method of testing might typically involve the use of a flying probe device to perform net-by-net testing. Essentially, two probes are programmed to operate in concert, one to pulse a signal through a net and the other to detect the presence (or absence) of that signal.
Two common test scenarios for bare-board fabrication testing are:
- Test to ensure that intentional end-to-end contiguous copper carries a clean signal (under a maximum permissible impedance threshold) without any open circuits.
- Test to ensure that nets are not shorted to each other.
- Dedicated testpoint pads/vias are usually not necessary for fabrication testing. As the board is not yet loaded with components, the probes enjoy free access to component pads. Since the pads tend to be free of solder mask at this stage, the testpoints are typically located directly on the pads themselves.
- Flying probe tests are not constrained by a grid, as flying probe devices are capable of quite precise locations.
- Each location pair is constrained by a minimum separation - due to the physical body size of the probe heads.
- For fine-pitch devices, it may not be possible (or even practical) to probe a single component pad. Such copper features can be minuscule and delicate, so it is occasionally recommended that they avoid contact with test probes. In these instances, it can be a good idea for the designer to add dedicated test pads/vias to the board.
- A bed-of-nails fixture can also be used during bare-board fabrication testing. This is typically the case for high-volume manufacturing runs, where the use of such a fixture involves less testing time than a flying probe. However, bed-of-nails testing can involve more rigid testpoint location constraints and, if the test fixture is not a customized one, will often require that the testpoints conform to a specific grid.
- There are occasions where specific pairs of testpoint locations are not tested in concert by a flying probe. This is typically the case when there is no danger of a short (or crosstalk) between nets, as the nets are not adjacent to each other (all objects of both nets are mutually separated by their physical proximity).
Assembly Testing
Assembly testing relates to the testing of a printed circuit board at the post-assembly phase of manufacture, after the board has been populated with all components specified in its associated Bill of Materials (BOM). As such, it is often referred to as in-circuit or electrical testing. This method of testing typically involves (but is in no way limited to!) the use of a manually-configured bed-of-nails fixture. Depending on the type of testing being performed using the fixture, the board may or may not be powered up.
Two common test scenarios for in-circuit assembly testing are:
- Simultaneously probe one dedicated testpoint for each net (or net of interest). This is done by pulsing a signal through each probe individually and detecting signal reception results by all other probes.
- Test specific components/buses to ensure that the device itself is operating properly. These are specialized tests that can be conducted using a variety of testing methods. In the simplest case, a bed-of-nails fixture can be used to test across component pads.
- Testpoint locations typically need to conform to a minimum spacing requirement. Test equipment, such as bed-of-nails fixture probe heads, have a body size that constrains their proximity to each other. Unless a custom fixture is used, testpoint locations are often required to be on a specific grid. Fabricating a custom fixture is more costly and time-consuming than configuring a reusable bed-of-nails fixture.
- Testpoints can be required to be located according to a minimum clearance with respect to component bodies. The probe heads of most test fixtures tend to be larger nearest the fixture, tapering down to a smaller size as they approach the shank of the probe. Taller components require more clearance. It is therefore best to consider the maximum component height on the board and define an overall body clearance that factors in this worst-case scenario.
- Testpoint locations can be required to be positioned according to a minimum clearance with respect to the board edge. The process of contacting the board with a flying probe pair or a bed-of-nails array of probes can be tough on the board itself, and the board may flex to some extent under the strain of automated testing. For this reason, damage to thin, fragile boards, is minimized when testpoints are located at a distance from the board edges.
- Bare copper component pads are usually rendered inaccessible by the presence of placed components.
- Unless the board is specifically designed with testing in mind, component pads and vias are not likely to be located on the required testpoint grid.
- Even if a component pad itself seems suitable to be used as a testpoint location, clearance constraints to the component body often prevent its use.
- While bed-of-nails fixtures are a common method of assembly testing, it is by no means the exclusive method. Among the variety of alternatives are cases where flying probe devices are used - with care, so as not to collide with placed components.
- When performing an electrical test on a specific component, the component pads might be accessible by a test probe to some degree. However, it is important to note that the component body often obscures the center of such pads. In other words after the board has been assembled, the accessible portion of the pad rarely includes the pad center location.
Pad and Via Testpoint Support
Altium Designer provides full support for testpoints, allowing you to specify pads (thru-hole or SMD) and/or vias to be used as testpoint locations in fabrication and/or assembly testing. A Pad or Via is nominated for use as a testpoint by setting its relevant testpoint properties, and answering two key questions:
- Should the pad/via be used as a fabrication and/or assembly testpoint?
- On which side of the board should the pad/via be used as a testpoint - Top, Bottom, or both?
These properties can be found in the Properties panel, when a pad (see Pad Properties ) or via (see Via Properties ) object is selected in the design space, respectively.

Testpoint Design Rules
The constraints of a PCB design should be thought out and implemented as a well-honed set of design rules . To implement a successful testpoint scheme - where all defined testpoints can be accessed and used as part of the bare-board and/or in-circuit testing - governing constraints must be put in place. To this end, the following rule types are definable as part of the PCB Editor's Design Rules system:
- Fabrication Testpoint Style
- Fabrication Testpoint Usage
- Assembly Testpoint Style
- Assembly Testpoint Usage
Access and define rules of these types from the PCB Rules and Constraints Editor dialog ( Design » Rules ).

The Testpoint Style and Usage rules are identical, in terms of constraints, between the two testing modes (fabrication and assembly). The style rule essentially specifies constraints that a pad or via has to meet in order to be considered for selection as a testpoint location. The usage rule specifies which nets require a testpoint.
 and Testpoint Style (bottom) rules.")
The testpoint design rules are used by the Testpoint Manager , the Autorouter, Online and Batch DRC processes, and also during output generation.
Default Fabrication and Assembly Testpoint Style and Testpoint Usage rules exist. You should check whether these rules meet your board's requirements and make changes as necessary. If multiple rules of the same type are required, use the priority aspect of design rules to ensure that rules with more specific scoping are applied first (for example, when running a DRC).
Managing Testpoints
Assigning testpoints manually can be a painstaking and laborious job, and even more so on a complex board, populated with hundreds of components (and across both sides of the board). To cater for streamlined management of testpoints in your board designs, Altium Designer equips the PCB Editor with a Testpoint Manager . The Testpoint Manager allows you to assign testpoints - for bare-board fabrication testing and/or in-circuit assembly testing - in an automated fashion, based on defined design rules. This automated assignment sets the relevant testpoint properties for the pad/via in each case.
Access is made by choosing the Tools » Testpoint Manager command, from the main menus.

Use the dialog to automatically assign and clear testpoints from one convenient location. A listing of all nets in the design is provided in the Testpoint Net Status region, with status to indicate testpoint coverage - either Complete or Incomplete - for both bare-board fabrication and in-circuit assembly testing. Click the Fabrication Testpoints or Assembly Testpoints buttons or right-click in the grid to access commands for assigning or clearing that type of testpoint. Note that you can manually select nets in the upper region of the dialog to selectively assign/clear testpoints.
Whether assigning testpoints for some or all of the nets in a design, the Testpoint Manager follows the style and usage rules defined for fabrication and assembly testpoints. To see the order that valid objects are searched, click the Search Order button.
The Status Summaries region provides a full summary of the testpoint status for the board, for both testing modes. This region updates with each assignment or clearance action performed. For more lower-level detail, use the Assignment Results region. This will give detail, for example, on the number of top/bottom pads/vias involved in an assignment/clearance, along with an indication of failures.
Checking the Validity of Testpoints
Defined fabrication and assembly testpoint rules are followed as part of the PCB Editor's Design Rule Checking (DRC) facility. Online and/or Batch DRC checking can be enabled for the various rule types from within the Design Rule Checker dialog ( Tools » Design Rule Check ).

Testpoint-related Query Fields
In support of the various fabrication and assembly testpoints that can be assigned in a design, the following keywords are available for use when targeting testpoints using logical query expressions. Each of the following can be found in the PCB Functions - Fields category, when using the Query Helper :
- IsAssyTestpoint - is an assembly testpoint.
- IsFabTestpoint - is a fabrication testpoint.
- IsTestpoint - is a Top or Bottom side testpoint.
- Testpoint - is it a Top or Bottom side testpoint?
- TestpointAssy - is it an assembly testpoint?
- TestpointAssyBottom - is it a Bottom side assembly testpoint?
- TestpointAssyTop - is it a Top side assembly testpoint?
- TestpointBottom - is it a Bottom side testpoint?
- TestpointFab - is it a fabrication testpoint?
- TestpointFabBottom - is it a Bottom side fabrication testpoint?
- TestpointFabTop - is it a Top side fabrication testpoint?
- TestpointTop - is it a Top side testpoint?
Create logical expressions for queries to target and return testpoints in your design as required. Some examples of logical query expressions targeting fabrication and assembly testpoints are:
- (ObjectKind = 'Pad') And (TestpointAssy = 'True') Targets all pads that are assembly testpoints.
- IsPad And (TestpointAssyTop = 'True') Targets all pads that are Top side assembly testpoints.
- (ObjectKind = 'Pad') And (TestpointFab = 'True') Targets all pads that are fabrication testpoints.
- ((IsPad Or IsVia)) And (TestpointAssy = 'True') Targets all pads and vias that are assembly testpoints.
- ((IsPad Or IsVia)) And IsFabTestpoint Targets all pads and vias that are fabrication testpoints.
Generating Testpoint Reports
Altium Designer includes dedicated report generators for generation of fabrication and assembly testpoint reports, respectively. These two report generators utilize the relevant testpoint properties for the pad and via primitives in a design.
Reports can be generated in two ways:
- Directly from within the PCB document, using the File » Fabrication Outputs » Test Point Report and File » Assembly Outputs » Test Point Report commands.
- By using appropriately configured outputs defined in an Output Job Configuration file ( *.OutJob ).

Regardless of the method used to generate a report, the report options themselves are defined in the same dialog. For a fabrication testpoint report, this involves the Fabrication Testpoint Setup dialog . For an assembly testpoint report, the Assembly Testpoint Setup dialog is used. Report options are identical between these dialogs.

Role of the IPC-D-356A Netlist File
One of the three flavours of testpoint report output formats is an IPC-D-356A netlist file. This file is typically used to target the bare-board fabrication testing mode. The IPC file is post-processed into commands that drive a flying probe testing device.
Regardless of which features are specifically identified as test point locations in an IPC-D-356A file, board fabrication houses can generally use the file data to achieve whatever type of testing that they want although, depending on circumstances and the content of the file, it may require some manual intervention to do so.
- Printer-friendly version
The features available depend on your Altium product access level. Compare features included in the various levels of Altium Designer Software Subscription and functionality delivered through applications provided by the Altium 365 platform .
If you don’t see a discussed feature in your software, contact Altium Sales to find out more.
Was this page helpful?
COMMENTS
Learn about Azure role assignments in Azure role-based access control (Azure RBAC) for fine-grained access management of Azure resources.
Azure role-based access control (Azure RBAC) is the authorization system you use to manage access to Azure resources. To grant access, you assign roles to users, groups, service principals, or managed identities at a particular scope. This article describes how to assign roles using the Azure portal.
Azure role-based access control (Azure RBAC) is the authorization system you use to manage access to Azure resources. To grant access, you assign roles to users, groups, service principals, or managed identities at a particular scope. This article describes the high-level steps to assign Azure roles using the Azure portal, Azure PowerShell, Azure CLI, or the REST API.
Includes the NSW Government Graduate program, recruitment and selection guide, NSW Public Service talent pools, assignments, transfers and secondment guides, onboarding and exiting information, and the NSW Aboriginal internships program. Guidelines, templates, capability comparison guide, and a library of sector role descriptions.
ARM templates can help define Azure Role-Based Access Control. By creating role assignments, users can grant Managed Identities access to resources.
We're excited to share the public preview of delegating Azure role assignment management using conditions. This preview gives you the ability to enable others to assign Azure roles but add restrictions on the roles they can assign and who they can assign roles to.
The way you control access to resources using RBAC is to create role assignments. This is a key concept to understand - it's how permissions are enforced. A role assignment consists of three elements: security principal, role definition, and scope. User - An individual who has a profile in Azure Active Directory.
Learn how to manage Azure Role assignments using PowerShell snippets and simple commandlets. Discover examples for listing all role assignments, adding and removing assignments for users or service principals, creating custom roles, and more. Plus, check out a script that combines some of these examples into a single function. Written by Vukasin Terzic.
Scripting Azure AD application role assignments When using Azure Active Directory for adding role-based access control to your web applications and APIs, it is highly recommended to use application roles. This allows you to define custom application roles and these can be assigned to users and applications. A clean way to secure your applications!
I have been following this feature request for a while now, and up until recently Microsoft stated that implementing Azure AD role assignment for Azure AD groups wasn't the issue, the issue was more related to who is able to manage those groups. For example, if enabled how can we circumvent that someone with the "User Administrator" role (capable of adding users to groups) is capable of ...
Role assignment conditions can also be used in conjuction with Custom security attributes in Azure Entra ID to make role assignment easier by reducing the number of individual role assignments.
Enhance your knowledge by learning about adding or removing role assignments in Azure using Microsoft Azure AZ-304 online course and practice exam Now!
Azure role-based access control (Azure RBAC) has several Azure built-in roles that you can assign to users, groups, service principals, and managed identities. Role assignments are the way you control access to Azure resources. If the built-in roles don't meet the specific needs of your organization, you can create your own Azure custom roles. For information about how to assign roles, see ...
Learn how to assign roles to a user using the Auth0 Dashboard or the Management API.
Learn how to define roles and responsibilities effectively. Discover tips, examples, and templates to create clarity and boost team performance.
As you are assigning a 'Administrator' level role assignment to a service principal, so you should have higher privileges to assign that role to the concerned service principal.
Users will only have access to records and data specified by their assigned Role for the Programs they are assigned. Note: Administrators can modify a user's Role assignment at any time to assign the same Role to new programs or give the user a different role with greater access in an individual program.
Learn how to grant access to Azure resources for users, groups, service principals, or managed identities using Azure Resource Manager templates and Azure role-based access control (Azure RBAC).
When it came to her summer assignment, 1/c Mackenzie Bucki got the opposite of what she requested. Instead of a small, patrol boat in the Pacific, she got a 270-foot ship in the Atlantic. ... We simulated a man overboard, practiced dropping anchor, and ensured that everyone knew their assigned role for getting underway." ...
Byron Buxton began a rehab assignment with the Class AAA St. Paul Saints on Monday. He has been on the 10-day injured list since Aug. 15 because of right hip inflammation.
This automated assignment sets the relevant testpoint properties for the pad/via in each case. Access is made by choosing the Tools » Testpoint Manager command, from the main menus. ... Role of the IPC-D-356A Netlist File. One of the three flavours of testpoint report output formats is an IPC-D-356A netlist file. This file is typically used to ...
Azure role-based access control (Azure RBAC) is the way that you manage access to Azure resources. In this quickstart, you create a resource group and grant a user access to create and manage virtual machines in the resource group. This quickstart uses an Azure Resource Manager template (ARM template) to grant the access.
At least a day after placing Tommy Pham on waivers, the Cardinals took the abrupt move to designate the veteran outfield for assignment.
A role assignment policy is a collection of one or more end-user roles that enable users to manage their mailbox settings and distribution groups in Exchange Online. End-users roles are part of the role based access control (RBAC) permissions model in Exchange Online. You can assign different role assignment policies to different users to allow or prevent specific self-management features in ...
GM DOES NOT PROVIDE IMMIGRATION-RELATED SPONSORSHIP FOR THIS ROLE. DO NOT APPLY FOR THIS ROLE IF YOU WILL NEED GM IMMIGRATION SPONSORSHIP (e.g., H-1B, TN, STEM OPT, etc.) NOW OR IN THE FUTURE. Work Arrangement: Onsite: This role is categorized as onsite. This means the successful candidate is expected to report to their assigned plant on a full-time basis. What You'll…